 12
12
Apr - 2019MicroPython, Product Reviews
5 min | 14401#MAiX Dock & MicroPython: Hands-On with low power AI at the edge
MicroPython, Product Reviews | 5 min | 14401
Table of contentShowThis week, I received from Seeed Studio a MAiX Dock to review it. The main board of the kit includes a Sipeed M1w which is a compact module like the ESP32 but based on the Kendryte K210 dual core RISC-V processor. It is designed for low power artificial intelligence workloads, such as face detection, object recognition, or audio processing. There are two type of modules: the Sipeed M1 and M1w, the last one includes WIFI connectivity.
The main features of the MAiX Dock boards are:
- Display I/F – An FPC24P socket for 8-bit MCU LCD
- Camera I/F- An FPC24P socket for DVP camera
- Storage – micro SD slot
- Audio – Power amplifier IC for use with speakers, built-in microphone
- USB – USB Type-C interface
- Connectivity:
- WiFi
- I/Os
- On-board high speed DAC
- Access to all 72-pin full pin lead-out, freely mapable
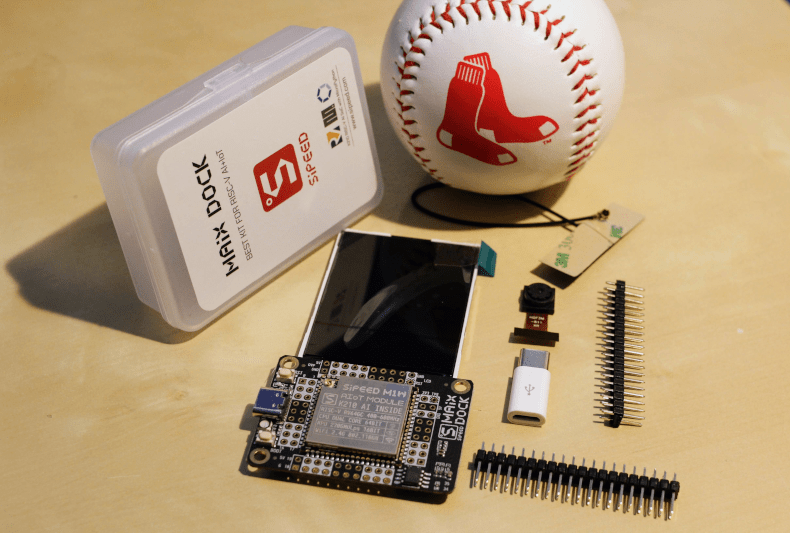
The "Sipeed M1w Dock suit" (see Fig. 1) includes in the box: a 2.4 inch LCD, a OV2640 camera, two pinheaders, a USB Type C - Micro USB adapter and a WIFI antena. This means, you can start directly with the demos, which are e.g. image recording, face detection etc. I almost forgot to mention: the board can be programmed using MicroPython! This means, the included demos are "python" based examples.
![sipeed m1w.png]()
Fig. 1: Sipeed M1w Dock suit (MAiX Dock) Hardware & Software
On the following list, I included links to the hardware kits and the software needed. The company "Orgmar" located in ShenZhen (China) has launched several MAiX boards based on M1 module. Sipeed MAIX Bit is the cheapest one, while Sipeed MAiX Go Suit is the most expensive. There are multiple modules and camera and mic accessories that you can find on the Seeed Studio website or the closed Indiegogo campaign. Here a small list, and the related repositories:
(*) There are two versions of this suit. The M1 and M1w, the last one supports WIFI.MAiXPy: Upload files and run scripts
As I mentioned before, the board is MicroPython compatible, which means, it has MicroPython installed out of the box. Unfortunately, the PyMakr plugin is not 100% compatible yet. They are making some changes on the file-system, and there are still problems when uploading the files to the board. This means, you can use Visual Studio Code (VSC) with the PyMakr plugin to run MicroPython files on the board, but not to upload them. Download files is also possible.
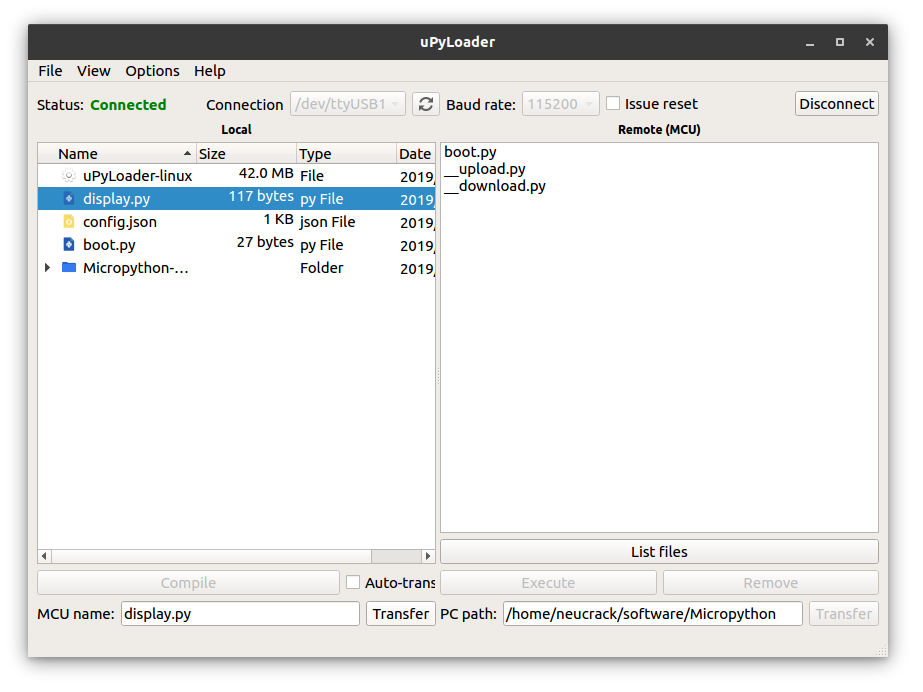
If you need some help with MicroPython, a tutorial is available here. This also includes information about the PyMakr plugin. Visual Studio Code (VSC) can be also used to program the boards.To upload the files, you can use uPyLoader. uPyLoader (see Fig. 2) is an open source software that allows you to easily connect to the MAiXPy and upload, download, and execute files. However, the connection with the MAiXPy is far away from stable. The upload is usually interrupted several times, and you need to retry a lot.
![uPyLoader.png]()
Fig. 2: uPyLoader connected to the MaixPy After downloading the application and executing it, you need to follow this steps to upload a file:
- Select the serial port and click the
Connectbutton to connect the board. - The first time you run the software, you need to initialize it:
- Go to
File->Init transfer filesto complete the initialization. This creates two files in the board,__upload.pyand__download.py.
- Go to
- Select the file that you want to upload, and Click on
Transfer.
but as I said, you need to retry a lot.
Upgrade the FW.
The upload tool is python3 compatible, so you need the following:
Linux
If you are in Linux, you need to have
Python3andpip3installed, if you don't have them, type the following:sudo apt update sudo apt install git python3 python3-pip pip3 install pyserialWindows
On windows, you need also to have
Python3withpip3installed (tutorial A, tutorial B) and thepyserialpackage as well:python3 -m pip install pyserialUpgrade tool
The tool can be cloned using
git:git clone https://github.com/sipeed/kflash.pyThe
kflashtool allows you to upgrate the firmware of the MAiXPy.This GitHub repository includes some pre-compiled releases. There are two versions available (
minimum&full), which are extended with the face detection model (_with_model...):maixpy_v0.2.4_full.bin: includes full features,maixpy_v0.2.4_minimum.bin: includes the base modules and leaves more space for AI or other applicationsmaixpy_v0.2.4_*_with_model_at_0x300000.kfpkg: integrates the face detection model at0x300000of the flash, which can be loaded usingkpu.load(0x300000)(see next section).
For the face detection example on this post, you need at least the
maixpy_v0.2.4_minimum_with_model_at_0x300000.kfpkgfirmware. This can be deployed typing the following:# linux ./kflash.py -p /dev/ttyUSB0 -b 2000000 maixpy_v0.2.4_minimum_with_model_at_0x300000.kfpkg # windows python3 kflash.py -p COM13 -b 2000000 maixpy_v0.2.4_minimum_with_model_at_0x300000.kfpkgFace detection
After upgrading the firmware, you can use VSC to run the following face detection algorithm:
import sensor,image,lcd
import KPU as kpu
lcd.init()
sensor.reset()
sensor.set_pixformat(sensor.RGB565)
sensor.set_framesize(sensor.QVGA)
sensor.set_hmirror(0)
sensor.run(1)
task = kpu.load(0x00300000)
anchor = (1.889, 2.5245, 2.9465, 3.94056, 3.99987, 5.3658, 5.155437, 6.92275, 6.718375, 9.01025)
a = kpu.init_yolo2(task, 0.5, 0.3, 5, anchor)
img_lcd=image.Image()
while(True):
    img = sensor.snapshot()
    code = kpu.run_yolo2(task, img)
    if code:
        for i in code:
            a = img.draw_rectangle(i.rect())
    a = lcd.display(img)
a = kpu.deinit(task)
Just copy the above code inside a file on VSC, and press the
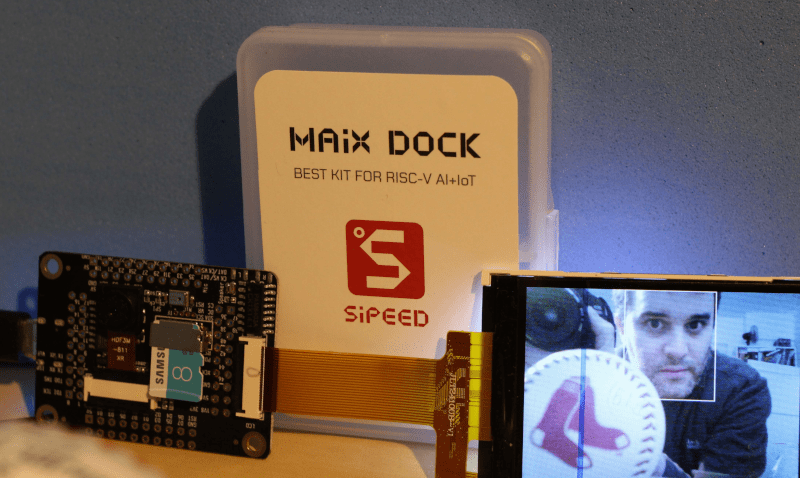
Runbutton of the PyMakr plugin. The result can be seen on Fig. 3.![Sipeed MAiX face recognition application.png]()
Fig. 3: Sipeed MAiX running a face recognition application (the display still has the protection) Seeed Studio
Here, I spend some words about the Seeed Studio. I am positive impressed about the bazaar. They are getting always the newest technology to sell. They are an excellent IoT enabler. Now, they are partners with Coral, Nvidia and Sipeed. That's very impressive! You should take a look at its bazaar: Seeed Studio. It is very simple to buy things there, they accept PayPal and the shipping time is very short (in this case, just 7 working days with standard mail - faster options are also available).
Conclusions
The MAiXPy is a "nice to have" board. It can be programmed using MicroPython and it allows you to do some low power AI at the edge. The camera to display data-transfer works really fast, and almost no delay can be perceived on the face recognition application. The documentation is available here, and in the last months, it has been really improved.
However,
- the filesystem problems need to be resolved. The file upload functionality is not working at all, and makes very difficult to use the board for developments. It should be compatible with PyMakr, then it will be possible to program the board using either VSC or Atom.io.
- I didn't find any information about wi-fi. There is neither a network package nor a machine.WLAN class. I am a little bit confused.
I will be "playing" with the MAiX Dock during the next days, and upload some extra results.
Last but not least, I want to thank Elaine from Seeed Studio for the support when I contacted her to evaluate these boards. Thank you!
We use cookies to improve our services. Read more about how we use cookies and how you can refuse them.


")
Empty