 27
27
Dec - 2017MicroPython
4 min | 2214Table of contentShowIt has been a while since my last post! Sorry, I was a little bit busy and then I was on a business trip in Melbourne for the CDC2017 and then I had a week holiday in Bangkok. I will be posting some photos on the next days!
It's been a year now since I started this blog. It's a hard job to maintain it up-to-date but I still have fun writing and coding for this purpose! So let us start!
Intro
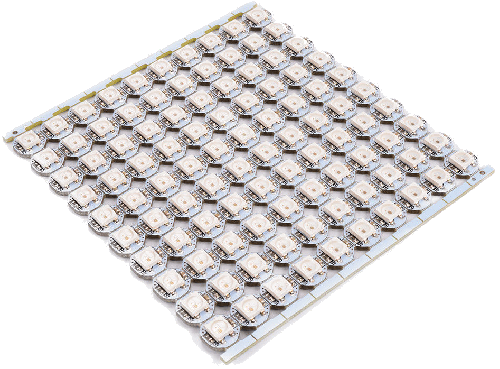
The first video that I published a year ago was using the Wipy2.0 and a WS2812b led strip for some Christmas lights (click here). Now, this time I bought a WS2812b panel (100 bits or 10x10 pixels -or leds- see fig. 1) and as we have/had christmas again, so I wrote some code for this panel to make again some Xmas lights! :).
![WS2812b Panel]()
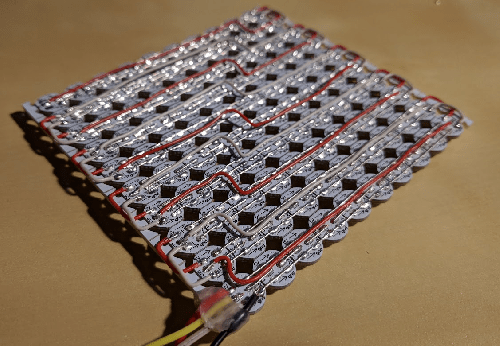
Fig. 1: WS2812b 100 bits LED panel First, I had to do some wiring. It was a relly hard work! You can see the results on figure 2. All the 5V can be connected together. The LED boards (per LED, the small ones) have two pins, but they are connected. The GND pins can be connected together too. There are also two pins on each LED board for GND, but they are also connected. With the data pins you need to be careful, there are two pins: Din (data in) & Dout (data out). You need to wire the Dout to the Din between LED boards (again, the small ones), but not on the LED boards. It's also important to check the data direction. The Wipy2.0 needs to be connected to a Din pin.
![WS2812b Panel Wired]()
Fig. 2: WS2812b 100 bits LED panel wired! Hardware & Software
You need the following hardware and software.
The Wipy2.0 is not available any more, but the WiPy3.0 is better (it has more RAM) and it's pin-compatible with the Wipy2.0.DIY
Follow the following steps to play with this led panel:
First, you need to acquire the hardware. Read the previous section;
You need to do some wiring! I used unipolar (I think, that's the name of a cable with only one conductor) cable. It is easier for connecting e.g. all the 5V and GND pins;
Download the repo from GitHub;
Configure your mappings:
The folder
mappingcontains two files that creates the mapping of letters or pictures to the 10x10 LED panel.letter2matrix.py: reads the defined font file (font_file) and generates aletters.txtcontaining the mapping (only ascii_uppercase charaters are converted, you can change this in the file, but be aware that the wipy2.0 has limited ram).icons2matrix.py: reads all png files from the folderimgand generates aicons.txtcontaining the mapping of the icons.
The content of these files needs to be copied into the files
letters.pyandicons.py, respectively. As you see, you need to define a variable at the begging of the file. Again, the upper case letters are only mapped, that means, you need to write your message in capital. The name of the icon files is used to map the icons, it should only contain[a-z]characters (otherwise, rename the file).If you modify the mappings: The Wipy2.0 has limited RAM (I bougth the Wipy3.0, when I receive it, I am going to update this). In order to reduce the ram use, you need to cross-compile the files that include the mappings and the ws2812b driver. To do that, you need to use linux (sorry) and clone the pycom/pycom-micropython-sigfox repository. If you are using an ESP32 (Wemos) -I think you do not need to do this, because the Wemos has more ram, but just for your information-, you need to clone the micropython/esp32 repository. Then, go to the folder
mpy-crossusing a terminal, and typemake. Wait a couple of seconds/minutes. Then, you can compile the files using./mpy-cross <file_name.py>in order to get the.mpyfiles. E.g../mpy-cross ws2812b.py./mpy-cross icons.py./mpy-cross letters.py./mpy-cross colors.py
I included a copy of these files in the folder
wipy2.0_mpy. If you modify the mapping or use another micro (e.g. Wemos), you need to generate these files again.Load only the
.mpyfiles not the.pyfiles! Otherwise, the Wipy tries to load the.pyand you get the error:MemoryError: memory allocation failed, allocating xxxx bytes.In conclusion, you need to load and/or modify the following files:
boot.py: it connects to the internet, you need to modify the Wi-Fi access (SSID/WPA);main.py: you can modify the icons, the message, etc.;ws2812b.mpy: cross-compiled led drivers;icons.mpy: cross-compiled icon mapping;letters.mpy: cross-compiled letter mapping;colors.mpy: this file is not used yet, you can skip it. It maps 'english colors' to RGB.
The
.mpyfiles are not uploaded with Atom and the pymark plugin. I uploaded the configuredboot.pyfile first, then using FileZilla I managed to upload the other files. Please be aware of this configuration for FileZilla. You can also useampyfor uploading the files. Please refer to this tutorial for more information.Reset the board and enjoy!
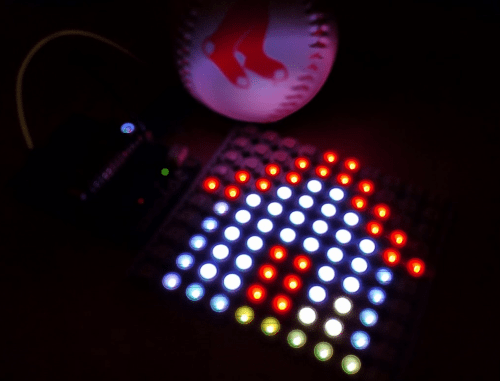
![Wipy2.0 Sample]()
Fig. 3: WS2812b showing a mapped icon Credits
The code of letter2matrix is based on the following stackoverflow answers:
- https://stackoverflow.com/a/27753869/190597 (jsheperd)
- https://stackoverflow.com/a/36386628 (unutbu)
We use cookies to improve our services. Read more about how we use cookies and how you can refuse them.


")


Empty