 21
21
Jul - 2018Real Time Systems
6 min | 22349#Raspberry Pi: Real Time System - Xenomai Patching Tutorial for Kernel 4.14.y
Real Time Systems | 6 min | 22349
Table of contentShowThe website of Xenomai says the following about it Xenomai:
Xenomai brings POSIX and traditional RTOS APIs for porting time-critical applications to Linux-based platforms. When the native Linux kernel cannot meet the response time requirements of the application, Xenomai supplements it with Cobalt, a small real-time infrastructure which schedules time-critical activities independently from the main kernel logic.
Checking the list of supported hardware, the Raspberry Pi 2, 3 B(+) ARM micro (BCM2835) is included.
This tutorial is almost the same as the tutorial for Preempt-RT patching, but in this case, we need to patch the kernel. The patched Preempt-RT sources are included in the official Raspberry Pi repository. If you need a tutorial for patching the kernel click on the link above.
Getting the sources
For this tutorial, you need a host computer running Linux. In my case, I am using Ubuntu 18.04 LTS, but the tutorial should work with any version of Linux.
Requirements
To start in a clean way, make a subdirectory, e.g.
rpi-kernelunder yourhomedirectory:~$ mkdir ~/rpi-kernel ~$ cd ~/rpi-kernel ~rpi-kernel$ mkdir rt-kernelThe subdirectory
rt-kernelis for the compiled files.Then, clone the following repositories:
~/rpi-kernel$ git clone https://github.com/raspberrypi/linux.git
~/rpi-kernel$ git clone https://github.com/raspberrypi/tools.git --depth 3
The Raspberry PI kernel source will be downloaded to the
linuxsubdirectory (1-2GB) and the Raspberry PI cross-compilers to thetoolssubdirectory (200MB).We need also the Xenomai files and the patch, in this case I took the last stable version (v3.0.7) and the patch for arm32. There is a patch for arm64, but at the moment of writing this, it's still for kernel 4.9. There is also a Xenomai "next" version here, but it is a development version.
~/rpi-kernel$ wget https://xenomai.org/downloads/ipipe/v4.x/arm/ipipe-core-4.14.36-arm-1.patch
~/rpi-kernel$ wget http://xenomai.org/downloads/xenomai/stable/xenomai-3.0.7.tar.bz2
~/rpi-kernel$ tar xjf xenomai-3.0.7.tar.bz2
Switching the branch
As we are going to patch the kernel source with the Xenomai patch, both versions have to be the same. The Xenomai patches can be downloaded here. At the moment of writing this, the last compatible patch is for kernel version 4.14.36. Looking at the commits in https://github.com/raspberrypi/linux.git there are no merge for this kernel version. We can merge the upstream 4.14.36 and generate a local version for us as:
~/rpi-kernel$ cd linux
~/rpi-kernel/linux$ git reset --hard 719df11c
~/rpi-kernel/linux$ git merge d6949f48093c2d862d9bc39a7a89f2825c55edc4
or we can clone the next kernel version, which is the 4.14.37 and hope that it is still compatible:
~/rpi-kernel$ cd linux
~/rpi-kernel/linux$ git reset --hard 29653ef5475124316b9284adb6cbfc97e9cae48f
I used the second option and it works!
Two files have problems with the patch (also from kernel version 4.14.36):
linux/drivers/irqchip/irq-bcm2835.c
linux/drivers/irqchip/irq-bcm2836.c
If you try to prepare the kernel to patch, you are going to get the following error:
Unable to patch kernel 4.14.36/7 with ipipe-core-4.14.36/7-arm-1.patch.IMPORTANT: But, I included the patched files here. You need to copy them into
linux/drivers/irqchip/and then everything works as usual. ;)Patching the kernel
To patch the kernel you need to type the following:
~/rpi-kernel$ xenomai-3.0.7/scripts/prepare-kernel.sh --linux=linux/ --arch=arm --ipipe=ipipe-core-4.14.36-arm-1.patch --verbose
[ ... ]
I-pipe core/arm #1 installed.
Links installed.
Build system ready.
If you decided to clone, download or compile the kernel in other directories, you need to modify the paths.
Configuration
Tools
You need to set the following variable before starting to configure and/or compile the kernel source.
~/rpi-kernel$ export ARCH=arm ~/rpi-kernel$ export CROSS_COMPILE=~/rpi-kernel/tools/arm-bcm2708/gcc-linaro-arm-linux-gnueabihf-raspbian/bin/arm-linux-gnueabihf- ~/rpi-kernel$ export INSTALL_MOD_PATH=~/rpi-kernel/rt-kernel ~/rpi-kernel$ export INSTALL_DTBS_PATH=~/rpi-kernel/rt-kernelNote:
- If you get the following error:
scripts/link-vmlinux.sh: line 61: ~/rpi-kernel/tools/arm-bcm2708/gcc-linaro-arm-linux-gnueabihf-raspbian-x64/bin/arm-linux-gnueabihf-ar: No such file or directorytry using the absolute path to the directory and avoid using relative path (
~) (Thanks Hans J. for your E-Mails!).
The variables set the following:
ARCH: the system architectureCROSS_COMPILE: the path to the toolchain. If you cloned the tool repository into another directory, you need to change this path.INSTALL_MOD_PATH: the path, into where the compiled kernel modules (MOD) are going to be installed.INSTALL_DTBS_PATH: the path, into where the compiled DTB (Device Tree Blob) files are going to be installed.
Notes:
- If you decided to clone, or compile the kernel in other directory, you need to modify these paths. Otherwise, you are going to get some errors while compiling or configuring the kernel.
- Leave no spaces near the
=. - You can check the variable contain typing e.g.
echo $INSTALL_MOD_PATH. - If you close the terminal or sub-window in Terminator, you need to set the variables again.
Building the kernel configuration
As I said before, Xenoami is only compatible with Raspberry Pi 2, 3 B(+) -I think-. To build the kernel configuration, we type the following:
~/rpi-kernel$ export KERNEL=kernel7
~/rpi-kernel$ cd ~/rpi-kernel/linux/
~/rpi-kernel/linux/$ make bcm2709_defconfig
Then, we need to configure some kernel options, typing the following we get the config menu:
~/rpi-kernel/linux/$ make menuconfigIf you get the error
make menuconfig' requires the ncurses libraries, install thencurseslibrary using:~/rpi-kernel/linux/$ sudo apt-get install libncurses-devTo avoid the warnings you need to disable the following options:
- Disable
CPU Frequency scaling: CPU Power Management → CPU Frequency scaling → CPU Frequency scaling - Disable
Allow for memory compaction: Kernel Features → Contiguous Memory Allocator - Disable
Contiguous Memory Allocator: Kernel Features → Allow for memory compaction - Disable
KGDB: kernel debugger: KGDB: kernel debugger → Kernel Hacking
Compiling the Kernel
To compile the kernel you need to type the following:
~/rpi-kernel/linux$ make -j4 zImage
~/rpi-kernel/linux$ make -j4 modules
~/rpi-kernel/linux$ make -j4 dtbs
~/rpi-kernel/linux$ make -j4 modules_install
~/rpi-kernel/linux$ make -j4 dtbs_install
Choose the right
-jXparameter according to the number of processors that your host computer has. In my case 4.Note:
- The last line returned after installing
modules_installreports the kernel version that you compiled, e.g.:DEPMOD 4.14.37-v7+
Then, make just a blob of data at the end of the kernel image typing:
~/rpi-kernel/linux$ mkdir $INSTALL_MOD_PATH/boot
~/rpi-kernel/linux$ ./scripts/mkknlimg ./arch/arm/boot/zImage $INSTALL_MOD_PATH/boot/$KERNEL.img
Transfer the Kernel
After the compilation is completed, compress all files to tranfer them to the Raspberry Pi:
~/rpi-kernel/linux$ cd $INSTALL_MOD_PATH
~/rpi-kernel/rt-kernel$ tar czf ../xenomai-kernel.tgz *
Then, transfer the resulting '.tgz' file to the Raspberry Pi using
scpand your ssh credentials:~/rpi-kernel/rt-kernel$ cd .. ~/rpi-kernel$ scp xenomai-kernel.tgz pi@<ipaddress>:/tmpChange
<ipaddress>to the corresponding IP of your Raspberry Pi.Installing the Kernel Image, Modules & Device Tree Overlays
Before you start doing this, be sure that you've already saved the important data from your Raspberry Pi (may be you should do a MicroSD card backup). The following commands replace the kernel, modules & device tree overlays without making any backup. That means, if it doesn't work because errors ocour, then you are not going to be able to boot your Raspberry Pi as usual. You can get your files from the MicroSD (e.g. connecting to your host computer), but the hardware is not going to boot. Be also aware there could be compatibility issues with some drivers. This tutorial helps you to install the kernel version 4.14.y. Discussion for kernel compatibilities are here.
If you are sure to continue, type the following on the Raspberry Pi:
~$ cd /tmp
/tmp$ tar xzf xenomai-kernel.tgz
/tmp$ sudo cp *.dtb /boot/
/tmp$ cd boot
/tmp/boot$ sudo cp -rd * /boot/
/tmp/boot$ cd ../lib
/tmp/lib$ sudo cp -dr * /lib/
/tmp/lib$ cd ../overlays
/tmp/overlays$ sudo cp -d * /boot/overlays
/tmp/overlays$ cd ..
/tmp$ sudo cp -d bcm* /boot/
Add the following entries to
/boot/config.txt:kernel=${zImage name} device_tree=bcm2710-rpi-3-b.dtband following entries to
/boot/cmdline.txt. Otherwise the USB drivers are not going to work, and you cannot have neither network nor keyboard!~$ sudo nano /boot/cmdline.txt # Add the following options: dwc_otg.fiq_enable=0 dwc_otg.fiq_fsm_enable=0 dwc_otg.nak_holdoff=0Some info about this: here.
Reboot the Raspberry Pi and if all the stars are aligned, you get the Xenomai kernel working!
Compiling Xenomai Tools
Xenomani includes a suite of tools for testing its realtime kernel, you can cross-compile these tools typing:
~/rpi-kernel$ cd xenomai-3.0.7
~/rpi-kernel/xenomai-3.0.7$ ./scripts/bootstrap --with-core=cobalt –enable-debug=partial
~/rpi-kernel/xenomai-3.0.7$ ./configure CFLAGS="-march=armv7-a -mfpu=vfp3" LDFLAGS="-mtune=cortex-a53" --build=i686-pc-linux-gnu --host=arm-linux-gnueabihf --with-core=cobalt --enable-smp CC=${CROSS_COMPILE}gcc LD=${CROSS_COMPILE}ld
~/rpi-kernel/xenomai-3.0.7$ make -j4 install DESTDIR=${PWD}/target
The last line compile the tools, and it could ask you the host root password to install the tools, but don't worry they are going to be installed under the subdirectory
target/.Again, we compress and transfer the testsuite to the Raspberry Pi using.
~/rpi-kernel/xenomai-3.0.7$ cd target
~/rpi-kernel/xenomai-3.0.7/target$ tar czf ../../xenomai-tools.tgz *
~/rpi-kernel/xenomai-3.0.7$ cd ~/rpi-kernel/
~/rpi-kernel$ scp xenomai-tools.tgz pi@<ipaddress>:/tmp
Change again
<ipaddress>to the corresponding IP of your Raspberry Pi.Deploying the Testsuite on Raspberry Pi
Type the following on the Raspberry Pi:
~$ cd /tmp
/tmp$ tar xzf xenomai-tools.tgz
/tmp$ sudo cp dev/* /dev/
/tmp$ sudo cp usr/* /usr/
You can test the kernel latency using the testsuite:
~$ sudo /usr/xenomai/bin/latency
== Sampling period: 1000 us
== Test mode: periodic user-mode task
== All results in microseconds
warming up...
RTT|  00:00:01  (periodic user-mode task, 1000 us period, priority 99)
RTH|----lat min|----lat avg|----lat max|-overrun|---msw|---lat best|--lat worst
RTD|     12.239|     12.693|     19.427|       0|     0|     12.239|     19.427
RTD|     12.291|     12.720|     16.926|       0|     0|     12.239|     19.427
RTD|     12.290|     12.701|     17.447|       0|     0|     12.239|     19.427
RTD|     12.238|     12.709|     14.634|       0|     0|     12.238|     19.427
or the kernel installation using:
~$ sudo /usr/xenomai/bin/xeno-testand you get a huge report. ;)
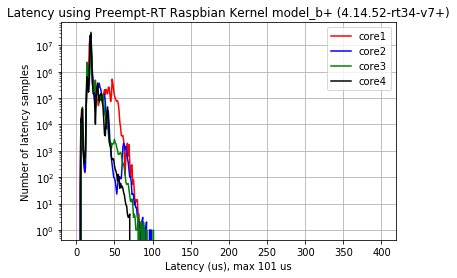
Latency Kernel Results
The latency of the Xenomai patched kernel is not as good as I expected! I think, I need to check the kernel configuration again.
![Model B+ Latency Results Preempt-RT]()
![Model B+ Latency Results Xenomai]()
Fig. 1a: Latency results Preempt-RT patched Kernel Fig. 1b: Latency results Xenomai patched Kernel The latency results were calculated using the suite RT-Tests, and the test were configured as described here.
- If you get the following error:
We use cookies to improve our services. Read more about how we use cookies and how you can refuse them.


")

")


")
Empty