 13
13
Aug - 2019Home Automation, Raspberry Pi
3 min | 77680#Zigbee: Flashing a CC2531 dongle using a Raspberry Pi
Home Automation, Raspberry Pi | 3 min | 77680
Table of contentShowLast April, I published a tutorial about connecting the Aqara sensors to a Raspberry Pi without using the Xiaomi Gateway. To make that possible, I needed a CC Debugger to flash the TI CC2531 Zigbee Dongle. This debugger was used only one time, and then the Zigbee-USB dongle worked without any problem.
In this article, I will cover a way to flash the CC2531 without the CC Debugger. This reduces project costs (about $10 for debugger + cable adapters) and waiting time. Usually, you wait 30 days to get a low cost version of the debugger (using the cheapest shipping option). Let's start!
This article is outdated! A new version has been published: Hardware
You need the following hardware for this project:
DIY: Hardware Connection
You need a soldering iron and 4 jumper cables. Then, solder 4 wires to the pins: GND, DC, DD and RST of the CC2531 header (see CC2531 Pin Header in Fig. 1a). The header is very small and you can bend the pins a little, if you cannot solder them directly.
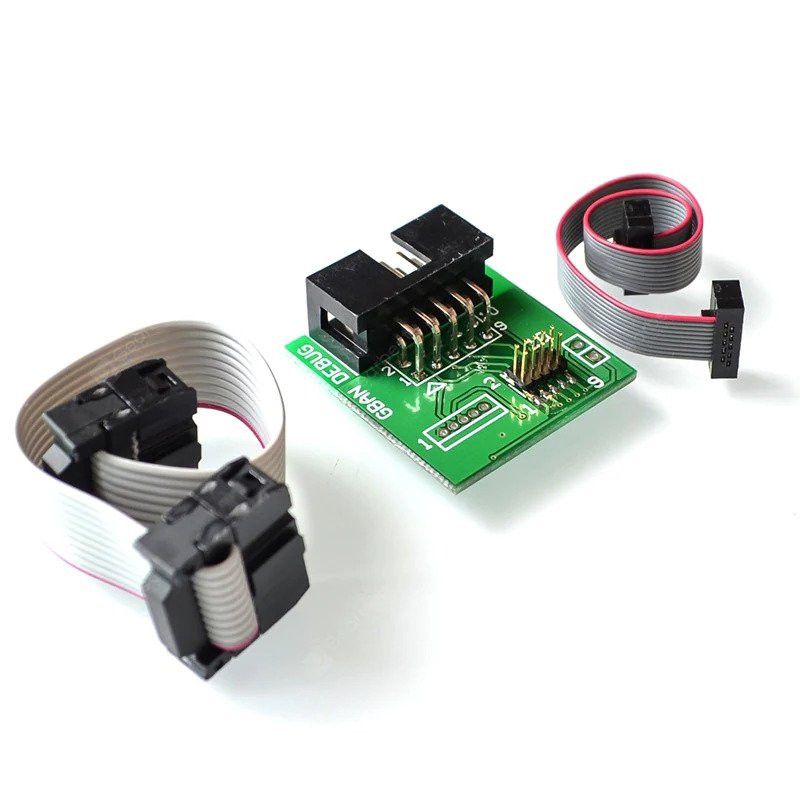
However, if you are not good at soldering, or if you don't have any soldering iron, you can buy the following adapter:
The adapter connects using a flat cable to the CC2531 and it has a bigger pin header on board side. Thus, you can connect the female jumper connectors directly to that header (see CC Debugger Pin Header in Fig. 1a). It doesn't matter which option you have chosen (solder or adapter), but then, connect the other end of the wires to the Raspberry Pi header (see Fig. 1b) as described in the following table:
Raspberry Pi CC2531 GND GND Pin 38 DD Pin 36 DC Pin 35 RST After connecting the CC2531 header to the Raspberry Pi headers, plug the USB dongle to a USB port of the Raspberry Pi and then, power up the Raspberry Pi.
If you use the flexible flat cable (FFC) provided with the adapter and you want to connect male jumper connectors from there to the Raspberry Pi, please be aware that connection is not described in Fig. 1a (CC Debugger Pin Header). You need to mirror it.![CC2531 PINs]()
![Raspberry Pi]()
Fig. 1a: PIN description CC2531 Fig. 1b: PIN description Raspberry Pi DIY: Flashing the CC2531
- On the Raspberry Pi, check if you have already installed Wiring Pi typing:
gpio -vin the terminal. If not, install it following these instructions. - Clone the jmichault/flash_cc2531 repository typing the following:
git clone https://github.com/jmichault/flash_cc2531.git - Go inside the
flash_cc2531folder and check if the Zigbee-USB dongle is wired correctly and if it's identified:cd flash_cc2531 ./cc_chipid - You should see
ID=b524. If you get any other text (e.g.0000orffff), re-check your wiring. - Download the latest firmware from Koenkk/Z-Stack-firmware.
wget https://github.com/Koenkk/Z-Stack-firmware/archive/master.zip unzip master.zip # (**) cd Z-Stack-firmware-master/coordinator/Z-Stack_Home_1.2/bin/default/ # (*) unzip CC2531_DEFAULT_<<yyyymmdd>>.zip - Erase the CC2531 flash with
./cc_erase - Flash the firmware using
./cc_write /path/to/CC2531ZNP-Prod.hex. This will take about 3 min. - Disconnect the wires/adapter and reboot the Raspberry Pi
(*) Note 1: changeyyyymmddwith the actual date of the file (check it here: /bin/default, /bin/source_routing).
(**) Note 2: I used the default version of the Z-Stack coordinator. But:- a. If you have a network of 1 - 30 devices, the Z-Stack_Home_1.2 /bin/default firmware is recommended.
- b. If you have a network of 30+ devices, the Z-Stack_Home_1.2 /bin/source_routing firmware is recommended.
Raspberry Pi 1 users
I copy here a comment written by whooty on 01.26.2020 (THANKS!):
Just did it with a pi 1. all you have to do is use different pins. Check the documentation for flash_cc2531, there is a section which tells you how to change the pins you use. Use 'gpio readall' to figure out which pins you have connected to what, and use the wPi number off that for the command flags in flash_cc2531.Conclusions
This tutorial covers an alternative way to flash the CC2531 without using the official TI CC Debugger or the low cost SmartRF04EB. If you followed the steps as described, you should have your CC2531 dongle flashed with the firmware. Then, you can follow this article to integrate the Aqara sensors to Hass.io: #Raspberry Pi: Xiaomi Sensors & Home Assistant (Hass.io) or use a broker explained here: #Zigbee: Xiaomi Sensors using Raspberry Pi (without Gateway!).
Acknowledgements
Many thanks to the developers of the following software:
- On the Raspberry Pi, check if you have already installed Wiring Pi typing:
We use cookies to improve our services. Read more about how we use cookies and how you can refuse them.


")

")


Michel Kuenemannn 11.27.2020
Great tutorial. Many thanks. Michel
Janis 12.13.2020
I checked my wiring 10 times, but cc_check still reported ffff. Here: https://github.com/jmichault/flash_cc2531/issues/9I found that removing c_delay_calibrate() from cc_init() an set cc_delay_mult=90 helped for me. Some people succeed with delay = 80, some with 110. For me 90 was enough.
bob 01.09.2021
worked perfectly. Thank you very much :)
Hermann 01.15.2021
Beautiful tutorial, thank you so much! I wish they were all like this.
Paul 02.05.2021
Thanks. Worked straight away after fighting unsuccessfully with other methods (Arduino, HASS add-on ...).
KilPen Technical Services 02.10.2021
Thanks! This worked perfect. Great directions.
hfuster 02.18.2021
It also can be done with alligator clips instead of soldering them.
marcos 03.09.2021
simple and perfect, thank you very much for sharing
joe 05.25.2021
on the last step ./cc_write ../../CC2531ZNP-Prod.hex, i get the error:
Can't open file .. / ../CC2531ZNP-Prod.hex
do i need to update the permissions?
Robert 08.06.2021
Great tutorial. Do you have ko-fi site or something? I just flashed 12 USB keys thanks to your tutorial :)
Hz 09.24.2021
Nice tutorial! I would suggest a backup first with ,/cc_read backup_filenameyouwant before the erase command
cisr 11.07.2021
Hi Guys, If you want to use Raspberry 4 for flashing, remember to check version of WiringPI (gpio-v). Version 2.50 doesn't support this board, and it is only officially available version in APT. You need >2.52. If your system kernel is arm64 architecture (e.g. Ubuntu), you have to fined fork (e.g. https://github.com/guation/WiringPi-arm64) or recompile everything by yourself.
I spend 2 days checking all wiring (because I was receiving ffff. ID, no matter what -m I passed), code etc just to find out that WiringPI is the issue.