 28
28
Oct - 2017MicroPython
5 min | 34438Table of contentShowAnother quick tutorial, this time for MicroPython on ESP32/ESP8266. You can find all the information that I'm writing in this post in different articles on the Internet but I've not found anything that summarizes all the topics. That is why I am writting this article. I included some links at the end of each topic to extend the info. Feel free to visit them, if you want more information, or write a comment I will try to reply it ASAP!
![Python]()
Code: https://github.com/lemariva/ESP32-MicroPython This article is outdated! A new version has been published: MicroPython & Board
What's MicroPython?
Quoting the official micropython page results in the following
MicroPython is a lean and efficient implementation of the Python 3 programming language that includes a small subset of the Python standard library and is optimised to run on microcontrollers and in constrained environments.
As you see, in my last posts (
sorry about the link, I need some pagekit taxonomy!), I have been programming the Wipy 2.0. This board is a tiny MicroPython enabled WiFi & Bluetooth IoT development platform.Other development boards/kits, that support MicroPython are the following:
The cheapest boards are the ESP8266. They only have 160kb RAM, which can be a problem and you usually get a memory error exception, when you import 3 or 4 libraries. The ESP32 WROOM has 512kb RAM and the WROVER 4MB. There is also a new WROVER-B that has 8MB RAM.
More Info
MicroPython MicroPython Download (ESP32) Software Requirements
You can download and compile the MicroPython firmware from the GitHub repository, or you can download a compiled firmware from here. I took the second way.
To download the firmware to the ESP32 microcontroller, you have to install Python. You can use either Python 2.7 or Python 3.6. Then, you need to install
pip. A tutorial for installingpipon Windows can be found here.pipcan be downloaded from get-pip. After that, you need to install theesptoolsusing the following commandpip install esptool # or usually on windows python -m pip install esptoolYou should get something like the Fig 1 (I typed
python3because I've the two versions (2.7 & 3.6) on Windows, so I changed the name of the executable file topython3.exe). Remember to include the Python directory to the Windows path in the Environment Variables.![Installing esptools tool]()
Fig. 1: Installing esptoolon Windows.You should also install
ampy. This tool is useful for uploading files to the ESP32 via serial interface. To do that, you need to type the following on a command promptpython3 -m pip install adafruit-ampyMore Info
Python 3.6 pipesptoolampyFirmware Download & Installation
Download the MicroPython firmware from here. You have to download the image under
Firmware for ESP32 boards. Do not try another firmware; it is not going to work. If you have a version with extra pSRAM (WROVER-A/B modules) flash the version with SPIRAM. If you need to use the BLE module, read this tutorial: Tutorial: MicroPython and Bluetooth (BLE)Connect the Wemos to a USB port on your PC, and check the serial interface number where the CP201x is connected (turn the board on, if it is not). On Windows, open the
Device Managerand look underPorts (COM & LPT). In my case, the port isCOM17. On Linux, it should be under/dev/ttyUSBx(changexto the corresponding port number). Usingdmesgyou should look for something like this:usb 5-3: cp210x converter now attached to ttyUSB0.![Checking Device Manager]()
Fig. 2: Windows Device Manager. First, open a cmd/terminal. You need first to erase the flash of the ESP32. To do so, just type the following comand lines:
# on Windows
python -m esptool --port COM17 erase_flash
# on Linux
python -m esptool --port /dev/ttyUSB0 erase_flash
Change the
COM17or/dev/ttyUSB0to the serial port, where your ESP32 is connected.After doing this, you can flash the firmware (
.binfile) to the ESP32 typing these lines:# for Windows python -m esptool --port COM17 --baud 460800 write_flash --flash_mode dio --flash_size=detect 0x1000 <firmware_name>.bin # for Linux python -m esptool --port /dev/ttyUSB0 --baud 460800 write_flash --flash_mode dio --flash_size=detect 0x1000 <firmware_name>.binAgain, replace the port with the ESP32 COM/Serial port, and change the
<firmware_name>.binwith the path/file, where your firmware is located. If you get an error like Fig. 3, you should close all open connections to the board (e.g. putty, serial console etc.).![Error by uploading MicroPython firmware]()
Fig. 3: Error by uploading MicroPython firmware If everything goes right, you'll get something like Fig. 4.
![Uploading MicroPython Firmware]()
Fig. 4: Uploading MicroPython Firmware Programming using Atom and PyMakr plugin
This part is a bit outdated. I recommend using VSCode and the PyMakr extension.
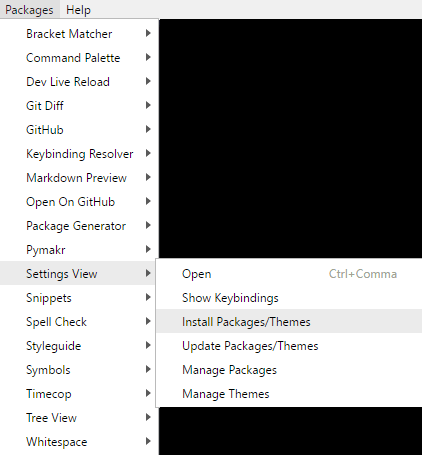
Read the following tutorial: MicroPython: Visual Studio Code as IDEDownload Atom.io and install it. Then, search for the plugin
pymakr. To do so, go toPackages, thenSettings View, and finallyInstall Packages/Themes(see Fig. 5).![Install Packages on Atom.io]()
Fig. 5: Install Packages on Atom.io Type
pymakrto search the plugin, wait, and install it using theinstallbutton (Fig. 6)version 1.2.0 is available.![PyMakr Installation]()
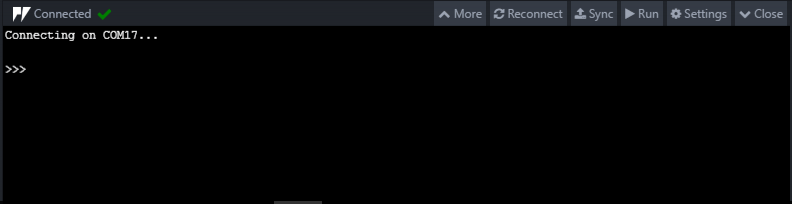
Fig. 6: pymakrInstallationIf everything goes right, you get a console on Atom (lower side of the right panel), that can be configured to connect to the ESP32. The console should look like Fig. 7.
![Atom Console]()
Fig. 7: Atom pymakrConsoleIt is usually closed at the beginning; you need to click on the
openbutton on the right. Before that, you should click onSettingsto configure the port on which the Wemos board is connected. You can set aGlobal settings(Fig. 8) for all your projects or aProject settings, if you have more than one board connected to your PC and different projects running on these boards.- Note for Windows users:
COMXXshould be written in uppercase, otherwisepymakrdoesn't find the port and asks the DNS server to translate that address, which usually does not exist, and you get an error!
![Global settings]()
Fig. 8: pymakrGlobal settingsPymakr size problem - Atom 1.30:
If your console size is too small and you cannot resize it like this one:
![PyMakr Console]()
Fig. 9: pymakrConsole too small and not resizableyou need to disable the
atom-ide-uipackage (Packages>Settings View>Manage Packages):![PyMakr Console]()
Fig. 10: atom-ide-uiPackageIt is a known bug.
More Info
ESP32 Firmware Atom.io Pymakr Plugin VSCode Pymakr Extension Uploading files using adafruit-ampy
The MicroPython firmware for ESP32 doesn't have a FTP server like the version for PyCOM boards. You have to upload the files using the serial interface.
Thesyncbutton of thepymarkplugin on Atom doesn't work with this firmware (with the Wipy 2.0, it works).Outdated section, if you use VSCode or Atom.io and the PyMakr Extension/Plugin. However, if you need an FTP server to upload the files, take a look!Write the following code in a file called
boot.pychanging the<ssid>and<wpa2_passvalues to the right ones of your WiFi configuration# boot.py ssid_ = <ssid> wpa2_pass = <wpa2_pass> def do_connect(): import network sta_if = network.WLAN(network.STA_IF) if not sta_if.isconnected(): print('connecting to network...') sta_if.active(True) sta_if.connect(ssid_, wpa2_pass) while not sta_if.isconnected(): pass print('network config:', sta_if.ifconfig()) do_connect()You can upload the
boot.pyfile to the Wemos board usingampywith the following command line# for Windows ampy --port COM17 put /pathToFile/boot.py # for Linux ampy --port /dev/ttyUSB0 put /pathToFile/boot.pyYou can upload a simple FTP server to upload files using e.g. Filezilla. You will find the FTP Python file on my GitHub repository, together with a
boot.pyto connect to the WIFI Router.Uploading files using PyMakr console in Atom
With the PyMakr plugin version newer than 1.30, it is possible to upload files not only to the WiPy2.0/3.0 but also to the ESP32/ESP8266 modules. You need to open your project, configure the
Settingsas described above and click on theUploadbutton (see Fig. 11). The files are uploaded and after that the board is rebooted.If you have a
main.pyfile with awhile True:and you want to stop it, you can pressCTRL+Cafter clicking inside the console. Thewhilewill be breaked and you can type your commands inside the console. This could be helpfull when the microcontroller is doing too many task, and theUploadfile action fails. Additionally, you can switch the"safe_boot_on_upload": true,inside thepymakr.conffile.![PyMakr Console]()
Fig. 11: atom-ide-uiPackageMore Info
ampyESP32-MicroPython If you have further questions, please don't hesitate to comment this article. But, first check the section: MicroPython! There are many interesting articles and projects to follow!
- Note for Windows users:
We use cookies to improve our services. Read more about how we use cookies and how you can refuse them.


")


MiUbi 08.26.2018
i am an instructor, i wanted to teach micro python for students, found difficulty with mpfshell and REPL , this is just a great plugin, it helped me creating many applications i just collated them in a video have a look : [...] i even created free course too : [...]
Heikki Hietala 09.10.2018
Hi! I followed your very good tutorial, but and got my ESP32 DevKitC's both erased and flashed with the ESP32 firmware, but when I try to connect via Atom running Pymakr, I get this:
Failed to connect (Error: getaddrinfo ENOTFOUND com8 com8:23). Click here to try again. Connection error: Error: Login timed out
i can see the COM8 working, and I can access it on PuTTY etc. but getting Pymakr to talk to it doesn't work.
Do you have any solution for this? Thanks for taking the time to read this!