 29
29
Apr - 2018Android Things
3 min | 9779Table of contentShowAfter the Hannover Fair 2018, I have this weekend some time and I decided to update the #ProjectDIVA to the last version of Android Things. Today the actual version is 0.8.1 DP and the Android Things Setup Utility has the version number 1.0.19.
I have two applications running on Android Things:
- nRF24Things - Related post: here
- SensorTag-Things - Related post: here
In Oct. 2017, I wrote a tutorial for Android Things, but I checked that the tutorial needed an update, and the repositories too. That's why I'm writing this post.
What is Android Things?
This section does not change too much from my last tutorial post.
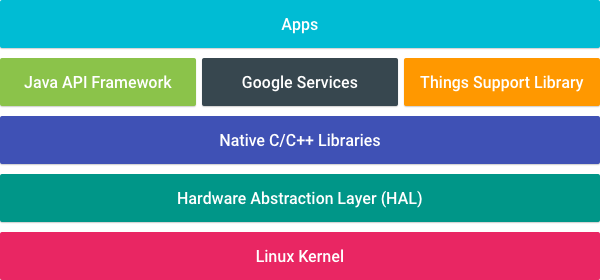
Google announced Android Things on December of 2016. It's a modified version of the Android that we all know, but for Internet of Things (IoT) devices. The architecture of the SDK is described in the following figure:
![Android Things Architecture]()
Fig.: Android Things SDK architecture (Source: Google) As you can see, the core Android framework (the level below the Apps) is extended with additional APIs provided by the 'Things Support Library' (in orange). These APIs enable the integration of the apps with the new IoT devices.
Android Things is compatible with many developer kits. A list can be found here and nowaday Google offers two main kits:
Android Things is still in development phase (-devpreview), which means that there are many (un)known issues. A list of known issues can be found here together with the release notes, others can be found or reported here (search "Android Things" or your something related to your problem).
How to get the Android Things Image?
- Go to: Android Things Console and sign in using your Google credentials
- Go to the Menu (left corner) and click on Tools. Or click here.
- Click on the Download bottom, and unzip the file.
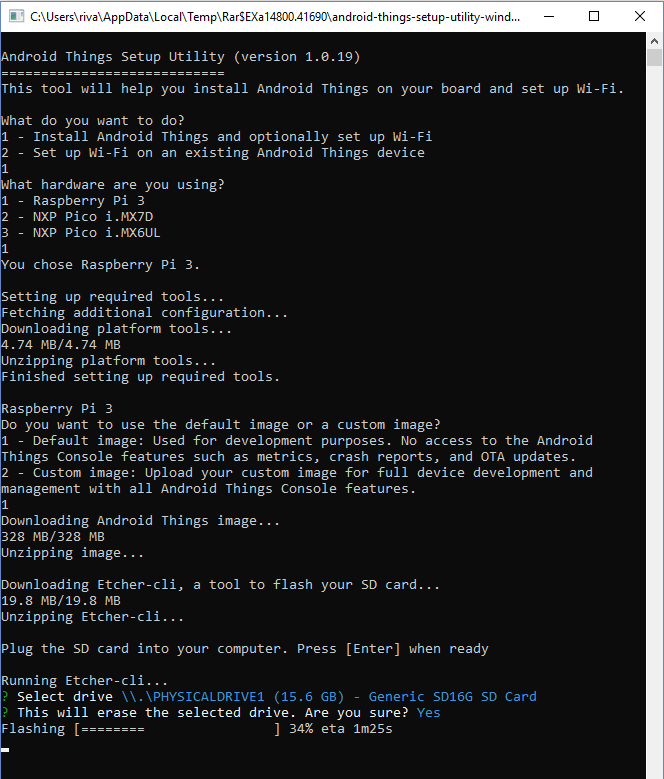
- Use the corresponding file related to your operating system (Linux, Windows or MacOS). You must run the setup utility as an administrator. If you are using Windows, you get something like this:
![Android Things Setup Utility]()
I picked the following options:- Option 1: Install Android Things and optionally set up Wi-Fi;
- Option 1: Raspberry Pi 3;
- Option 1: Default image. If you have created an image using the console you need to select option 2 and give a path to the downloaded image.
- Insert a SD card and press Enter. The image is flashed and then verified.
- After the image is verified, you can insert the SD card to your Raspberry Pi and plug it to your router with an Ethernet cable.
- The Setup Utility allows you to configure the Wi-Fi connection. The utility tries to find the Raspberry Pi in your network, if it fails, it asks you for the IP address. Then, you need to type the SSID and password of your Wi-Fi network.
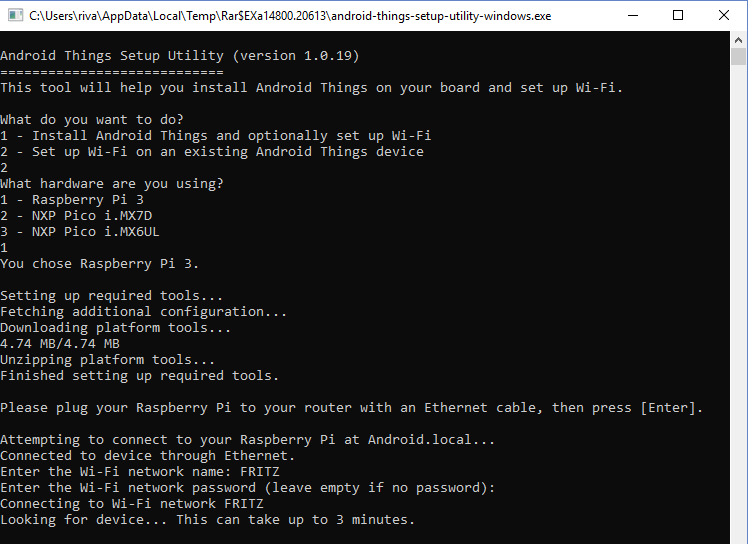
You can start the Wi-Fi setup later, running again the Setup Utility and choosing 2 for the option "what do you want to do?" and you get something like this:
![Android Things Setup Utility]()
If the Wi-Fi configuration using the Setup Utility failed:
- Open a
cmdon Windows orTerminalon Linux/Mac - Then, type (change
<WiFiSSID>and<Secr3tPassw0rd>for the right values):$ adb shell am startservice \ -n com.google.wifisetup/.WifiSetupService \ -a WifiSetupService.Connect \ -e ssid <WiFiSSID> \ -e passphrase <Secr3tPassw0rd> or in one line: $ adb shell am startservice -n com.google.wifisetup/.WifiSetupService -a WifiSetupService.Connect -e ssid <WiFiSSID> -e passphrase <Secr3tPassw0rd>
You need to have the Android Debug Bridge, if you don't have it, read the following section to install it.
How I connect my development computer to the Raspberry Pi?
You need to use the Android Debug Bridge (adb). This is included if you've already installed Android Studio, otherwise you can download and install the last version from here. On Windows, I needed to modify the
Environmental Variablesto include:C:\Users\<your-username>\AppData\Local\Android\sdk\platform-tools.Having problems with application permissions?
I had a problem with the permissions accessing to the Raspberry Pi IO. I got:
Caller lacks required permission com.google.android.things.permission.USE_PERIPHERAL_IOI had the following to the
AndroidManifest.xmlfile:<uses-permission android:name="com.google.android.things.permission.MANAGE_INPUT_DRIVERS" /> <uses-permission android:name="com.google.android.things.permission.USE_PERIPHERAL_IO"/>but, you need to install or debug the application once, and then reboot the device. This will grant the permission on restart.
Useful links
Developer Kits Android Things compatible IoT devices Android Things Console download Android Things image issues known issues per release issue tracker issues tracker and report Android Debug Bridge (adb) download the adb to connect to Raspberry Pi Android Studio download Android Studio to write, debug and build Android applications
We use cookies to improve our services. Read more about how we use cookies and how you can refuse them.

")

")


Empty