") 15
15
Jan - 2017Android Things
6 min | 168443#ProjectDIVA: Sensor mesh based on nrf24l01+ connected to Android Things (Update 1.0)
Android Things | 6 min | 168443
Table of contentShowI've just uploaded the Java codes for the
rf24,rf24Networkandrf24Meshthat work with Android Things. This time I didn't write a library because I thought it was better to upload an Android project that can be opened with Android Studio (>2.2.3) and directly started on the Raspberry Pi. I think this can also work with NXP Pico i.MX6UL and Intel® Edison with minor modifications (especially in theBoardDefaultsfile).In this post you will find some explanations about Android Things (installing, connecting, debugging, speed, etc.), the wiring of the complete 'thing' , the Java code, the modifications that I added, and so on. Some screenshots and videos are also available.
If you find this article interesting, or if you find mistakes (grammar and spelling count too! ),
please leave a comment, share and/or like!
![]()
![Android Things]()
nRF24Things: https://goo.gl/SNnhxq I will be also uploading the codes for the node slaves (sensors) that I am using. They are based on Texas Instruments Launchpads. I have some board designs in Eagle too. #ProjectDIVA is big! so, I need some more time to cleanup code!
I thought of rewriting RF24Gateway and RF24Ethernet (both from TMRh20, btw all great developments!), but may be some time in the next weeks!
Let us start now!
Things used in this project
Hardware components
Software and Libraries
Wiring
The rPi
SPI0unit allows the communication with the rf24l01+ module. TheSS1(chip select 1) -"SPI0.1"- is connected to theCSNpin of the rf24l01+ (green solid line - see Fig. 1). Another possibility is to connect theSS0(chip select 0) -"SPI0.0"- which is indicated with the dotted green line -see Fig. 1. This selection can be made using the following code (constructor of the classrf24):_cspin = 1; /* -> SS1 */ _cspin = 0; /* -> SS0 */ rf24 radio = new rf24(_cepin, _cspin, _spi_speed)The
CEpin can be connected to different I/O pins of the raspberry Pi, in this case I selected theBCM22(orPIN 15). If you choose another pin (because of you board design, etc.), you have to modify the functiongetGPIOce()included in the classBoardDefaults. That means, the fist TODO comes here!//TODO: allow to select the CE pin using the rf24 constructorThe pins
MOSI,MISO, andCLKof the rf24l01+ module are connected to the respectively pins with the same function name on the Raspberry Pi (see Table 1). TheIRQpin is not needed and though not connected and theVCCpin should be connected to3.3Vnot5V!. The complete connection is shown in Fig. 1 and described in Table 1. I used the pinout description and the Raspberry Pi schematic figures from Google (Thanks!) and adapted them to describe my connection! I made the rf24l01+ figure. If you want the vector graphic, please leave a comment, or write me.![rPI connected to a rf24L01+]()
![rPi pinout]()
Fig. 1: rPi v3 connected to a rf24l01+ Fig. 2: Raspberry Pi I/O description (source) raspberry pi rf24l01+ GND(PIN9)GND(PIN 1)3.3V(PIN1)VCC(PIN 2)BCM22(PIN15)CE(PIN 3)SS1(PIN26)CSN(PIN 4)SCLK(PIN23)SCK(PIN 5)MOSI(PIN19)MOSI(PIN 6)MIS0(PIN21)MOSI(PIN 7)Table 1: Connections Android Things
Instalation & Download
This section of the article is outdated! I wrote the following new articles:
- #ProjectDIVA: Android Things 0.8.1 getting started!
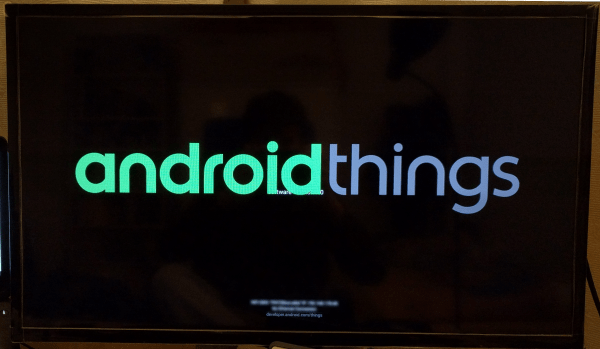
- #ProjectDIVA: Android Things v1.0!You can find the system image provided by Google here and the instructions to install and configure it are here. If everything goes right, you are going to see something like Fig. 3.
One important thing is: "Network: Wi-Fi cannot connect to the internet if Ethernet is also connected to a network without internet access." and some others problems can be found here. Sadly, the hardware graphics acceleration is not enabled yet.
![Android Things working!]()
Fig. 3: Android Things working! (Note 1) Debugging/Running App
After installing Android Studio (>2.2.3) open a command prompt (CMD) and type:
adb connect <<rPi IP>>Android Things reports the device IP on the screen of the monitor connected via HDMI (blurred on Fig. 3). After doing this, you will find the rpi as a debugging/running device (see Video 1).
Video 1: Connecting Android Studio with the Raspberry Pi If you prefer to run on the command line, type
gradlew installDebug
adb shell am start com.lemariva.androidthings.rf24/.MainActivity
Switching Pins
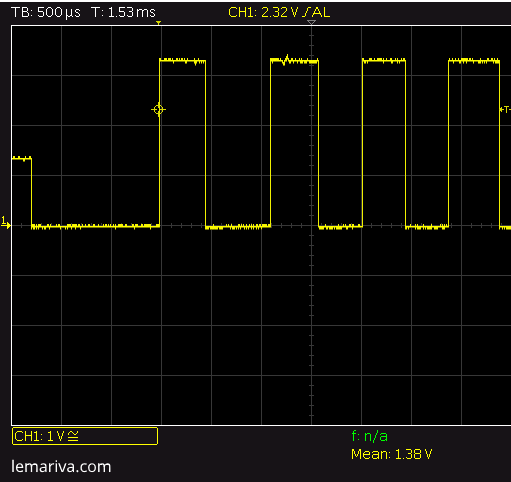
First of all, I tested how fast I was able to switch a pin status with Android Things: The following code switches
BCM22(orPIN 15) after the initialization ofPeripheralManagerServiceand the corresponding GPIO object initialization (pioService.openGpio("BCM22"))./* Speed test: Switching BCM22 */ / PeripheralManagerService */ PeripheralManagerService pioService; / CE (GPIO 'device') */ private Gpio mCEpin; try { pioService = new PeripheralManagerService(); }catch(Exception e) { Log.e(TAG, "Unable to access PeripheralManagerService", e); } try { mCEpin = pioService.openGpio("BCM22"); mCEpin.setDirection(Gpio.DIRECTION_OUT_INITIALLY_LOW); ... mCEpin.setValue(false); mCEpin.setValue(true); mCEpin.setValue(false); mCEpin.setValue(true); ... } catch (IOException e) { Log.e(TAG, "Error on initializing CE pin", e); return false; }Switching the value between false and true
mCEpin.setValue(false/true)makes the output (between 0V and 3.3V) that you see in Fig. 4.![Osciloscope Android Things]()
Fig. 4: Switching I/O Pin with Android Things Conclusion: The Raspberry Pi using Android Things needs about between 435 and 503 microseconds (download raw data) to turn on and off the pin. Of course, no threads, UI, etc., were running in parallel. This was only a test with just one function. This surely changes, when the Java VM is fully loaded. HOWEVER, I find those values reasonable, and it allows me to rewrite and test the classes using Java. Sadly, I have no comparison using the libraries in C++, then, the second TODO comes here:
//TODO: test the switching speed using the libraries in C++SPI configuration
The unit initialization can be found in the class
rf24as:// Initializing SPI try { mDevice = pioService.openSpiDevice(SpiPort); // Low clock, leading edge transfer mDevice.setMode(SpiDevice.MODE0); mDevice.setFrequency(spi_speed); // _spi_speed MHz mDevice.setBitsPerWord(8); // 8 BPW mDevice.setBitJustification(false); // MSB first } catch (IOException e) { Log.w(TAG, "Unable to access SPI device", e); return false; }The choosen configuration is:
Mode 0,8 bits per WordandMSB first. The user configures the SPI speed. The communication works with either 8Mhz or 16MHz. The constructor of the classrf24configures the SPI unit using e.g. the following code:_cspin = 1; /* -> SS1 */ _spi_speed = 16000000; /* SPI Clock @ 16MHz */ radio = new rf24((byte) 0, (byte) _cspin, _spi_speed);Code Modification: Java vs. C++ libraries
Unsigned and etc...
Java doesn't have unsigned type! I really don't know why, but they are not available. I switched the values to
int,short,byteand here comes a big TODO ! As I started to rewrite the classes, I was lazy and I usedinteverywhere. The first classrf24that I rewrote is the worst. It works, but it wasted a lot of RAM, I need to check the code again and optimize it. May be in the following days/weeks!Boolean are not 0 or 1
C++ allows
boolto be0which will be considered asfalseor1which istrue. Or:uint_8 ready = 1; if(ready) // if ready != 0 { // make something! }Java is more 'sensible' and the boolean variables have to be
falseortruenot0or1, andif (ready)has to beif (ready != 0). Rewriting this was a funny thing! Especially theifwith bit operators&,|, etc. between variables.C++ structures vs. Java classes, pointers and cast!
C++ has structures and it possible to cast an array with a structure or to memcpy the array 'into' the structure pointer (correctly speaking, into the memory pointed by the structure pointer) or vice versa. If you look at the class
rf24Networkcode you will find, e.g., the following C++ codes:uint8_t frame_buffer[MAX_FRAME_SIZE]; struct RF24NetworkHeader { uint16_t from_node; uint16_t to_node; uint16_t id; unsigned char type; unsigned char reserved; static uint16_t next_id; RF24NetworkHeader() {} RF24NetworkHeader(uint16_t _to, unsigned char _type = 0): to_node(_to), id(next_id++), type(_type) {} const char* toString(void) const; }; ... RF24NetworkHeader* header = (RF24NetworkHeader*)&frame_buffer; /* 1. line */ ... memcpy(frame_buffer,&header,sizeof(RF24NetworkHeader)); /* 2. line */ ...The structure with methods
RF24NetworkHeaderis used to cast in1. linetheframe_bufferas aRF24NetworkHeaderstructure and in2. linememcpy copies the structure values into theframe_buffer. Same thing can be found with the structureRF24NetworkFramealso with methods. Structures are not available in Java, that's way I implemented classes. The first difference is that the default acces control of a class is private, and the default access control of a struct is public (not a big deal). The second difference was that casting or copying directly an object with/into an array/buffer is also of course not possible. Then, I wrote these new methods for theRF24NetworkHeaderclass:public void CastMsg(int[] msg): which receives andint[]array, as 'cast' or 'fill' the header object;public void ChangeHeader(int[] msg): which receives andint[]array and update the header object;public int[] toIntArray(): which 'serialize' the object, meaning that it converts the object into anint[]array;public void CopyHeader(rf24NetworkFrame copy): which receives arf24NetworkFrameobject and copies the header contained in the object;public static int sizeOf(): return the header size.
and this method for the
RF24NetworkFrame:public void AttachMsg(int[] _message): attach a message (_message) to this frame (use by fragmentation) -not really tested;
Payloads implements a Java Interface
Due to the changes because of variable cast and array copy, the payloads are classes, which implement the following Java Interface:
interface rf24NetPayloads{
    /
     * Returns the size of the payload
     * @return size of the payload (variables)
     */
    int sizeOf();

    /
     * Receives a msg (message_buffer) and fills the fields of the payload.
     * @param msg
     */
    void CastMsg(int[] msg);

    /
     * Serialize the object, meaning returns the fields of this object in an int[] array
     */
    int[] toInt();
}
This allows to 'cast' (may be reconvert) a received message (
CastMsg(int[] msg)) or transmit a new message generated from the node running Android Things (int[] toInt();) (not tested yet, but it should work! -retransmitting received payloads is working and was tested). You can find some payload examples in theMainActivyclass like this one:/ payload example */ class payload_command implements rf24NetPayloads{ short nodeId; byte[] command = new byte[10]; byte[] value = new byte[3]; / * short nodeId 4 * byte[10] command 10 * byte[3] value 3 * ======== * 17 */ private static final int PAYLOAD_SIZE = 17; public int sizeOf() { return PAYLOAD_SIZE; } public void CastMsg(int[] msg) { nodeId = ((msg[3] << 32) + (msg[2] << 16) + (msg[1] << 8) + msg[0]); for(int jArray = 0; jArray < command.length; jArray++) command[jArray] = (byte) msg[jArray + 4]; for(int jArray = 0; jArray < value.length; jArray++) value[jArray] = (byte) msg[jArray + 4 + command.length]; } public int[] toInt() { int[] ret = new int[PAYLOAD_SIZE]; ... ... return ret; } }If you have a better/another idea to solve this problem, let me know (comment, write me!), I would apreciate that.
SQLite and rf24Node
I replaced the structure
addrListStructwith the classrf24Node. The class has the following properties and access methods:public class rf24Node { / Node table id */ private int ID; / Node unique id */ private short nodeID; / Node address */ private short address; / Node type */ private String type; / Node name */ private String name; / Node info */ private String info; / Node release time (in milliseconds) */ private long releasetime; / Node topic */ private String topic; ... }The instances of this class are the different nodes that are connected or have been reported to node 0. That means, when a node connects to the
pipe0to ask for an address, the 'DHCP services' releases the address, which is transferred to the node, and a new instance of rf24Node is generated and added to the ArrayListrfNodes.The methods
loadDHCP()andsaveDHCP()of the classrf24Meshadministrate the 'DHCP reservations' and 'address leases'. When an address is leased, the resulting ArrayList<rfNodes> -containing this new address- is saved with the methodsaveDHCP(). The methodloadDHCP()loads the saved nodes into the ArrayList<rfNodes>. In C++, these two methods use a file to save and load the node addresses, and the node unique identifiers. In Java I use a SQLite database, which is managed using the classDatabaseHandler. The most important methods of this class are:public ArrayList<rf24Node> getNodes(): which returns all saved nodes;public void addNode(rf24Node node): which checks if the node exists in the database, if yes, thenodeis updated with the new data, if not,nodeis added to the database;public int getNrNodes(): it returns the number of saved nodes.
A point to take into account here is that the Java class
rf24Nodecontains more information about the node as the C++ structureaddrListStruct. I plan to use another extra fields to report e.g. battery status, power consume, etc.Another type of database can be used in this project; you should need just only to replace the class
DatabaseHandlerwith your database handler class.UI
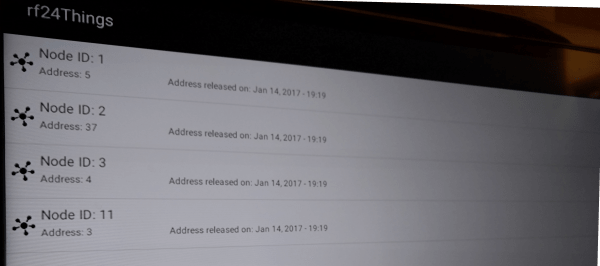
I implemented just a basic layout. This layout displays the nodes that report to the node 0 (or using Android Things) and get an address. This is really an alpha version. It has a lot of potential and maybe a lot of errors. I will be updating the layout in the next weeks to display more information about the nodes (type, battery state and etc.). The file
activity_main.xmlcorresponds to the main layout and contains aRecycleView. The filerowlayout.xmlgive the list rows (which are the sensor nodes) some style. The classMyAdapterhandle the UI, and the methods are called from the classMainActivity.The radio
rf24, the networkrf24Networkand the meshrf24Meshinstances run in a separated thread, and are connected to the UI using a Handler. As I said, this is all primitive and requires a lot of improvement. A photo of the UI can be seen on Fig. 5.![rf24Things]()
Fig. 5: rf24Things UI showing 4 sensor nodes (note 1) Changelog
- Revision: 0.1v
Credit
Based on:
Libraries from TMRh20 and maniacbug:
More Info & Help
- Almost all classes, methods and properties have a help description.
- The github documentation written by TMRH20:
- Android Things documentation:
Licenses
Licenses include, but are not limited to the following: (check respective files)
- GNU
- Apache
- etc...
Notes
Note 1: I hate taking photos of a TV, but
adb shell screencapdoesn't work yet, and the image quality of Vysor (free version) is really bad. If you have installed Vysor, you can remove it usingadb uninstall com.koushikdutta.vysor. It continuously stops and gives error.
We use cookies to improve our services. Read more about how we use cookies and how you can refuse them.
")


")

")


")
Empty