 21
21
Aug - 2019Raspberry Pi
7 min | 40972Table of contentShowE-paper or e-ink displays are becoming more common in recent days. You can find them e.g. on readers, clocks and sensors. Thus, I looked for an e-ink display for the Raspberry Pi and I found the Waveshare® 7.5" E-ink Screen.
There are many projects with an e-ink display and the Raspberry Pi, but I first tried with an ESP32 and MicroPython. That solution didn't work (something was not working with the reset voltage - too much signal noise). So, that remains a work in progress and I will use this board. But now, in this tutorial, I uploaded a solution for the Raspberry Pi.
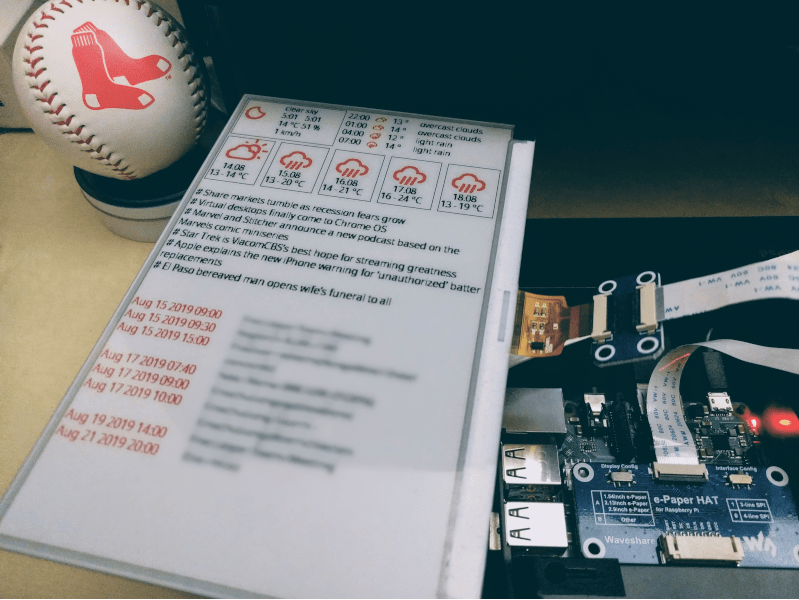
![Waveshare® 7.5" E-ink Screen connected to a Raspberry Pi]()
Fig. 1: Waveshare® 7.5" E-ink Screen connected to a Raspberry Pi running ePaperWidgets Thus, this tutorial helps you to connect a Raspberry Pi to an e-ink screen to display information e.g. weather forecast, news, google calendar events, etc. This project, unlike others found in GitHub, divides the display in different "widgets" that can be programmed separately using classes. I also included a small tutorial for Visual Studio Code and the Remote-SSH extension that provides a local-quality development experience — including full IntelliSense (completions), code navigation, and debugging — regardless of where the code is hosted.
Hardware & Software
You find here a list of hardware and software that you need for this tutorial:
Visual Studio Code (VSCode)
Before I start explaining the source code for the e-ink screen, I include a section for VSCode in this tutorial. As I mentioned, the whole tutorial is for the Raspberry Pi, and I used VSCode with the extension Remote-SSH to write the code. With this extension you can connect to a running SSH server on:
- Full support: x86_64 Debian 8+, Ubuntu 16.04+, CentOS / RHEL 7+.
- Experimental support: ARMv7l (or ARMv8 in 32-bit mode) Raspbian Stretch/9+ (32-bit) in Visual Studio Code Insiders only.
This means, for the Raspberry Pi you need nowadays (surely it changes in the near future) the VSCode Insiders and the Raspberry Pi should have SSH enabled.
The extension allows you to open a remote folder on the Raspberry Pi with a running SSH server and take full advantage of VSCode's feature set. Once connected to a ssh server, you can interact with files and folders anywhere on the remote file system and you get also a terminal directly connected with the remote OS.
Follow these steps to connect to the target board:
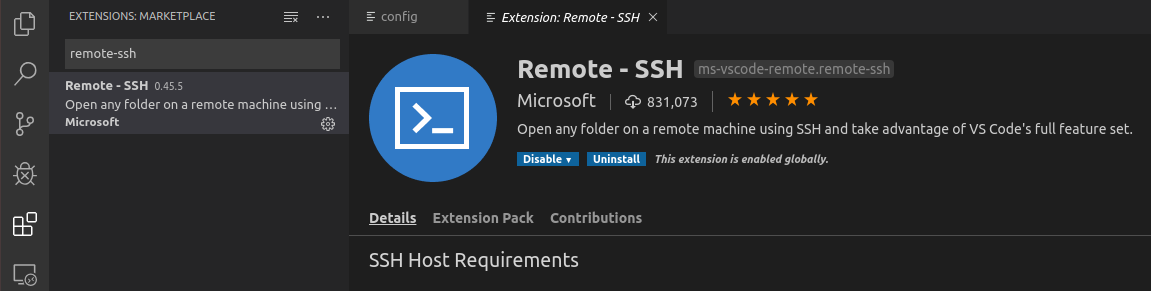
- Install the extension using the extension marketplace tab (see Fig. 2).
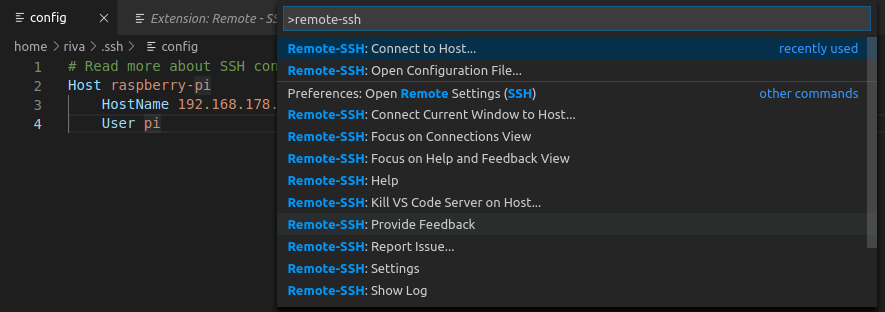
- Open the command palette using
Ctrl+Shift+P(see Fig. 3) and search forRemote-SSH: Open Configuration Fileand select one of the offered options:/home/<user>/ssh/config/etc/ssh/ssh_config
- Configure the connection to the Raspberry Pi (example in Fig. 4) and save the file.
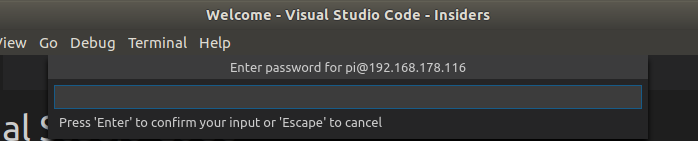
- Open the command palette using
Ctrl+Shift+Pagain, and selectRemote-SSH: Connect to Hostand hit on the name of the connection that you've configured, a new VSCode window will open. - Enter the password in the popup field (see Fig. 5) otherwise you will get an error. The popup field appears usually twice.
- Then, when you go to
File > Open Folderfrom the main menu, you'll get the remote system's files! and you are working and editing locally on remote files. The terminal tab on the lower side of the window is also connected to the Raspberry Pi.
Note that some of the extensions are NOT installed locally on the target! The Python language services (e.g. Jedi) are running remotely on the Raspberry Pi. This means, when I get IntelliSense, I'm getting it remoted from the actual machine I'm coding on (host).![Remote-SSH extension and Marketplace]()
Fig. 2: Installing Remote-SSH extension using the Marketplace ![Remote-SSH to connect to the Raspberry Pi]()
Fig. 3: Configuring the Remote-SSH to connect to the Raspberry Pi ![Example to connect to the Raspberry Pi]()
Fig. 4: Configuration example to connect to the Raspberry Pi ![Password pop-up for remote connection]()
Fig. 5: Password pop-up for remote connection ePaperWidgets
The source code is available on lemariva/ePaperWidgets. There are 3 pre-configured widgets (see Fig. 1):
- News Widget: this reads the latest news from the source that you can defined.
- Forecast Widget: this downloads the weather and forecast (hourly and daily) for the defined location.
- Agenda Widget: this connects to Google Calendar and downloads a defined number of events.
To run the application, you need to follow these steps:
- Connect the E-ink screen to the provided e-Paper HAT and this board to the pin header of the Raspberry Pi, then power up the Raspberry Pi.
On the Raspberry Pi, install the following libraries. For this, you can use the terminal on VSCode:
sudo apt-get install python3-pip -y
sudo apt-get install python-rpi.gpio-dbgsym -y python3-rpi.gpio -y python-rpi.gpio -y python3-rpi.gpio-dbgsym -y python3-spidev -y git -y libopenjp2-7-dev -y libtiff5 -y python3-numpy -y
and the following Python modules:
pip3 install pyowm Pillow==5.3.0 ics feedparser pytz google-api-python-client google-api-python-client google-auth-httplib2 google-auth-oauthlib- Clone the
lemariva/ePaperWidgetsrepository withgit clone https://github.com/lemariva/ePaperWidgets.git. - Get the following API keys:
- -For the News Widget: go to https://newsapi.org/ and get an API key.
- -For the Forecast Widget: go to https://openweathermap.org/api and get an API key.
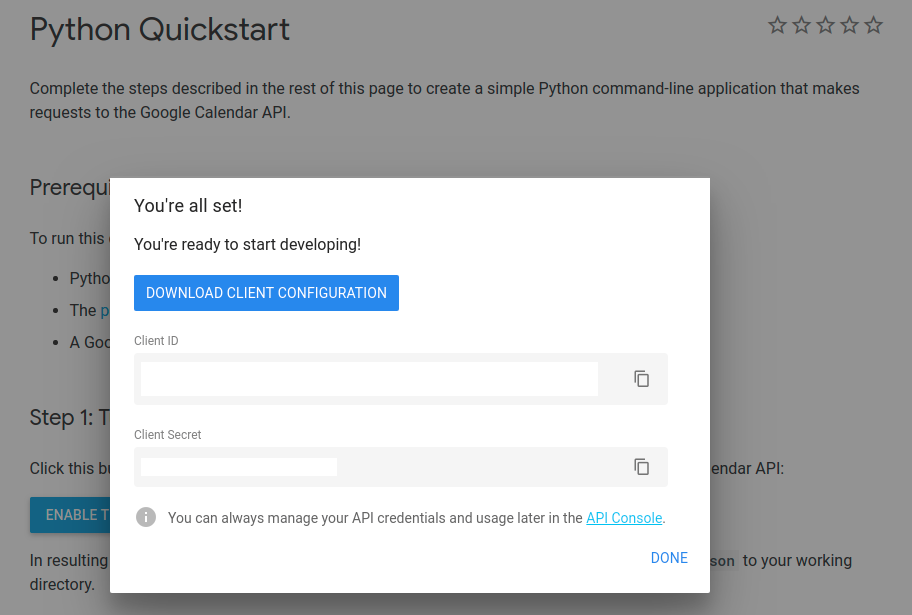
- -For the Agenda Widget: go to https://developers.google.com/calendar/quickstart/python and hit on the button
Enable the Google Calendar API, then hit onDownload Client Configurationand get thecredentials.json. Copy this file in the same folder where the filee_paper_widget.pyis located (improvement in code is still needed ;) ).
- Rename the file
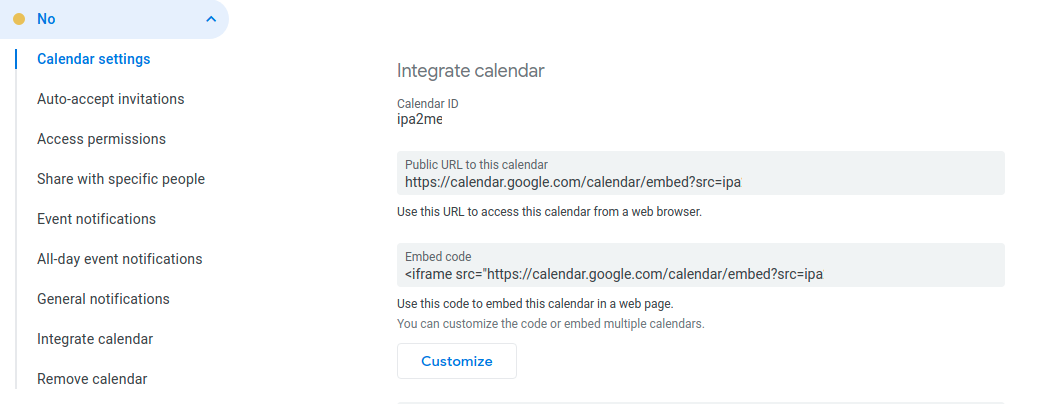
settings.py.sampletosettings.pyand enter the API keys that you obtained in step 4.- -For the Agenda Widget: The setting "primary" reads you primary calendar, but if you want other calendar, you need the unique identified known as "Calendar ID". To get it, go to https://calendar.google.com, make a right click on the calendar name (left column), click on
Settings and Sharing, scroll down toCalendar ID(see Fig. 6) and copy the complete string underCalendar ID(it looks something like thisipa2xa5qmssvp212a112uhfjgoo@group.calendar.google.com).#
- -For the Agenda Widget: The setting "primary" reads you primary calendar, but if you want other calendar, you need the unique identified known as "Calendar ID". To get it, go to https://calendar.google.com, make a right click on the calendar name (left column), click on
- Run the application typing:
python3 e_paper_widget.py
For the Agenda Widget which uses the Google Calendar API, you need the Raspbian with desktop option and a monitor or remote desktop enabled. This is required only once, because for the Google API you need to allow the application to connect to your calendar (I will change this in a future version). The application will attempt to open a new window or tab in your default browser. If this fails, copy the URL from the console and manually open it in your browser on the Raspberry Pi (remote verification doesn't work). If you are not already logged into your Google account, you will be prompted to log in. If you are logged into multiple Google accounts, you will be asked to select one account to use for the authorization. Then, click the Accept button. The application will proceed automatically, and you may close the window/tab.
![Google Calendar API]()
Fig. 5: Google Calendar API - Download Client Configuration ![Getting Calendar ID]()
Fig. 6: Google Calendar: Getting Calendar ID The file Installer-with-debug.sh installs the dependencies and the application almost automatically. I took it from: aceisace/Inky-Calendar and modified it a little bit. It uses
supervisorto run the application as a service. To install ePaperWidgets using that file, type the following on a terminal:bash -c "$(curl -sL https://raw.githubusercontent.com/lemariva/ePaperWidgets/master/Installer-with-debug.sh)"Widgets
The widgets objects are created and "appended" in the main file
e_paper_widget.pyto a python list:forecast_widget = ForecastWidget(language, weather_api_key, units, hours, location) news_widget = NewsWidget(language, news_api_key) agenda_widget = AgendaWidget(calendarId=google_calendar_id) widget_grid = [] widget_grid.append(forecast_widget) widget_grid.append(news_widget) widget_grid.append(agenda_widget)The classes require two methods:
get_data(self): this method is called in order to connect to the service and get the data e.g. forecast, news, events.get_widget_image(self): this method is called to generate and return the widget image. It uses the classUIProcfrom the moduledisplay.image_processing, and the image is generated using Pillow. The generated widget image is then pasted to a bigger image, which is then sent to the e-ink screen.
You need also to define the following attributes:
_widthand_height. These are used to define the size of the widget.The widgets are then refreshed and the images are generated with the following code:
# Refreshing widgets
y_position = 0
for widget in widget_grid:
    widget.get_data()
    tmp_widget_img = widget.get_widget_image()
    uiwriter.paste_img(tmp_widget_img, (0, y_position))
    y_position = y_position + widget._width
Common Errors
If you got something like this:
Connecting to Openweathermap API servers...

__________OWM-ERROR!__________

Reason: Your API subscription level does not allow to perform this operationReason: Invalid API Key provided

Traceback (most recent call last):File "e_paper_widget.py", line 121, [...]
This error is related with the function
owm.daily_forecastand the free and paid version of the OpenWeather API. You can find some differences between them here.Conclusions
ePaperWidgets enables you to use a Raspberry Pi for displaying information on an e-ink screen. Unlike other repositories for e-ink screen, you can easily extend this repository writing new classes that collect and display the information that you want or need.
The e-ink screen is a nice option to display almost "static" information due to its ultra-low power consumption (it only requires power to change the image) and wide viewing angle. However, it flickers about 30 times to remove ghost images (full refresh), thus it takes about 25/30 seconds to update the screen. If you have a version with the red or yellow color, you need to wait for about another 15 flickers (partial refresh - 10 seconds -) that update the color part of the screen (if you display some colors). This is to avoid display burn-in problems as described here.
If you have a Raspberry Pi running e.g. Hass.io. or some home automation software and you want to display some "static" information on a screen, the e-ink screen is a top option. Otherwise, having a Raspberry Pi to update the display is an over-dimensioned solution: You have a ultra-low power consumption display controlled by a Raspberry Pi, which consumes at least 0.7W and doesn't have any sleep function. A combination with an ESP32 to shut down and power up the Raspberry Pi can be a nice option. The Sleepy Pi 2 combines an Arduino (not an ESP32) on a HAT to manage the power of the Raspberry Pi. But, I think it is still an over-dimensioned solution. Thus, as I said, if your Raspberry Pi makes something else and you need a screen, buy the e-ink display and use the code in this article. Otherwise, wait for a next post in which I will use this ESP32 board to control the display.
We use cookies to improve our services. Read more about how we use cookies and how you can refuse them.


")

")


Empty