 03
03
May - 2020Analytics, Cloud Platforms
8 min | 56468#GCP: Data pipeline - from datastore to Google Data Studio
Analytics, Cloud Platforms | 8 min | 56468
Table of contentShowThis tutorial is about exporting data from Google Firestore to Google Data Studio to visualize it; or to import it on Google Colab to analyze it and train a machine learning model.
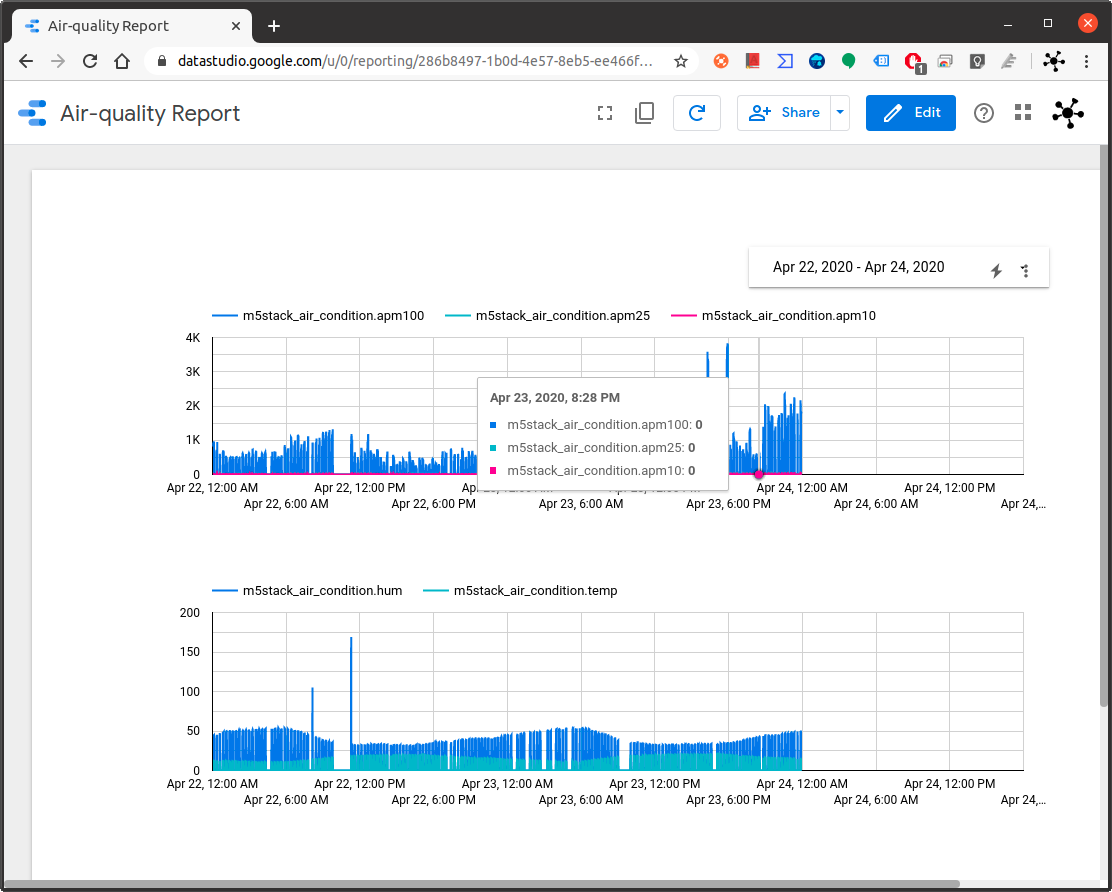
![Data Report]()
Fig. 1: Data diagrams on Google Data Studio This is the third tutorial from the series "implementing real-time data pipelines - from generation to models" and the other tutorials are the following:
- MicroPython: GCP getting air-quality data from an M5Stack ATOM
- GCP: Implementing Real-Time data pipelines - from ingest to datastore
The data is generated using an M5Stack ATOM that collects data from two sensors: a PSMA003 (particle sensor) and a BME680 (gas sensor). Furthermore, a service programmed in Python collects weather information using the OpenMapWeather API. The data is synchronized and saved in Firestore using Apache Beam (second service running in a VM). For more information, please refer to the tutorials linked above.
Software
The following software will be used in this tutorial:
Getting data on Google Data Studio
I've found three ways to connect the Firestore to Google Data Studio. These are the following:
- Community Connector
- Export to Bucket and Import into BigQuery
- Firebase Application
Community Connector
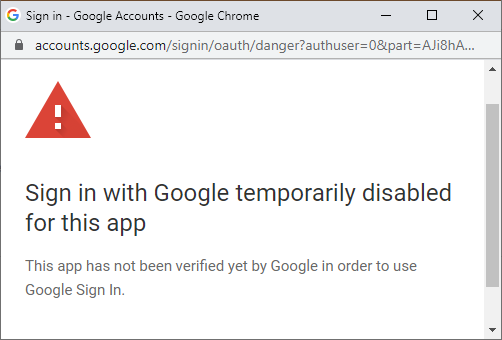
There is a community connector to connect Data Studio to Firestore. However, a bug is affecting the authorization of the Apps Script, which is needed to get access to the Google Cloud Database. You'll get the following error
Sign In with Google Temporarily Disabled for this appif you follow these steps.The bug is affecting every App Script that requires the
https://www.googleapis.com/auth/script.external_requestscope. If your application is already included in the permission list, you won't get any problem. Otherwise, any new deployment will deal with this bug, and thus, it is impossible to run the connector or application as expected. You should star the issue so that you can stay updated about modifications. As I mentioned, every community connector is affected by this bug. :(![Sign-in authorization error]()
Fig. 2: Authorization Bug for the Google App Script. The connector has only support for string, number, boolean, and timestamp. There is no support for nested collections, which can be a problem for our data structure. But, it should work first and it can be then extended. :)
Export to Bucket and Import into BigQuery
This option works "offline", this means, you'll work with the exported data. New data coming to Firestore won't be available on Google Data Studio. To get that, you need to export the datastore and import it again.
Before you export the data to a bucket, you need to create a Google Storage Bucket. The bucket needs to be located in the same region as the Firestore database, which is usually the project location. Otherwise, you cannot export the collections and you'll get this error (my project is located in the
europe-west1region):INVALID_ARGUMENT: Bucket air-data-quality is in location US-EAST1. This project can only operate on buckets spanning location europe-north1 or europe-west1 or eu or europe-west2 or europe-west3 or europe-west4 or europe-west5 or europe-west6 or europe-west8 or europe-west9This export and import option has some limitations: Check these out here, before you start with the next steps. However, these limitations do not affect this project.
Create a Google Storage Bucket
To create a Google Storage Bucket, follow these steps:
- Open the Cloud Storage browser in the Google Cloud Console.
- Click Create a bucket to open the bucket creation form.
- Enter your bucket information and click Continue to complete each step:
- Specify a Name, subject to the bucket name requirements.
- Next, select a Location where the bucket data will be permanently stored. In my case, the project is located in the europe-west1 (Belgium) region, thus, the location should include this region (i.e. Region: europe-west1 (Belgium) or Multi-region).
- Select a Default storage class for the bucket. The default storage class will be assigned by default to all objects uploaded to the bucket (e.g. Standard).
- Select an Access control model to determine how you control access to the bucket's objects (e.g. Fine-grained).
- Optionally, you can add bucket labels, set a retention policy, and choose an encryption method.
- Click Done.
This bucket is not free. In my case, it costs about USD0.01/day. The cost estimate calculator in the right panel helps you to calculate the bucket's monthly costs based on your selected storage class and location, as well as your expected data size and operations. This can be deducted from your free amount, or if you've already used your free budget, you will get an invoice at the end of the month.You can find more information about creating Google Storage Buckets on this link.
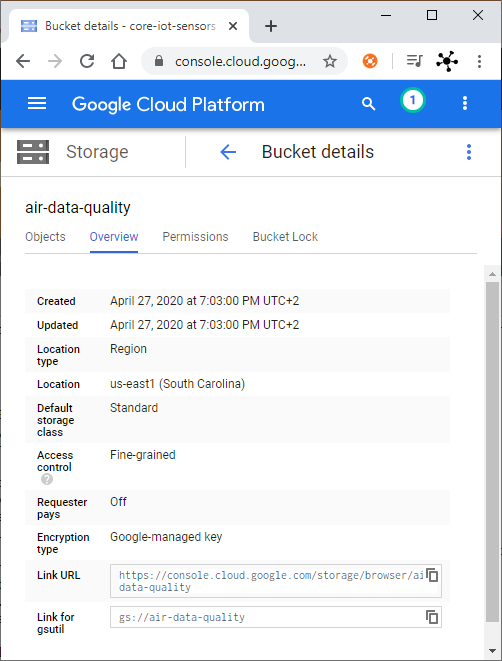
After creating the bucket, go to the details (see Fig. 3) to get the
Link for gsutil. You will need this address to export the data.![bucket_details.PNG]()
Fig. 3: Details of the created Google Storage Bucket. Export data from Firestore
- To export the data, you can use the Google Cloud SDK or the Cloud Shell. If you use the Google Cloud SDK, you need to login to GCP executing the following on a Terminal:
gcloud auth init - Select the correct project:
gcloud config set project [PROJECT_ID] - Use the Firestore export command to export all documents in your database, replace
[BUCKET_NAME](i.e.gs://air-data-quality) with the name of your Cloud Storage bucket.gcloud firestore export gs://[BUCKET_NAME] --asyncIf you want to export a specific collection type the following:
gcloud firestore export gs://[BUCKET_NAME] --collection-ids=[COLLECTION_ID_1],[COLLECTION_ID_2] --asyncThe
--asyncflag makes the export async so that you don't need to wait to get the console back.
To avoid errors like this:Entity "c17ff97fc9a4d80d9e6044f900c23a06c788dd67" was of unexpected kind "iot-air".
while importing the data into BigQuery (following steps), export the data to a bucket using the--collection-ids, which should point to your collection on Firestore (e.g.--collection-ids=iot-air).You can find more information about exporting or importing data to Firestore on this link.
Import data to BigQueryBigQuery is also not free on GCP. It charges for data storage, streaming inserts, and querying data, but loading and exporting data are free of charge. For detailed pricing information, please view this pricing guide.
Once you have the data inside the bucket, you can import it on BigQuery. To do that, follow these steps:
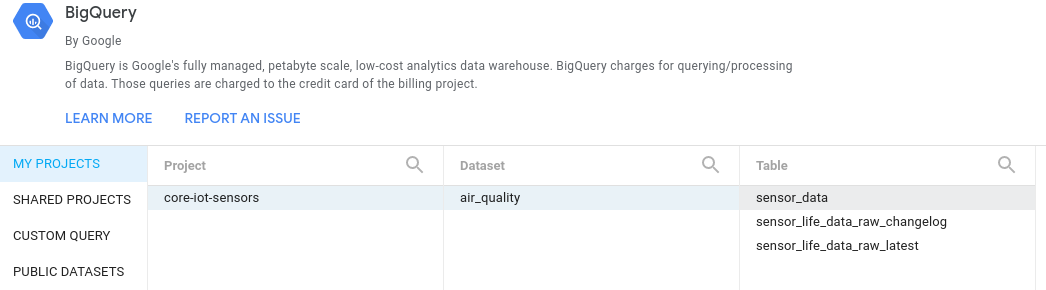
- Open the BigQuery web UI in the Cloud Console.
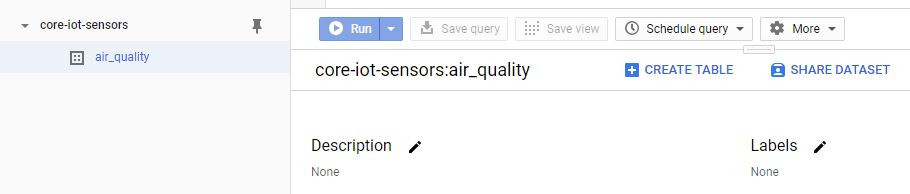
- In the navigation panel, in the Resources section, expand your project and select a dataset. If you don't have any dataset, create one, clicking on Create Dataset on the right (see Fig. 4 - e.g.
air_quality). - Click Create table (see Fig. 5). The process for loading data is the same as the process for creating an empty table.
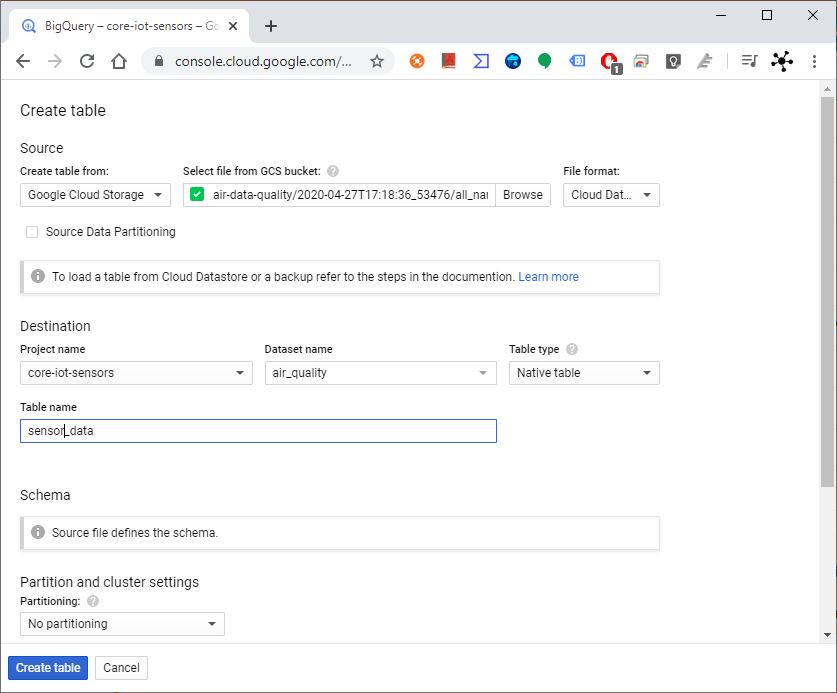
- On the Create table page (see Fig. 6), in the Source section:
- In the source section:
- For Create Table from, select Google Cloud Storage
- and Browse to select the Cloud Storage URI. The URI for your Firestore export file should end with
[KIND_COLLECTION_ID].export_metadatae.gall_namespaces_kind_iot-air.export_metadata. - For File format, select Cloud Datastore Backup. Datastore Backup is the correct option for Firestore. Firestore and Datastore share an export format.
- In the Destination section:
- For Dataset name, choose the appropriate dataset (e.g.
air_quality, created on step 2). - In the Table name field, enter the name of the table you're creating in BigQuery.
- Verify that Table type is set to Native table.
- For Dataset name, choose the appropriate dataset (e.g.
- In the source section:
- In the Schema section, no action is necessary. The schema is inferred for a Firestore export.
- Select applicable items in the Advanced options section. If you are overwriting an existing table, set Write preference to Overwrite table.
Check this link for more information.
![Create a Dataset]()
Fig. 4: Creation of a Dataset.![Create a Table]()
Fig. 5: Creation of a Table.![Import data from the bucket into a table.]()
Fig. 6: Import data from the bucket into a table.![Extension for Firebase]()
Fig. 7: "Firestore BigQuery Export" extension for Firebase.Firebase Application
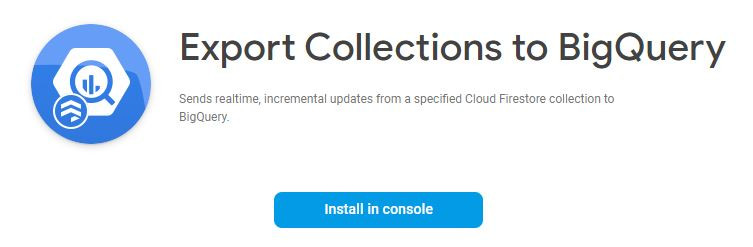
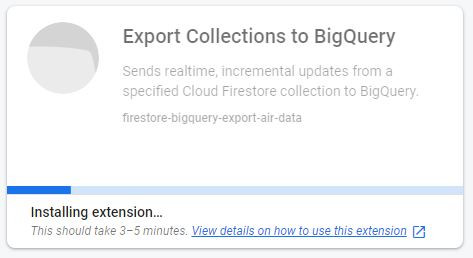
This option uses a Firebase extension to export the documents from a Cloud Firestore collection to BigQuery. The exports are realtime and incremental, so the data in BigQuery is a mirror of your content in the Cloud Firestore. It doesn't work with data already saved in Firestore. However, it could be expensive, if you are over the free limits. Check these using the blaze calculator.
I manage to connect Firestore with BigQuery, but I am still not able to separate the JSON data from an imported field (see Fig. 11) and thus, I cannot display the data on Google Data Studio.You need first to activate Firebase and then install the "Firestore BigQuery Export" extension, by clicking on Install in console on this link (see Fig. 7). If you don't have it, you may need to create a project to install and configure the extension, following these steps:
- Type an Extension instance ID (e.g.
firestore-bigquery-export-air-data) and click Next. - Review the following points:
- APIs enabled and resources created
- billing and usage
- access granted to this extension
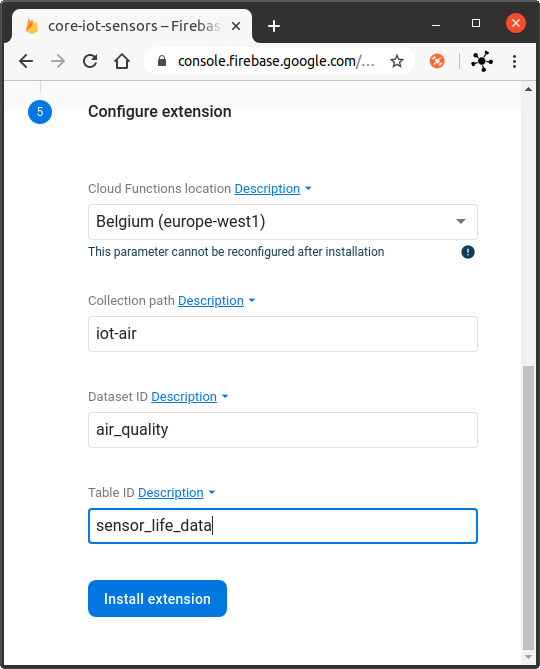
- and finally, Configure the extension (see Fig. 8):
- Select the Cloud Function location (it should be the same, where the Firestore database is located e.g.
Belgium (europe-west1)) - For the Collection path field, enter the name of the collection of Firestore that has the data documents (e.g.
iot-air). - For the Dataset ID field, enter an appropriate dataset name (e.g.
air_quality) - For the Table ID field, define the name of the table that you're creating inside the dataset (e.g.
sensor_life_data).
- Select the Cloud Function location (it should be the same, where the Firestore database is located e.g.
- Click on Install extension and wait. The extension needs about 3-5 minutes to be installed (see Fig. 9).
This extension exports documents in realtime, which means you won't get the data that is already in Firestore. You have to wait until the sensor generates a new payload, and then you can see it in the BigQuery table.
![Configuration of extension]()
Fig. 8: Configuration of the "Firestore BigQuery Export" extension.![Firebase extension - Installing process.]()
Fig. 9: Firebase extension - Installing process.BigQuery
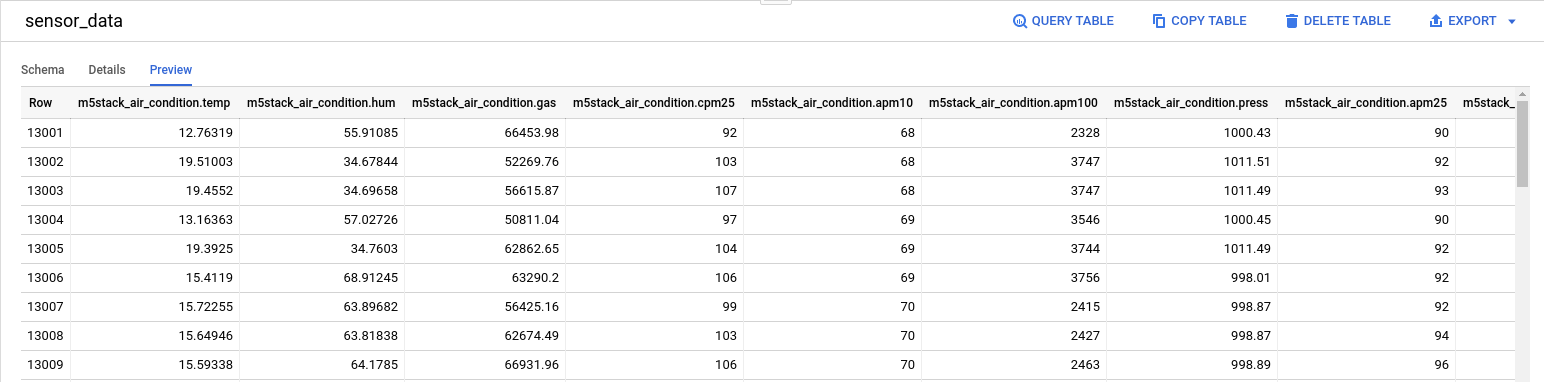
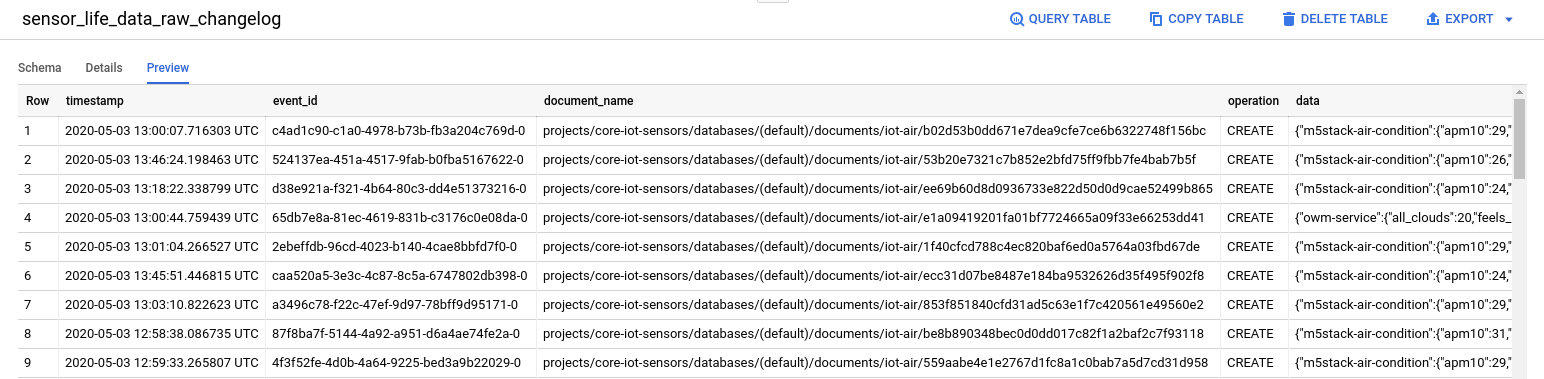
The importing methods result in two different types of tables in BigQuery as shown in Figs. 10 and 11. The data imported from the Google Storage Bucket is easy to display in Google Data Studio. I am still figuring out how to display the data imported from Firebase :(. All sensor data is imported as JSON in the data field (see Fig. 11), and I am still learning how to use the
JSON_EXTRACTfunction. If you have any suggestions, please write a comment, or contact me.![Data preview imported from Google Storage Bucket]()
Fig. 10: Data preview imported from Google Storage Bucket.![Data Obtained from the Firebase connector]()
Fig. 11: Data obtained from the Firebase connector.Google Data Studio
To display the sensor data, we will use Google Data Studio.
- Go to Google Data Studio and click on Blank Report.
- You will be asked to Add data to report, then select BigQuery.
- Select the Data Table (e.g.
sensor_tablein Fig. 13) and click on Add. - A pop-up will be displayed "You are about to add data to this report", click on Add to report.
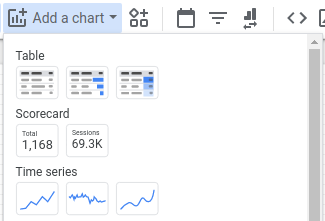
- Once the report is created, click on Add a Chart and on the first option of Time Serie to add a chart.
- Place the Chart in the report. You can modify its dimensions, or position by clicking on it.
- Add the variables, and play a little with the settings on the right panel to display your data. You can get something like in Fig. 1.
![Create a Blank Report]()
Fig. 12: Create a Blank Report.![Connect Google Data Studio with BigQuery]()
Fig. 13: Connect Google Data Studio with BigQuery.![Data Report]()
Fig. 14: Add a Time Series ChartConclusion
This tutorial presents three possible ways to display the data obtained from an M5Stack ATOM in Google Data Studio. Unfortunately, the easiest way to do that is not working due to a reported bug. Combining the other tutorials of this series:
- MicroPython: GCP getting air-quality data from an M5Stack ATOM
- GCP: Implementing Real-Time data pipelines - from ingest to datastore
the data pipeline is right now: from data generation to data displaying. Stay tuned for the next tutorials of this series:
- Export to Collab/JupyterLabs
- Training a prediction mode
We use cookies to improve our services. Read more about how we use cookies and how you can refuse them.


")


Guglielmo 01.27.2021
Hey, Great resources, really well done ! Did you find a way to convert the JSON to table by any chance? I have been trying for a while now without managing to! Thank you very much, have a nice evening.