 15
15
Apr - 2020Analytics, Cloud Platforms, M5Stack
13 min | 54570#GCP: Implementing Real-Time data pipelines - from ingest to datastore
Analytics, Cloud Platforms, M5Stack | 13 min | 54570
Table of contentShowTwo weeks ago, I published a tutorial that explains how to connect an M5Stack running MicroPython to the Google Cloud Platform using the IoT Core, and I did mention that upcoming tutorials will examine the following topics:
- Collecting and synchronizing external data (weather from OpenWeatherMap) and other sensors -window/door status, sneezing detector-.
- Saving the data to a NoSQL database
- Displaying the obtained data on Google Data Studio (check the tutorial).
- Training a prediction mode
This is the second tutorial in the series and it covers both collecting data from other sources (OpenWeatherMap) and saving it to a NoSQL database. I will use a non-conventional way to remain under the "always free tier" limits. However, as a consequence the performance of real-time data streaming will be reduced, which is not problem for this project.
Therefore, this tutorial will try to achieve the following (see Fig. 1):
- Create a VM instance, in which a Docker Engine runs containers (data-pipeline-service, owm-service)
- Create a service to obtain weather data from OpenWeatherMap using Python (owm-service)
- Create a service to subscribe to the Pub/Sub subscriptions to pull data, process and send it to the Firestore database using Apache Beam (data-pipeline-service)
- Build the Docker images using Cloud Build
![Create a service account]()
Fig. 1: Microservice application to check the air-quality running on GCP.The following products from GCP will be used in this tutorial:
I'm going to try to keep the tutorial as compact as possible, which is why I'm going to refer to GCP documentation links to extend the information when needed.
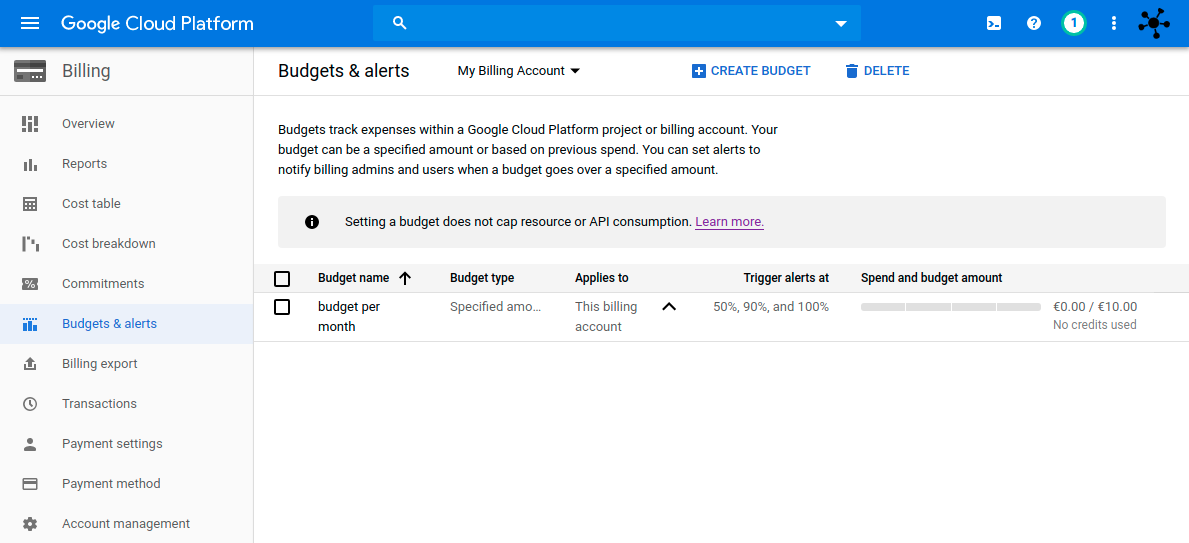
Google offers $300 free credit for new customers to spend on Google Cloud Platform (GCP) products during the first 12 months. If you have already used that, like me, you need to activate billing and you should define a budget limit and cap the API usage. To define a budget:
Go to the GCP console and then to Billing:![Budget limit]()
However, setting a budget does not cap API usage. The purpose of budgets is to allow you to trigger alert notifications so that you know how your spending is trending over time.
You can read more about this here: Set budgets and budget alerts.
Therefore, if you want to set a cap on API usage to prevent incurring costs, you should cap on the API usage using Quotas.Software
The following software will be used in this tutorial:
Create a VM instance
Google offers the f1-micro instance in the "always free tier" with a limitation of 720 hours/month, which means 30 days. This means you can run one instance of this VM machine within your account for free. There are some region limitations and these are the features:
- 1 non-preemptible f1-micro VM instance per month in one of the following US regions:
- -Oregon: us-west1
- -Iowa: us-central1
- -South Carolina: us-east1
- 30 GB-month HDD
- 5 GB-month snapshot storage in the following regions:
- -Oregon: us-west1
- -Iowa: us-central1
- -South Carolina: us-east1
- -Taiwan: asia-east1
- -Belgium: europe-west1
- 1 GB network egress from North America to all-region destinations per month (excluding China and Australia)
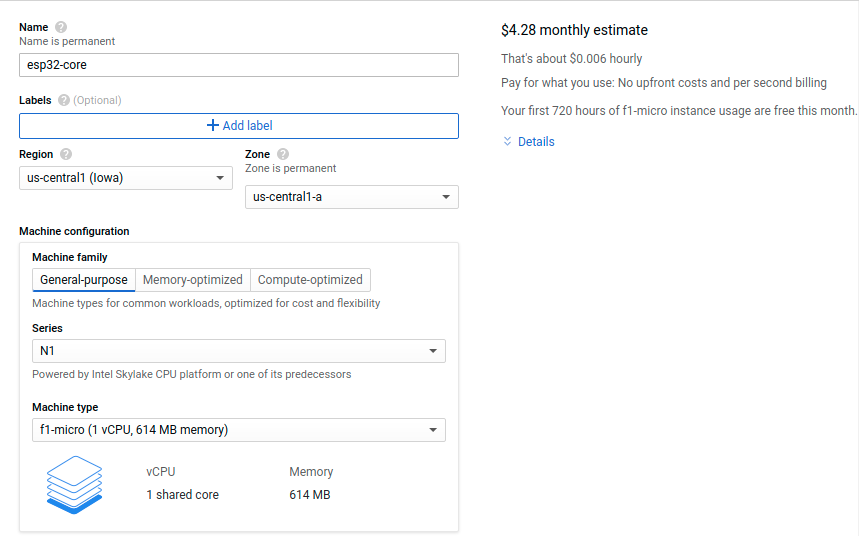
The f1-micro offers 1 virtualized CPU core (with burst capability to help with sudden load spikes) and 614MB of memory. These specs don't sound great, but would they be enough for this project? Let's see!
To create a new VM instance, head on over to the Google Cloud Console and sign up, and then head on over to the Google Compute Engine control panel. Maybe you need to activate the API. Then:
- Click the Create Instance button.
- Configure the VM hardware as described in Fig. 2.
- Region: us-west1, us-central1 or us-east1
- Series: N1
- Machine type: f1-micro (1 vCPU, 614 memory)
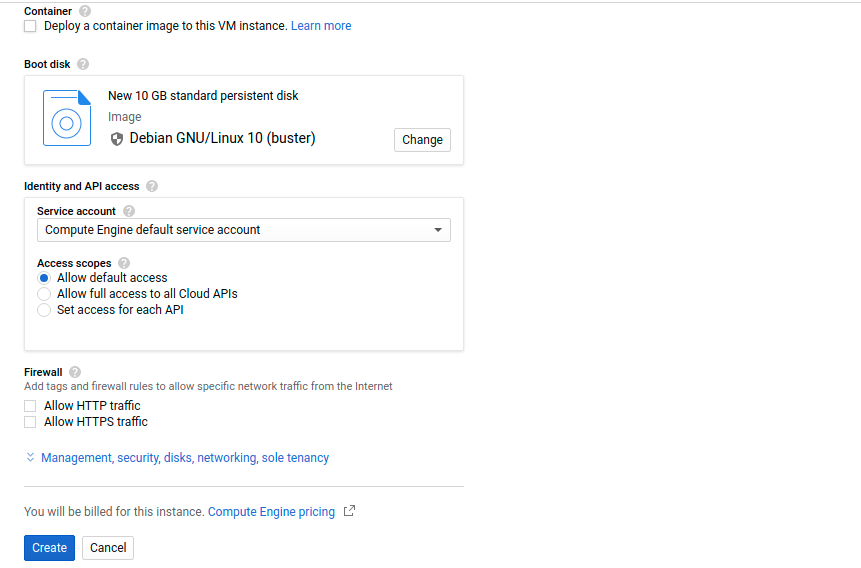
- Configure the VM software and Firewall as described in Fig. 3.
- Boot disk: I choose the last Debian version (v.10 - Buster)
- Firewall: Tick allow HTTP and HTTPS traffic (if you want to reach your VM from the open Internet, this is not necessary).
- Click Create and wait for Google to create your VM instance.
![Create a registry]()
Fig. 2: Configure the VM type.![Create a device]()
Fig. 3: Configure the VM firewall and boot disk.SWAP on VM instance
The f1-micro has only 614MB thus, a swap space is needed. In this tutorial, I add
1Gof swap. If you want to create a bigger swap, replace1Gwith the size of the swap space that you need. But this is more than enough for the containers planned in this project.![docker_gcp_running.jpg]()
Fig. 4: VM f1-micro instance running Connect to the machine using the SSH button shown in Fig. 4 and then, the following steps show how to add a swap space on Debian 10:
- Start by creating a file which will be used for swap:
sudo fallocate -l 1G /swapfile - Only the root user should be able to read and write to the swap file. Issue the command below to set the correct permissions:
sudo chmod 600 /swapfile - Use the
mkswaptool to set up a Linux swap area on the file and activate the swap file by typing:sudo mkswap /swapfile sudo swapon /swapfile - Make the change permanent by opening the
/etc/fstabfile:sudo nano /etc/fstaband adding the following
/swapfile [...](see below) line at the end of the file:# /etc/fstab: static file system information # [...] /swapfile swap swap defaults 0 0 - To verify that the swap is activated, type either the
swapon --showor thefree -hcommand as shown below:lemariva@esp32-core:~$ sudo swapon --show NAME TYPE SIZE USED PRIO /swapfile file 1024M 182.3M -2lemariva@esp32-core:~$ sudo free -h total used free shared buff/cache available Mem: 583Mi 488Mi 42Mi 4.0Mi 52Mi 22Mi Swap: 1.0Gi 370Mi 653Mi
Docker on VM
After allocating the swap space, you need to install the Docker Engine and
docker-composeto deploy the containers. The Docker installation can be easily performed on Debian typing:curl -sSL https://get.docker.com | shThen, add your username to the Docker group using:
sudo usermod -aG docker <username>and
rebootthe VM:sudo rebootAfter installing Docker, you need to install
python3-pipso that you can installdocker-composeas:sudo apt-get update sudo apt-get install python3-pip pip3 install docker-composeOpenWeatherMap (OWM) service
This service makes a GET request to the OpenWeatherMap (OWM) API to get the actual weather, processes the data, and publishes a message to Google Pub/Sub. Therefore, to connect to the services you need:
- an OWM API and
- a key to connect to GCP (service account). Furthermore, you need to create a Subscription to publish the messages.
OWM API key
To get an OWM API key, click here and register. The free plan includes 1000 calls/day with a limitation of 60 calls/min. Because the weather does not change too fast, this limitation is not a problem for this project. However, with the free plan, weather update might take up to two hours. This changes to less than 10 minutes, if you have a professional plan, which costs 470 USD/month. Thus, I stay with the free plan and hope that the weather does not change too fast to make the model training difficult or impossible.
GCP key
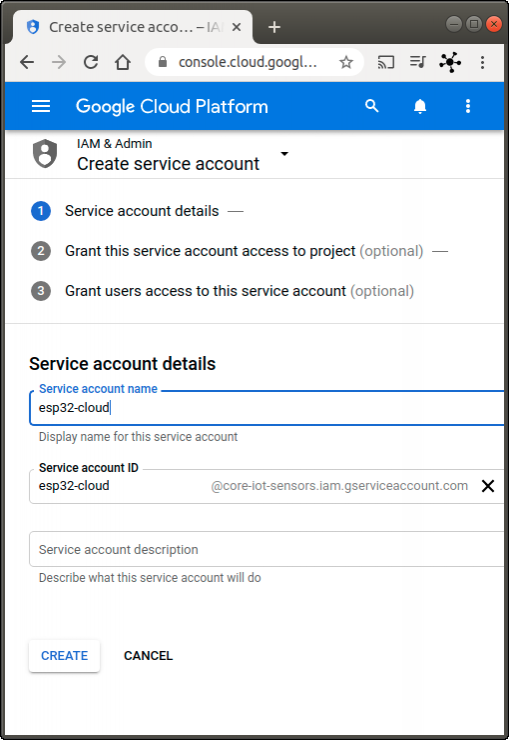
To create a service account to get a JSON key:
- Open the Service Accounts page in the Cloud Console.
- Click Select a project, choose your project, and click Open.
- Click Create Service Account.
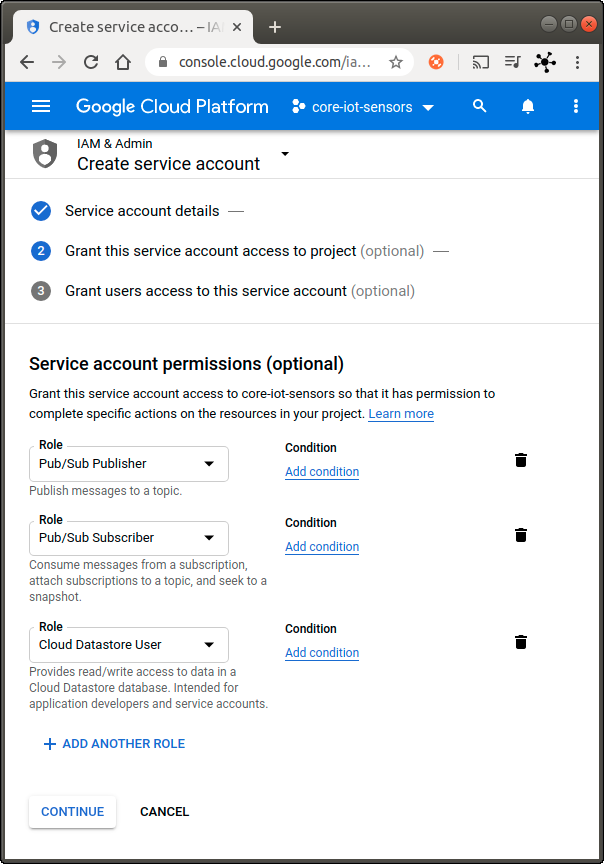
- Enter a service account name (friendly display name) and then click on Create (see Fig. 4).
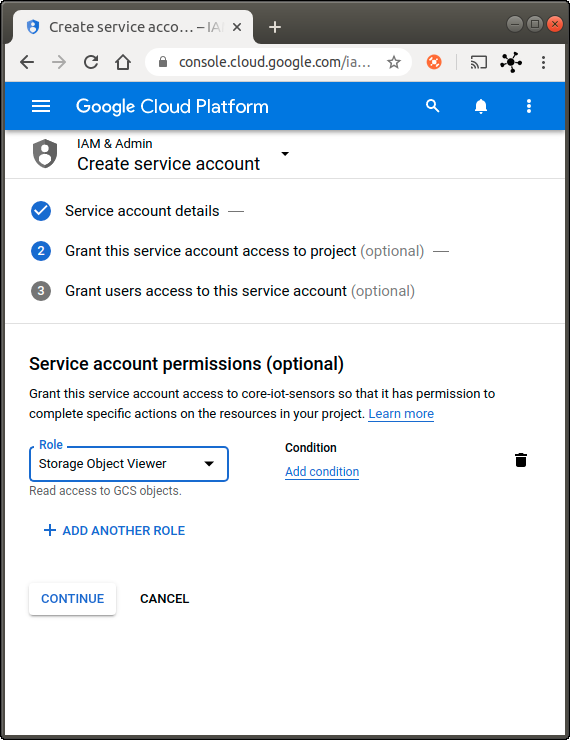
Grant the service account the following permissions (see Fig. 5) and click on Continue:
- Pub/Sub Publisher
- Pub/Sub Subscriber
- Cloud Datastore User
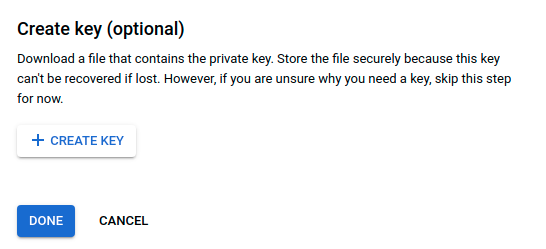
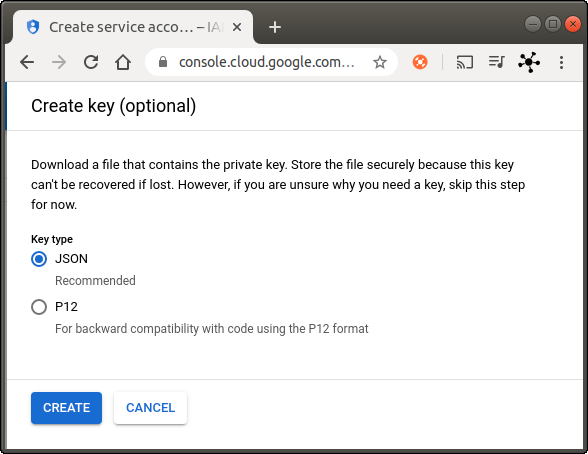
We will use this account to publish messages from the owm-service (Pub/Sub Publisher permission), but also to get data and save it to the datastore (Pub/Sub Subscriber & Cloud Datastore User permissions) on the data-pipeline-service. You can create a different service account for each service. However, to make this tutorial easier, I will create only one service account for both services.- Click on Create Key (see Fig. 5), select JSON on the overlay and click on Create (see Fig. 6).
You can find more information about this topic here.
![Create a service account]()
Fig. 3: Create a service account.![Grant the service account permissions]()
Fig. 4: Grant the service account permissions.![Create a private key]()
Fig. 5: Create a file with the private key.![Download the private key]()
Fig. 6: Download the private key of the service account.Topic and Subscription on Pub/Sub
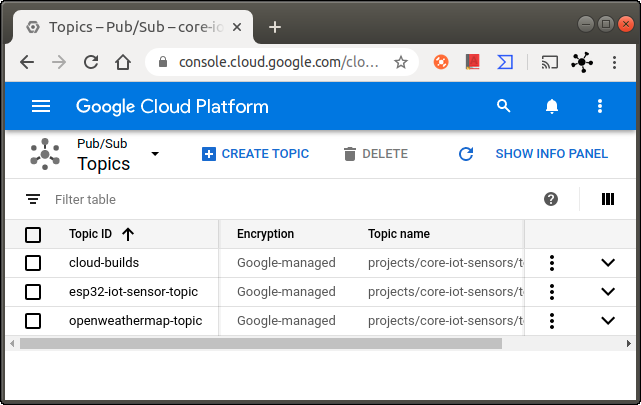
To publish a message, you need to create a topic by following these steps:
- Go to the Pub/Sub topics page in the Cloud Console.
- Click on Create a topic (see Fig. 7).
- In the Topic ID field, provide a unique topic name, for example,
openweathermap-topic. - Click Save
And that's all, you get the topic listed as in Fig. 7.
![Topics on Pub/Sub]()
Fig. 7: Topics on Pub/Sub.Setting up the project
In this subsection, you'll configure the project and set up an environment to upload the Docker files to the GCP to build the image using Cloud Build. You get 120 Build-minutes/day free to build images on GCP. Every extra will cost you USD0.003/minute.
Having said that, you'll need the Google Cloud SDK. To install it, follow the instructions presented here.
To configure the files of this project, I recommend using Visual Studio Code (VSC).
Clone the repository OpenWeatherMap-GCP typing the following:
git clone https://github.com/lemariva/OpenWeatherMap-GCP.gitand open the folder using the menu File > Open Folder on VSC.
Before you upload the files to build the Docker image, you need to set up the service account key. This file will be copied into the container while it is being built. Therefore, rename the file
resources/credentials/service_account.json.exampletoservice_account.jsonand copy the content of the JSON file that you downloaded, while you created the GCP key inside that file. Or just rename the file that you downloaded toservice_account.jsonand copy it intoresources/credentials/. You can also modify the interval, in whichmain.pychecks the weather conditions on OpenWeatherMap. The variable that defines this interval is located in themain.pyfile and is set asLOOP_TIME_SLEEP = 60 * 10, which means every 10 minutes.After finishing the steps above, you need to login to GCP using the SDK typing the following on a Terminal:
gcloud auth loginThis opens a browser, in which you select your Google account and give the SDK permission to access your account. If everything works, you'll see a webpage saying "You are now authenticated with the Google Cloud SDK!"
Then, you can select the project using:
gcloud config set project <<project-name>>and submit the files to build the Docker image typing (inside the OpenWeatherMap-GCP folder):
gcloud builds submit --config cloudbuild.yamlyou'll get something like this:
Creating temporary tarball archive of 12 file(s) totalling 18.6 KiB before compression.
Uploading tarball of [.] to [gs://core-iot-sensors_cloudbuild/source/158[..].tgz]
[...]
FETCHSOURCE
Fetching storage object: gs://core-iot-sensors_cloudbuild/source/158[..].tgz#158[..]
Copying gs://core-iot-sensors_cloudbuild/source/158... / [1 files][  7.9 KiB/  7.9 KiB]
Operation completed over 1 objects/7.9 KiB.
BUILD
Already have image (with digest): gcr.io/cloud-builders/docker
Sending build context to Docker daemon  31.23kB
Step 1/8 : FROM python:3.7-buster
3.7-buster: Pulling from library/python
[...]
DONE
------------------------------------------

ID         CREATE_TIME                DURATION  SOURCE                                               IMAGES                                           STATUS
a97ff1...  2020-04-12T14:10:13+00:00  1M25S     gs://core-iot-sensors_cloudbuild/source/158[..].tgz  gcr.io/core-iot-sensors/owm-service (+1 more)    SUCCESS
As you can see in the log above, building the image took me about 85 seconds.
To check the built images, go to the Container Registry page in the Cloud Console:
Data Pipeline service
This service will subscribe to the Pub/Sub subscriptions, get messages, process, synchronize them, and finally save the results in Firestore. The pipeline is programmed using Apache Beam in Python. This service could also run on Dataflow (e.g. using the DataflowRunner), or you could create a job on Dataflow using the Cloud Console and a template, but a pipeline on Dataflow would cost you about $0.40 and $1.20/hour.
In this project, the pipeline will run on the f1-micro VM instance using Direct Runner, which means locally. This limits the pipeline performance including possible scaling, but as I said before, for this project this is not a big deal. Furthermore, if you need more performance, you can change the runner to DataflowRunner and with minor modification (e.g. service authentication), it should work.
Pub/Sub Subscription (getting the data)
The
apache_beam.io.ReadFromPubSub()function can read messages from topics and subscriptions. As mentioned in the documentation, if you don't use thesubscriptionparameter and provide thetopicparameter, a temporary subscription will be created from the specified topic. However, for the GCP key that we created above, we didn't grant permission to create subscriptions (Pub/Sub Editor). Thus, you will get this error:google.api_core.exceptions.PermissionDenied: 403 User not authorized to perform this action.. Therefore, the service will subscribe to subscriptions.In the tutorial about connecting the M5Stack to Google IoT Core, I included the instructions to create a subscription to the sensor topic. We need to repeat these steps for the owm-service.
To create a subscription, in the Cloud Console, go to the Subscriptions page.
- Go to the Subscriptions page
- Click Create subscription.
- Enter the Subscription ID (e.g.
owm-data). - Choose or create a topic from the drop-down menu (e.g.
openweathermap-topic). The subscription receives messages from the topic. - Click Create.
For more information, check this tutorial.
GCP key
You need to provide a service account key file
service_account.jsoninside the folderresources/credentials/as mentioned in the section above. The permissions needed for this service arePub/Sub SubscriberandCloud Datastore User.Setting up the service
To clone the pipeline service, type the following on a Terminal
git clone https://github.com/lemariva/uPyApacheBeam.gitThe data pipeline reads the data from multiple topics and converts it to a tuple with this form:
(timestamp, dict). Inside the dict structure are the sensor/data values. This enables the service to synch the data using its timestamp (TimestampedValue). To do that, the pipeline usesapache_beam.CoGroupByKey()and a windowing systemapache_beam.WindowInto. This means: If two topics have the same timestamp, they will be combined into Pcollection, which is then converted into an Entity and saved to Firestore; If they don't, they are saved separately into two documents inside the same collection.A saved document under the
iot-aircollection on the Firestore looks like this:m5stack-air-condition apm10: 16 apm100: 693 apm25: 23 cpm10: 16 cpm100: 3 cpm25: 23 gas: 43709.48 hum: 46.62529 press: 1017.51 temp: 22.81116 owm-service all_clouds: 93 feels_like: 15.07 humidity: 42 icon: "04d" id: 804 main: "Clouds" sunrise: 1586579490 sunset: 1586628718 temp: 18.03 visibility: 10000 w_deg: 120 w_speed: 2.6 timestamp: 1586620922In this case, two messages were combined and as you can see, the
device_idwas used as a map (nested node) for the sensor/data values. This is done in theEntityWrapperclass.The data structure described above was/is useful for me to export the data to a bucket and import it on BigQuery for Google Data Studio. If you have better or another idea to process and save the data, feel free to modify the file, leave me a comment, contact me or even send me a Pull Request on Github, etc.After modifying the files, you need to upload and build the image using Cloud Build. Therefore, type the following inside the uPyApacheBeam folder:
gcloud builds submit --config cloudbuild.yaml --timeout 10mand you'll get this:
Creating temporary tarball archive of 12 file(s) totalling 20.7 KiB before compression.
[...]
ID       CREATE_TIME    DURATION  SOURCE             IMAGES            STATUS
83216... 2020-04...     2M12S     gs://core-iot-...  gcr.io/core-...   SUCCESS
The timeout argument is important. For this project, you only need less than 10min to build the containers. However, if you build something bigger, set this parameter to a higher value. The default value is only 10min.
You need to activate the Firestore API. To do that, go to the Cloud Console and then to the Firestore page and select the Native mode. The mode you select (Native mode) will be permanent for the project.
Deploy the microservice application
After creating both Docker images, you can use docker-compose to deploy the micro-service application. But first, you need to give the VM machine access to the Container Registry and set up environment variables for the Docker containers.
GCP key
As you may have already noticed, you'll need a service account to access the Container Registry. To create a service account to get a JSON key, follow the steps described above. This time, just grant the
Storage Object Viewerpermission to the service account as in Fig. 8.![Create service account]()
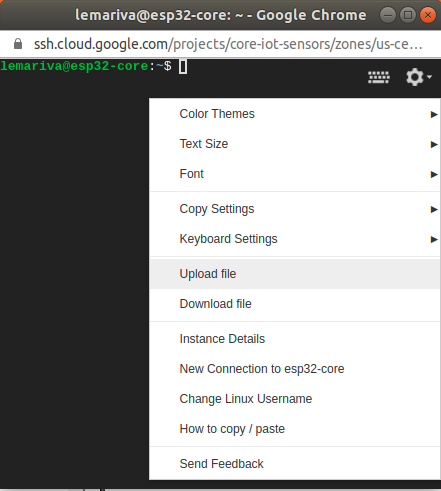
Fig. 8: Create a service account to access to the Container Registry.![Upload files to the VM]()
Fig. 9: Upload files to the f1-micro VM instance.After creating and downloading the key, follow these steps to upload the key to the f1-micro VM:
- Click on the SSH button from the f1-micro VM instance listed on the Google Compute Engine control panel (see Fig. 4).
- Upload the downloaded file clicking on the Gear > Upload file option (see Fig. 9).
- Authenticate to the Container Registry typing the following on the SSH Terminal:
# on Linux
docker login -u _json_key -p "$(cat [FILENAME].json)" https://[[HOSTNAME]]
# on Windows
docker login -u _json_key --password-stdin https://[HOSTNAME] < keyfile.json
Replace
[FILENAME]with the uploaded filename and[HOSTNAME]is gcr.io, us.gcr.io, eu.gcr.io, or asia.gcr.io, according to where your registry is located. You will get something like this:WARNING! Using --password via the CLI is insecure. Use --password-stdin. Login SucceededMore info here. If you prefer a secure way to store your credentials, check the following tutorial.
Setting up the application
You need to modify some files, before running the application:
Rename the file
.env.samplefrom one of the repositories to.envand modify the following variables:PROJ_NAME: your project name on GCPPROJ_TOPIC: the topic that you've chosen for the owm-service (e.g.openweathermap-topic)PROJ_SUBS: the subscription names for both services (owm-service, iot sensor from the M5stack tutorial) separated with a,without any spaces between, e.g.projects/core-iot-sensors/subscriptions/esp32-iot-data,projects/core-iot-sensors/subscriptions/owm-dataPROJ_DBKIND: type a collection name (e.g.iot-air)OWM_API: the OpenWeatherMap APILOCATION: latitude and longitude of your home (separated with a comma without spaces) to get the current weather (e.g.52.33,9.00, you can get it from Google Maps).
Don't use
"to enclose the variable values! This file includes the environment variables that will be used inside the container.- Modify the project name (core-iot-sensors) inside the
docker-compose.ymlto match your GCP project name. - Create a folder e.g. home-air-quality inside the VM using the SSH terminal.
mkdir home-air-quality - Upload the
.envanddocker-compose.ymlto the folder using the Gear > Upload file option (see Fig. 9). If you don't see the .env file (linux), use the right-click on the file browser and activate theShow hidden Filesoption. The files will be uploaded to the$HOMEfolder, therefore you need to move them inside the folder: - Move the files inside the
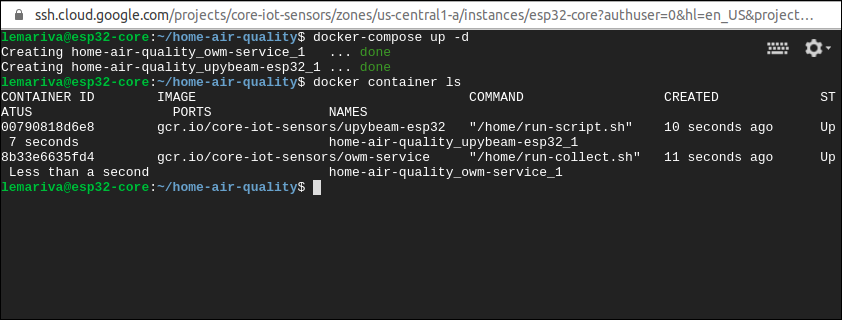
home-air-qualityfolder:cd home-air-quality mv ~/.env . mv ~/docker-compose.yml . - Start the microservice application typing:
docker-compose up -dinside the folder where the
docker-compose.ymlfile is located (see Fig. 10).
![Create service account]()
Fig. 10: Microservice application deployed dettached.![Upload files to the VM]()
Fig. 11: Microservice application deployed in "debugging mode".If you want to stop the application, you have these two options:
- This stops the containers but it doesn't remove anything:
docker-compose stop - This stops the containers, removes them and removes any network connected to them.
docker-compose down
If you stopped the containers and but actually you wanted to remove them, just type:
docker-compose rmThe
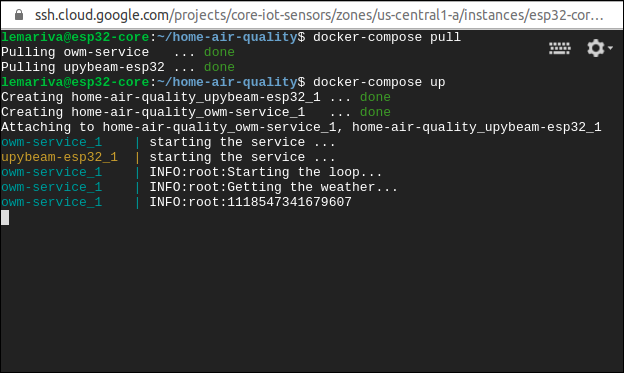
rmordownoption is needed if you've updated the images on the Container Registry. Otherwise,docker-composerestarts the stopped containers. Furthermore, you need to force the pull of the latest image or remove the old Docker images. Otherwise, Docker takes the local images and doesn't download the newest versions. To force a pull of the latest images, just type:docker-compose pullFor debugging purposes, you can skip the detached option
-dand deploy the application using:docker-compose upThis gives you Fig. 11, in which you can see the debugging messages of the application. You can also stop the application pressing Ctrl+C (this doesn't remove the containers).
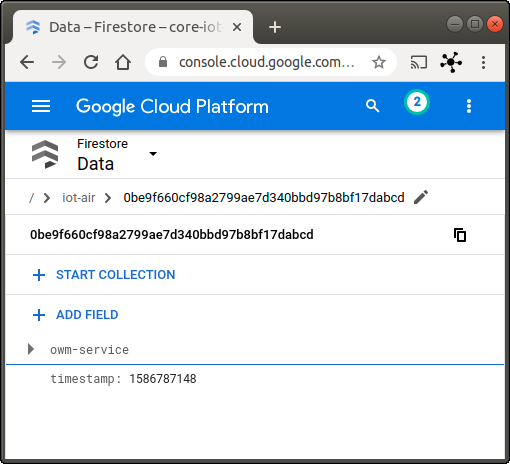
If everything works, you can check the data on the Firestore page in the Cloud Console (see Fig. 12).
![]()
Fig. 12: Firestore acquiring data from the microservice application.Conclusions
This tutorial helps you to create a data pipeline from sensors running MicroPython and other data sources up to databases in the cloud. This is a follow-up from the last tutorial: MicroPython: Google Cloud Platform getting data from an M5Stack ATOM sensing the air-quality.
In this tutorial, you learn how to set up a virtual machine on GCP, install Docker container and run a microservice application to get data from different sources and synch it to save it in a NoSQL database. The following products from GCP were used in this tutorial:The setup can run free using the "always free tier" offered by Google. The next tutorial will be about getting the saved data and displaying it on Google Data Studio!
We use cookies to improve our services. Read more about how we use cookies and how you can refuse them.


")


")

Empty