 06
06
Apr - 2020M5Stack, MicroPython
6 min | 32024#MicroPython: GCP getting air-quality data from an M5Stack ATOM
M5Stack, MicroPython | 6 min | 32024
Table of contentShowSpring in Europe has already started, and many people are having allergy problems. Therefore, I thought of making a project to measure air quality and collect this data to train a model that can tell me, when is the best time to open my apartment windows to let some fresh air into the apartment and thus minimize possible allergy attacks and sneezing! Like almost everyone right now (thanks to COVID-19), I'm working from home and this beautiful photo (Fig. 1) shows the probable causes of allergies.
![]()
Fig. 1: My apartment's courtyard This tutorial is about connecting an M5Stack ATOM running MicroPython to the Google Cloud Platform (GCP) to collect air-quality variables obtained from reading two sensors:
- BME680: a gas sensor that integrates high-linearity and high-accuracy gas, pressure, humidity and temperature sensors.
- PMSA003A: a digital and universal particle concentration sensor, which can be used to obtain the number of suspended particles in the air, i.e. the concentration of particles, and output them to a digital interface.
This tutorial will try to achieve the following points:
- Flash MicroPython on the M5Stack ATOM
- Create an IoT device on GCP and its credentials to connect the M5Stack running MicroPython
- Deploy the code on the M5Stack ATOM using Visual Studio Code
- Run the application to collect data.
The next tutorials will be about:
- Saving the data to a database (check the tutorial)
- Collecting and synchronizing external data (weather from OpenWeatherMap) and other sensors -window/door status, sneezing detector-
- Displaying the obtained data on Google Data Studio (check the tutorial)
- Training a prediction model
The model mentioned in the last point can find a correlation between the following:
- weather vs. dust particles
- weather & dust particles vs. allergy (subjective consideration collecting the data using other sensors: sneezing -audio- or how bad is my allergy today? -touch display-)
Between Sep. and Oct. 2018, I published two tutorials on how to send data to GCP using Zerynth. I used Zerynth because at that time MicroPython didn't support JSON Web Tokens (JWT), and therefore, it wasn't possible to connect to the GCP. But now it is possible! Some months ago, Google published a repo on Github, which has an example of how to connect to the Google IoT Core using JWT. The next tutorial of this series is available here: [GCP: Implementing Real-Time data pipelines - from ingest to datastore](https://lemariva.com/blog/default/default/gcp-firestore-database-m5stack-openweathermap-apachebeam) Hardware and Software
The following hardware and software will be used in this tutorial:
MicroPython on the M5Stack ATOM
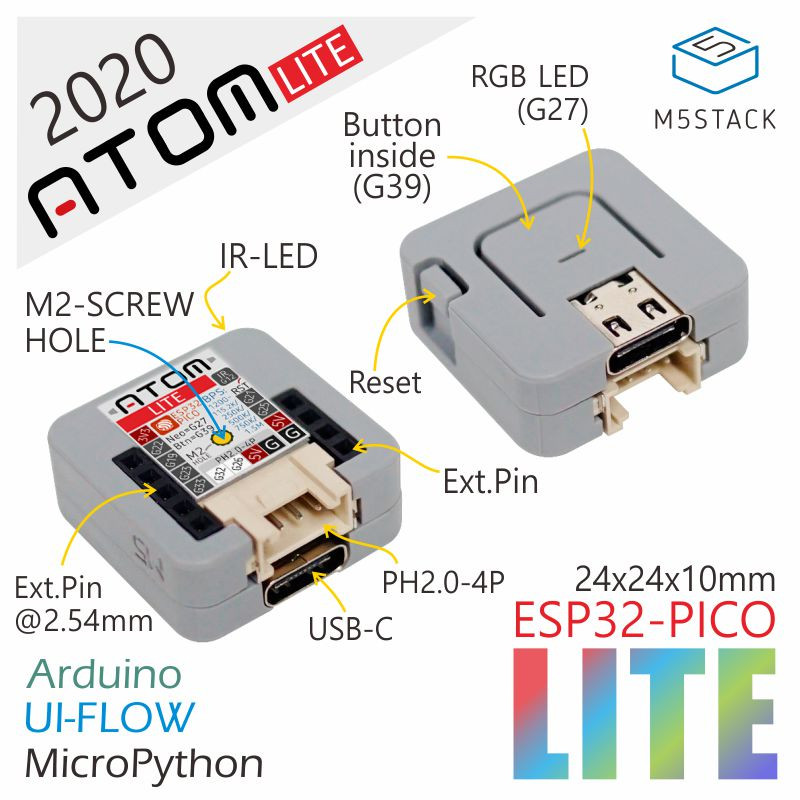
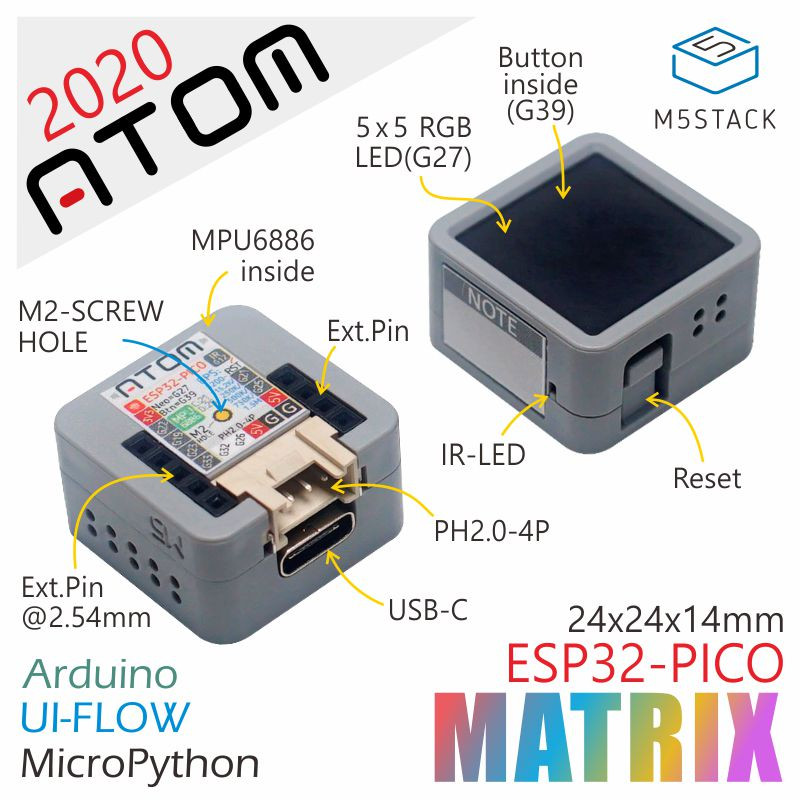
The M5Stack ATOM is the smallest ESP32 development board on the market. It is mainly designed for portable embedded systems and IoT development projects. There are two types of units in the ATOM series. The ATOM Matrix and ATOM Lite (see Fig. 2 a/b).
![ATOM Lite]()
![ATOM Matrix]()
Fig. 2a: ATOM Lite Fig. 2b: ATOM Matrix The MCU is the ESP-PICO chip. The ATOM Matrix has everything you need if your project requires a LED display. It comes with these features:
- USB Type-C
- ESP32 PICO-based
- 4 MByte flash
- 1 Programmable button
- 5x5 RGB LED matrix panel
- Infra-red LED
- Reset button
- 2.4G SMD Antenna: Proant 440
- MPU6886 Inertial Sensor
- 6x GPIO (Dupont Pins)
- 4Pin PH2.0 interface
- Product Size:24x24x14mm
- Product weight:1g
The ATOM Matrix and ATOM Lite can be currently programmed using Arduino, Micropython, Visuino, and UIFlow (a Web-based IoT programming system developed by M5Stack). In this article, I will use MicroPython. Therefore, to flash MicroPython on the ESP32 follow this tutorial: Tutorial: Getting Started with MicroPython on ESP32, M5Stack, and ESP8266.
M5Stack ATOM and Sensor connections
The M5Stack ATOM collects the air-quality using two sensors. The BME680 is connected via I2C and the PMSA003A uses the serial interface (UART1). Therefore, you need to connect the sensors to the M5Stack as described in the following tables. If you want to change the pin settings, check the file
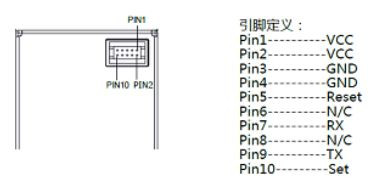
config.py.M5Stack ATOM BME680 3.3VVCCGNDGNDG22SCLG19SDAM5Stack ATOM PMSA003A 5VVCCGNDGNDG25SETG21RSTG23RXG33TXA connector description of the PMSA003A is shown in Fig. 3 or its datasheet. Check the pin order, it is not the normal way to describe it!
![pin_pmsa003a.JPG]()
Fig. 3: Connector description of the PMSA003A. Google Cloud Platform: Connecting the M5Stack and sending the data
This part of the tutorial is divided into three sections. Basically, the first section describes how to setup GCP, the second explains how to send data to GCP and the last section is about how to read the sent data.
Setup
Follow these steps to configure your GCP:
- Go to the GCP and if you haven't done it yet, start the free trial.
- Go to the Cloud Resource Manager and create a New Project e.g.
core-iot-sensors. - Go to the Cloud Console and if your project is not selected, select it using the dropdown selector.
Google IoT Core
To connect to the Google IoT Core:
- You need to create a public/private keypair typing the following on a Terminal:
openssl genrsa -out rsa_private.pem 2048 openssl rsa -in rsa_private.pem -pubout -out rsa_public.pem - Then, create a registry and device in the GCP, as described in the Cloud IoT Core documentation, using the keys from the previous step. I added some screenshots to help you to do this:
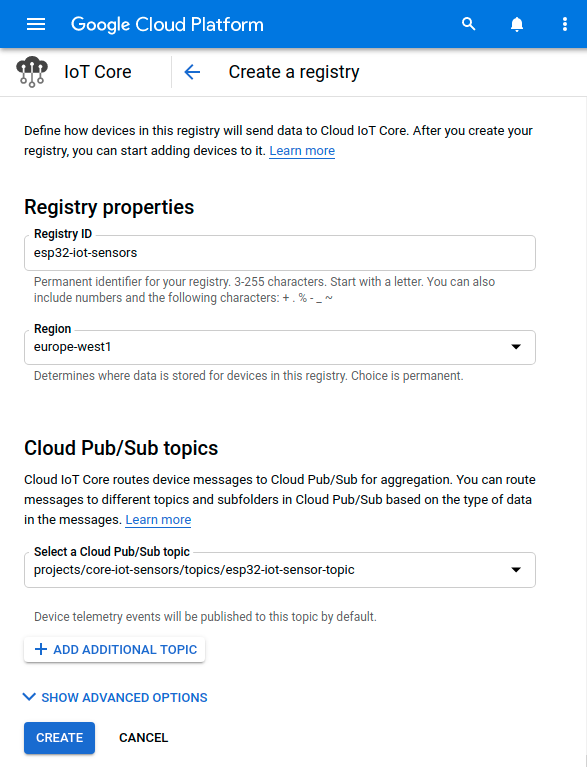
- Fig. 4: Create a registry (e.g.
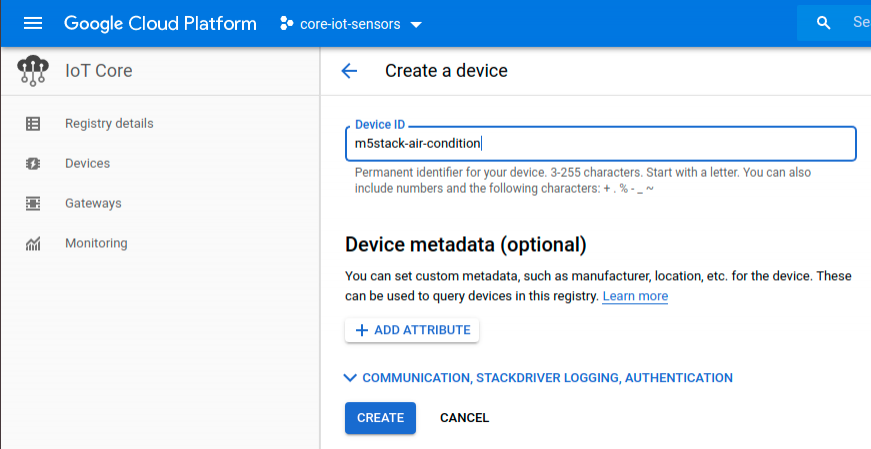
esp32-iot-sensors). This allows you to group devices and set properties to all the sensors inside it. - Fig. 5: Create a device (e.g.:
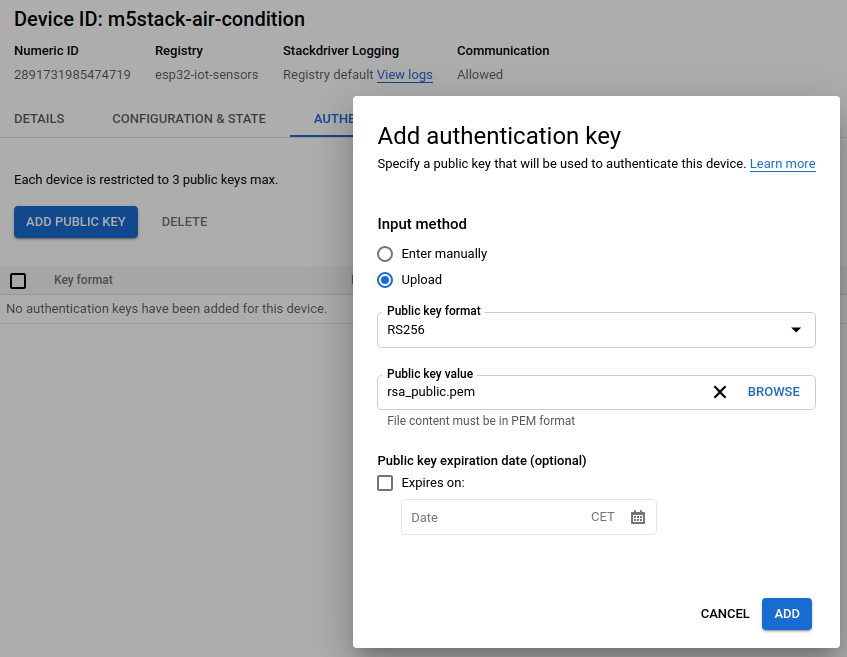
m5stack-air-condition) - Fig. 6: Upload the public key (from step 1.)
- Fig. 4: Create a registry (e.g.
- Using
pipinstall thersapackage. This is needed to translate the RSA key for the device configuration.pip install rsa - Clone the lemariva/uPyIoT repository typing:
git clone https://github.com/lemariva/uPyIoT.git - Copy the files
rsa_private.pemandrsa_public.pem(from step 1.) into the folderuPyIoT - Rename the file
config.py.exampletoconfig.pyand translate the RSA key typing the following:cp config.py.example config.py python utils/decode_rsa.py >> config.py ...You need to be inside the
uPyIoTfolder to execute the code above. Update
config.pyto use the key you appended to the file (jwt_config['private_key']) and set also the Google Cloud Configuration section (google_cloud_config) of the file based on the device and registry you set up in step 2. It should look like this:google_cloud_config = { 'project_id':'core-iot-sensors', 'cloud_region':'europe-west1', 'registry_id':'esp32-iot-sensors', 'device_id':'m5stack-air-condition', 'mqtt_bridge_hostname':'mqtt.googleapis.com', 'mqtt_bridge_port':8883 } jwt_config = { 'algorithm':'RS256', 'token_ttl': 43200, #12 hours # Use utiles/decode_rsa.py to decode private pem to pkcs1. 'private_key':(205325754945..............) }- Configure also your wi-fi credentials:
wifi_config = { 'ssid':'', 'password':'' } - Upload the code to the M5Stack ATOM, using e.g. VSCode and PyMakr extension and have fun! If you need help, check this tutorial: MicroPython: Visual Studio Code (VSCode) as IDE.
![Create a registry]()
Fig. 4: Create a registry in GCP.![Create a device]()
Fig. 5: Create a device in GCP.![Upload the public key]()
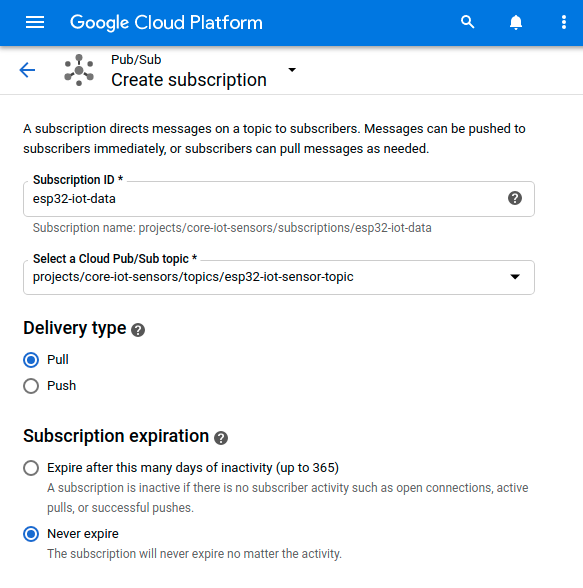
Fig. 6: Upload the Public key to the device configuration.![Create a Pub/Sub subscription]()
Fig. 7: Create a Pub/Sub subscription to the sensor topic.Subscription
To see the published messages, you need to subscribe to the topic. You can use the
Pub/SubAPI.To achieve that:
- Click on the Navigator Menu and scroll down to
Pub/Suband then activate the API (see Fig. 7). - Click on the listed topic, e.g.
projects/core-iot-sensors/topics/esp32-iot-sensor-topic. - Click on the
Create Subscriptionbutton. - Type a name for the subscription e.g.
esp32-iot-dataand select the optionpullfor theDelivery Type. - Click on the
Createbutton.
Google IoT Core: Reading the data
To see if everything is working, you can pull the data from the created subscription. To do that, you need to install or unzip the Google Cloud SDK. You can get the SDK here. After installing it or unzipping it, you can type the following on a terminal or command prompt (On Windows, be sure that the Environment Variables are set correctly):
- Log in to the Cloud, and select the API project typing:
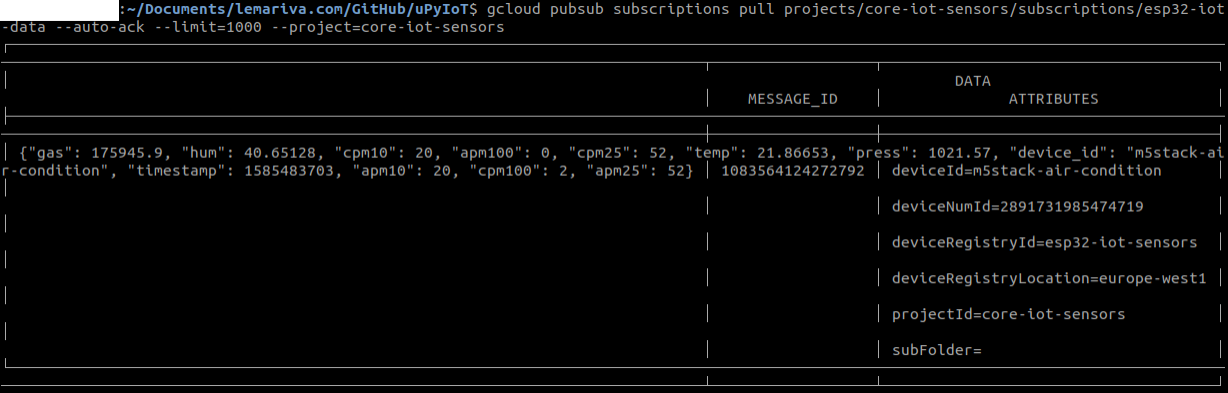
gcloud init - Read the subscription
esp32-iot-datadata typing:gcloud pubsub subscriptions pull projects/core-iot-sensors/subscriptions/esp32-iot-data --auto-ack --limit=1000 --project=core-iot-sensors
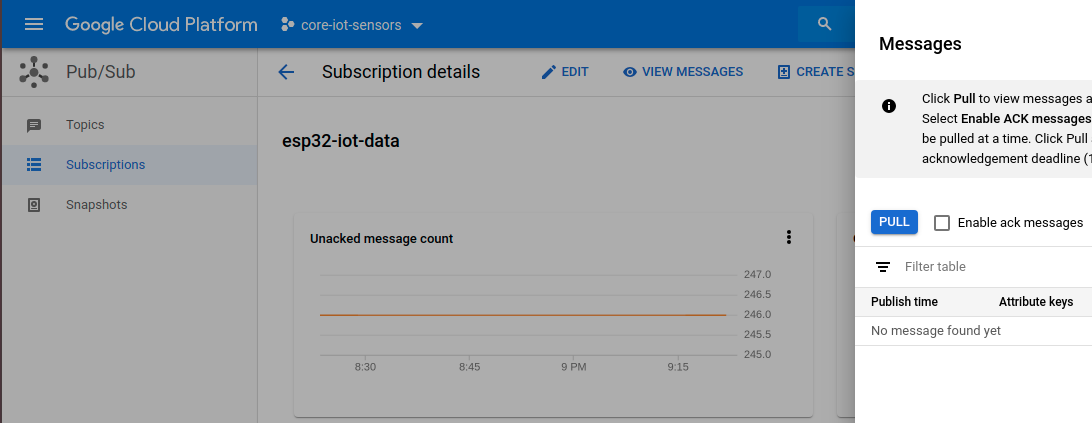
Or you can go to Google Cloud Console, select the project and go to
Pub/Sub > Subscriptionsand click onView Messagesas described in Fig. 9. Then, click onPullto get data.![Google Cloud SDK]()
Fig. 8: Reading subscription data using the Google Cloud SDK.![Google Cloud Console]()
Fig. 9: Reading subscription data using the Google Cloud Console.Conclusions
This tutorial allows you to connect an M5Stack ATOM running MicroPython to the Google Cloud Platform (GCP) to collect air-quality variables obtained from reading two sensors: a BME680 and a PMSA003A. Therefore, the data sent to GCP is the following:
- Temperature
- Humidity
- Index for Air Quality
- Particle concentration (PM1.0, PM2.5 and PM10)
The following tutorials will be about:
- Saving the data to a database
- Collecting and synchronizing external data (weather from OpenWeatherMap) and other sensors -window/door status, sneezing detector-
- Displaying the obtained data on Google Data Studio
- Training a prediction model
Stay tuned!
We use cookies to improve our services. Read more about how we use cookies and how you can refuse them.


")


Empty