") 13
13
Apr - 2019Home Automation, Raspberry Pi
5 min | 36903#Raspberry Pi: Xiaomi Sensors & Home Assistant (Hass.io)
Home Automation, Raspberry Pi | 5 min | 36903
Table of contentShowLast week, I published an article about using Xiaomi sensors without a Xiaomi Gateway. The gateway/hub can be replaced with a Raspberry Pi and a USB-ZigBee dongle. You find the instructions here: #ZigBee: Xiaomi Sensors using Raspberry Pi (without Gateway!).
As you can read in that article, two repositories are available to connect and process the data from the Xiaomi sensors. Additionally, Zigbee2mqtt can be connected to Hass.io. Well, I didn't want to use HassOS (the OS on which hass.io runs), but I wanted to use Hass.io running on Raspbian, otherwise with Home Assistant running as an application, the add-ons were not available as in Hass.io (Docker based) and I didn't get the possibility to run the hassio-zigbee2mqtt official container.
The following command doesn't help:
docker run -d --name="home-assistant" -v /home/pi/homeassistant:/config -v /etc/localtime:/etc/localtime:ro --net=host homeassistant/raspberrypi3-homeassistantbecause it deploys a container in which the Home Assistant application runs, but the Hass.io functionabilities are not available.
Then, I looked for the Hass.io installation scripts and I found a way to run Hass.io on Raspbian (if you are a Home Assistant expert and you know the right name for "this type of running" of Home Assistant, please leave me a comment).
This is what I will try to accomplish in this tutorial:
- Install Docker on Raspberry PI
- Install/Deploy Hass.io on Raspbian
- Install the Mosquito broker and the zigbee2mqtt add-ons
- Pair all the Xiaomi devices
This article is outdated! A new version has been published: Installing Docker
First, if you've not install Docker, you need to type and run the following:
curl -sSL https://get.docker.com | sh
sudo usermod -aG docker pi
After executing the
usermodline, reboot the Raspberry to get thepiuser added to thedockergroup. Otherwise, you need to always usesudoevery time that you use thedockercommand.More information about Docker on embedded systems is available here.Home Assistant dockerized (Hass.io on Raspbian)
The following deploys Home Assistant dockerized. Actually, it creates a service that deploys the
hassio-supervisorcontainer, which then pulls and runs theraspberrypi3-homeassistantcontainer.sudo apt-get update sudo apt-get install -y apparmor-utils apt-transport-https avahi-daemon ca-certificates curl dbus jq network-manager socat software-properties-common # older versions wget "https://raw.githubusercontent.com/home-assistant/hassio-installer/master/hassio_install.sh" chmod +x hassio_install.sh sudo ./hassio_install.sh -m raspberrypi3 # newer repository (from 2020 onwards) curl -Lo installer.sh https://raw.githubusercontent.com/home-assistant/supervised-installer/master/installer.sh bash installer.sh --machine raspberrypi3The first container launched is, as I mentioned,
armhf-hassio-supervisor. This pulls and deploys theraspberrypi3-homeassistantcontainer (because of the option-m raspberrypi3).You can also deploy Portainer.io to see how the containers run:
docker volume create portainer_data
docker run -d -p 9000:9000 --restart unless-stopped -v /var/run/docker.sock:/var/run/docker.sock -v portainer_data:/data portainer/portainer
If you need to update the Hass.io version, just type the following on a terminal/console:
sudo docker pull homeassistant/raspberrypi3-homeassistant:latest
systemctl start hassio-supervisor.service
sudo reboot
If it does not work, you need to kill the running homeassistant container. To do that, list the running containers using
docker psand look for the CONTAINER ID of the container with IMAGE name "homeassistant/raspberrypi3-homeassistant", then typedocker kill <<the container id/hash>>. Then, reboot the system. If you've installed Portainer.io, just select the container and click on the Kill button.Installing Zigbee2mqtt
After running the
hassio_install.shfile, you can access Home Assistant pointing tohttp://<ip-address>:8123. Home Assistant will ask you to set up a username and password as usual.Then, follow these steps to pair the Xiaomi sensors:
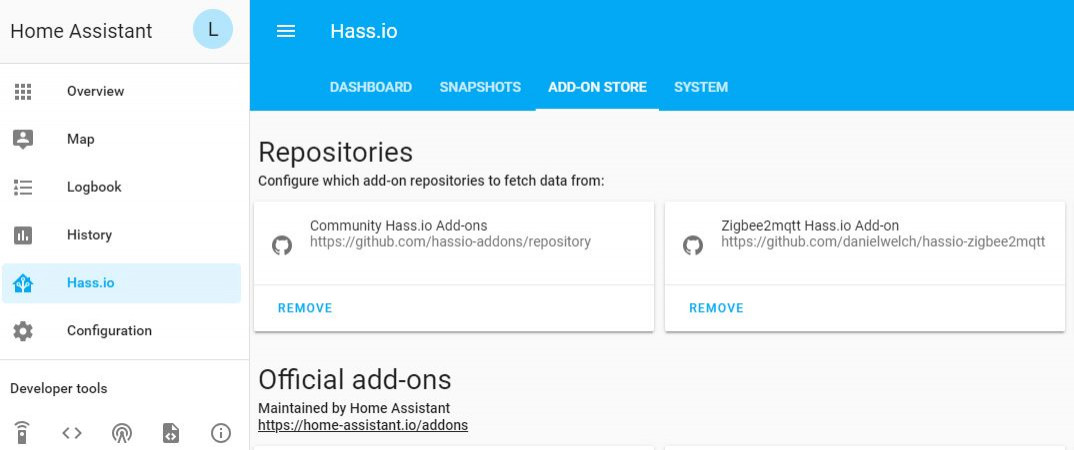
- Go to
hass.ioand add thehttps://github.com/danielwelch/hassio-zigbee2mqttas repository (see Fig. 1). - Look for the
Mosquitto brokeradd-on and install it. - Set the configuration to the following (I added login credentials to the MQTT broker. Alternative, you can set
anonymoustotrue) and start the add-on:{ "logins": [ { "username":"yourusername", "password":"yourpassword" } ], "anonymous": false, "customize": { "active": false, "folder": "mosquitto" }, "certfile": "fullchain.pem", "keyfile": "privkey.pem", "require_certificate": false } - Then, look for the
zigbee2mqttadd-on and install it (see Fig. 2). - Set the configuration (add the login credentials - more options are available here) to the following and start the add-on (the default options have an error, the password key should be
passwordand notpass!):{ "data_path": "/share/zigbee2mqtt", "devices": "devices.yaml", "groups": "groups.yaml", "homeassistant": true, "permit_join": false, "mqtt": { "base_topic": "zigbee2mqtt", "server": "mqtt://<ip-address>:1883", "user": "yourusername", "password": "yourpassword" }, [...]You need to have the USB-ZigBee dongle connected before you start the add-on. The
permit_joinoption should be set totrueto pair the ZigBee sensors. Once you joined all devices, setpermit_jointofalsefor security reasons. Every time you change a setting, you need to restart the add-on. - Go to
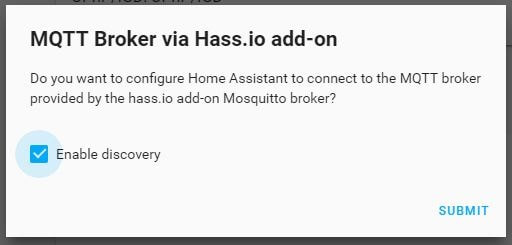
Configuration->Integrations, and configure the MQTT add-on selecting theEnable discoveryoption (see Fig. 3). - Press the
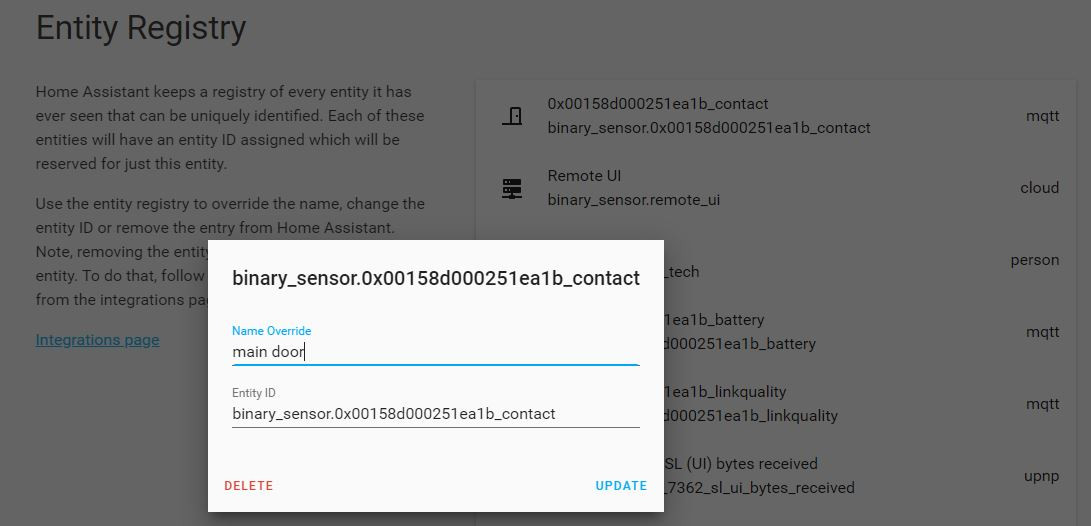
link/resetbutton on the Xiaomi sensors to pair and discover them. - Once a device is discovered, you can change the
device_idwith a friendly name using the web interface: Go toConfiguration->Entity Registryto do that (see Fig. 4). - The sensors should be available on the
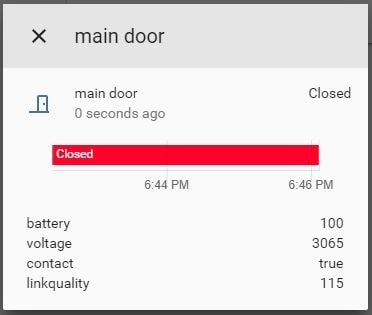
Overviewpage as in Fig. 5. - Once you joined all devices, do not forget to set the
permit_joinvariable tofalse! and restart the add-on.
If you want to stop everything, you need to type the following:
sudo systemctl stop hassio-supervisor.serviceThis stops the
armhf-hassio-supervisorcontainer and then you can stop all the other running containers. Otherwise, the containers will start automatically after you stop them.To start the service again, type the following:
sudo systemctl start hassio-supervisor.service![hass_io-min.JPG]()
Fig. 1: Hass.io running on Raspbian ![zigbee2mqtt-min.JPG]()
Fig. 2: zigbee2mqtt: installation dialog ![mqtt_configuration-min.JPG]()
Fig. 3: MQTT configuration: Enable discovery mode option ![rename_sensor-min.JPG]()
Fig. 4: Entity Registry: Changing the Entity IDwith a friendly name![main_door_status-min.JPG]()
Fig. 5: Overview page: Checking sensor status from the web interface Additional information and credits
- https://github.com/danielwelch/hassio-zigbee2mqtt
- https://www.zigbee2mqtt.io/integration/home_assistant.html
Conclusions
This is an extension to the #ZigBee: Xiaomi Sensors using Raspberry Pi (without Gateway!) article. In this article, I integrate the Xiaomi sensors to Home Assistant without any Xiaomi gateway, cloud or smartphone application. There is also no need to install HassOS, and it was possible to run Hass.io on Raspbian. If you are curious and you want to see how many containers are running, check Fig. 6!
![running_containers-min.JPG]()
Fig. 6: Portainer: Overview of the running Docker containers
We use cookies to improve our services. Read more about how we use cookies and how you can refuse them.
")


")

")
")


Empty