") 08
08
May - 2018Analytics
9 min | 23974Table of contentShowDocker is a technology that emerged for about 5 years and since then it has simplified the packaging, distribution, installation and execution of (complex) applications. Usually applications consist of many components that need to be installed and configured. Installing all needed dependencies and configuring them correctly is usually time consuming and frustrating for users, developers and administrators. Here is where Docker comes to simplify this process allowing developers and users to package these applications into containers.
A container image is lightweight, stand-alone, executable packages of a piece of software that includes everything needed to run it: code, runtime, system tools, system libraries, settings. Let me say something before I continue: Docker is not only for application developers, if you are a "normal" user you are going to love it too.
All data needed or used in this tutorial is located on GitHub.
Installing Docker & Portainer
There are many tutorials that help you install Docker on your PC. The Docker documentation helps you to install Docker on Windows, Ubuntu and MacOS. On the Windows installation you can choose to use Windows containers or Linux containers. I preferred Linux containers, because its technology is more mature and better supported than Windows containers.
Then, you should install Portainer. Portainer is a management UI which allows you to easily manage your different Docker environments. Portainer has a demo instance that you can try out (login with the username
adminand the passwordtryportainer).Update 2020.11:portainer/portaineris the home of Portainer v1.24.x, and is now deprecated; all new releases for Portainer 2.0 will be published inportainer/portainer-ce.After installing Docker, to install Portainer in a Linux system you need to type the following:
docker volume create portainer_data
docker run -d -p 9000:9000 --restart unless-stopped -v /var/run/docker.sock:/var/run/docker.sock -v portainer_data:/data portainer/portainer-ce
For Windows, you need to read this tutorial.Docker Hub & Data Science
After having installed Docker and Portainer, your next step is to look to Docker Hub. You can find some interesting images there. If you are doing some data science, you have to look the following links: Jupyter images or Tensorflow images. If you have a Nvidia graphic card on your PC, don't forget to pull the image with GPU support (only Linux -install nvidia-docker-, Windows 10 does not support GPU because Hyper-V does not support GPU passthrough on this Windows version. Windows Server 2016 should support it -click here for more info).
How Docker works?
The Docker documentation is a great start point to learn how Docker works.
![Docker Architecture]()
Fig 1: Docker Architecture. Source: Docker. The following is a summary of the Docker architecture taken from the Docker documentation:
- Docker uses a client-server architecture.
- The Docker client (docker) talks to the Docker daemon, which does the heavy lifting of building, running, and distributing your Docker containers. The Docker client is the primary way that many Docker users interact with Docker.
- The Docker daemon (dockerd) listens for Docker API requests and manages Docker objects such as images, containers, networks, and volumes.
- A Docker registry stores Docker images. When you use the docker pull or docker run commands, the required images are pulled from your configured registry. When you use the docker push command, your image is pushed to your configured registry. Docker Hub and Docker Cloud are public registries that anyone can use, and Docker is configured to look for images on Docker Hub by default.
- A Docker image is a read-only template with instructions for creating a Docker container.
- A Docker container is a runnable instance of an image. You can create, start, stop, move, or delete a container using the Docker API or CLI. You can connect a container to one or more networks, attach storage to it, or even create a new image based on its current state.
- A Docker volume is the preferred mechanism for persisting data generated by and used by Docker containers.
Docker on Embedded Systems
After this very short introduction on Docker, I'll be focusing this tutorial on "Docker on Embedded Systems". I'll take the Raspberry Pi B+ and the Beagleboard X15 as example systems, and I will show you, that if you use Docker on these systems, you'll lose very little performance but you win portability, scalability and security. You will also find information about latency using Docker (Standard vs. Preempt-RT patched Kernel Performance and Latency). I will deploy Portainer to manage the Docker environment, and test the performance using the N-Queens Problem. The two systems are arm processors, and while the Raspberry Pi is a arm64 architecture, the Beagleboard X15 is arm32.
Connect to the Embedded System using SSH, and just type the following on the terminal to install Docker:
curl -sSL https://get.docker.com | shand wait. Then, if you would like to use Docker as a non-root user, you should consider adding your user to the "docker" group with something like:
sudo usermod -aG docker piYou need to know, that adding a user to the "docker" group will grant the ability to run containers which can be used to obtain root privileges on the docker host. That's why you can avoid the last command if you have concerns about security, and you need to type
sudoevery time that you want to do something with docker.Portainer on Embedded Systems
Then, to install Portainer type the following (*):
docker volume create portainer_data
docker run -d -p 9000:9000 --restart unless-stopped -v /var/run/docker.sock:/var/run/docker.sock -v portainer_data:/data portainer/portainer
The first line creates a volume for the Portainer data and the second one run the Portainer container. If the Portainer image is not available locally, Docker pulls the image from the Docker Hub. The option
-dmakes the container to run in "detached" mode, in the background. The option-pconnects the port 9000 of the container to the 9000 "external" port. The option--restart unless-stoppedis a restart policy, and in this caseunless-stoppedmeans "restart the container unless it is explicitly stopped or Docker itself is stopped or restarted". The first-v /var/run/docker.sock:/var/run/docker.sock, it’s the unix socket the Docker daemon listens on by default and it can be used to communicate with the daemon from within a container, and the second-v portainer_data:/data portainer/portainerlinks the created volumeportainer_datawith the folder/data portainer/portainerinside the container. That means, if something inside the container writes a file on that folder, the data is written on the volume. If you kill the container, remove it, and then pull it and run it again, your data is not lost.*Note ()**: add
sudoat the beginning, if you have problems with permissions.![Portainer Interface Login]()
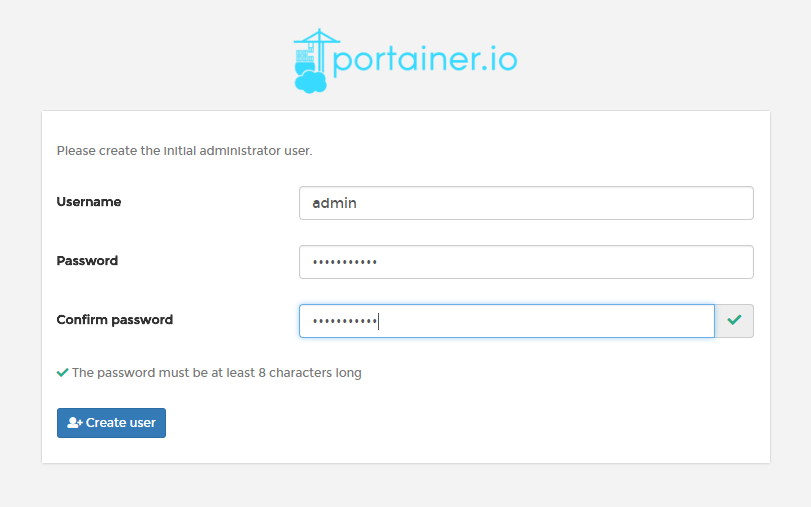
Fig. 2: Portainer login interface. If everything works, you should see the Portainer interface on
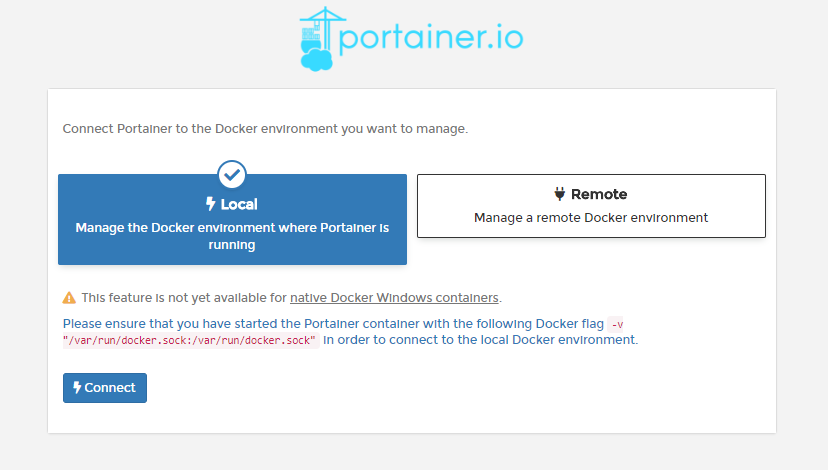
http://<ip-device-address>:9000. The first time that you run the container, you need to define your username and password (see Fig. 2). This data is saved "permanent" on theportainer_datavolume. If you want to reset them, you need to stop the container, remove it, then remove the volume and create it again. After clicking onCreate User, you need to connect to the Docker environment. Fig. 3 shows the configuration interface, you need to select local, and click onConnect.![Portainer Configuration Interface]()
Fig. 3: Portainer configuration interface. After that, you can manage your Docker environment on the Raspberry Pi using Portainer
Build Docker images
In this section I'll building the images for the performance tests. I need to install Python 3.5 and the flask and tqdm libraries.
Docker & DNS Troubleshooting
Docker uses Google DNS to get the packages to build the images. In some organizations outside DNS servers are blocked. To get it working under Linux, you need to add your company DNS servers to the following file
/etc/default/docker:DOCKER_OPTS="--dns <your_dns_server_1> --dns <your_dns_server_2>"and then restart the Docker service typing:
sudo service docker restartUsually adding the DNS servers in the file
/etc/resolv.confasnameserver <your_dns_server_1> nameserver <your_dns_server_2>helps too.
Raspberry Pi Dockerfile
For Raspberry Pi, I use the resin image as base for my image in which I add ssh support and Python 3.5 with the needed dependencies to run the N-Queens Problem test bench. The
Dockerfileinside the folderraspberry-pi-n-queensresults as follows:FROM resin/armv7hf-debian:stretch # enable building ARM container on x86 machinery on the web (comment out next line if built on Raspberry) RUN [ "cross-build-start" ] # labeling LABEL maintainer="lemariva@gmail.com" \ version="V0.0.1.0" \ description="Docker Application | Raspbian:Stretch" # environment variables ENV LEMARIVA_APPLICATION_VERSION 0.0.1.0 #install SSH & do users RUN apt-get update \ && apt-get install -y openssh-server \ && echo 'root:root' | chpasswd \ && sed -i 's/#PermitRootLogin prohibit-password/PermitRootLogin yes/' /etc/ssh/sshd_config \ && sed 's@session\s*required\s*pam_loginuid.so@session optional pam_loginuid.so@g' -i /etc/pam.d/sshd \ && mkdir /var/run/sshd #install python & dependencies RUN apt-get install -y screen python3 python3-dev python3-pip python3-setuptools\ && rm -rf /var/lib/apt/lists/* #install python libraries RUN python3 -m pip install pip --upgrade \ && python3 -m pip install wheel --upgrade \ && python3 -m pip install tqdm --upgrade \ && python3 -m pip install Flask --upgrade #SSH Port EXPOSE 22 CMD ["/usr/sbin/sshd", "-D"] # set STOPSGINAL STOPSIGNAL SIGTERM # stop processing ARM emulation (comment out next line if built on Raspberry) RUN [ "cross-build-end" ]Beagleboard X15 Dockerfile
For "cross building" the image for the Beagleboard, you need to copy the
binfolder containing the needed files to make cross-docker-build. Check the repository for these files. TheDockerfileinside the folderbeagleboard-x15-n-queensresults as:#use fixed ubuntu version FROM arm32v7/debian:stretch # stop processing ARM emulation (comment out next two lines if built on X15) COPY bin/ /usr/bin/ RUN [ "cross-build-start" ] #labeling LABEL maintainer="lemariva@gmail.com" \ version="V0.0.1.0" \ description="Docker Application | Debian:Stretch" #environment variables ENV LEMARIVA_APPLICATION_VERSION 0.0.1.0 #install SSH & do users RUN apt-get update \ && apt-get install -y openssh-server \ && echo 'root:root' | chpasswd \ && sed -i 's/#PermitRootLogin prohibit-password/PermitRootLogin yes/' /etc/ssh/sshd_config \ && sed 's@session\s*required\s*pam_loginuid.so@session optional pam_loginuid.so@g' -i /etc/pam.d/sshd \ && mkdir /var/run/sshd #install python & dependencies RUN apt-get install -y screen python3 python3-dev python3-pip python3-setuptools\ && rm -rf /var/lib/apt/lists/* #install python libraries RUN python3 -m pip install pip --upgrade \ && python3 -m pip install wheel --upgrade \ && python3 -m pip install tqdm --upgrade \ && python3 -m pip install Flask --upgrade #SSH Port EXPOSE 22 CMD ["/usr/sbin/sshd", "-D"] # set STOPSGINAL STOPSIGNAL SIGTERM # stop processing ARM emulation (comment out next line if built on X15) RUN [ "cross-build-end" ]Create image
Running the Docker builder as:
docker build beagleboard-x15-n-queens -t n-queens-problem-x15
# or
docker build raspberry-pi-n-queens -t n-queens-problem-rpi
generates the images with tags
n-queens-problem-x15andn-queens-problem-rpirespectively. You can create an User on Docker Hub to push these images. To do that, you need to login first typing:docker loginThe Docker client asks you your username and password for the Docker Hub. After that, you can push the image. To do that, you need to create a repository on Docker Hub, and you need to tag your local image with the name of the repository. For example, If I create the repository
lemariva/n-queens-problem-rpi, then I need to rename/retag my local image tolemariva/n-queens-problem-rpi, in my case:# docker tag SOURCE_IMAGE[:TAG] TARGET_IMAGE[:TAG] docker tag n-queens-problem-rpi lemariva/n-queens-problem-rpiThen, you can push the image to the Docker Hub repository as:
docker push lemariva/n-queens-problem-rpiIf you want to download the image, type the following:
docker pull lemariva/n-queens-problem-rpior run try to run the container.
Running Docker Containers
To run the Docker containers just type the following:
docker run -d -p 23:22 --privileged lemariva/n-queens-problem-rpi:latest
# or
docker run -d -p 23:22 --privileged lemariva/n-queens-problem-x15:latest
The containers will run in detached configuration (
-d), the SSH access will be available on port number 23 (-p 23:22) and the running will be in--privilegedway, which means the Docker will enable access to all devices on the host as well as set some configuration in AppArmor or SELinux to allow the container nearly all the same access to the host as processes running outside containers on the host. More info: Docker blog.Latency Results
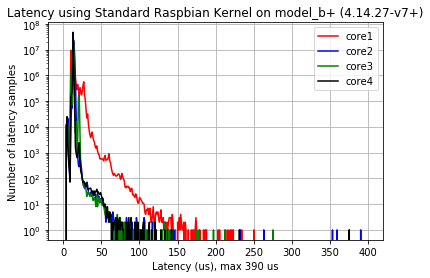
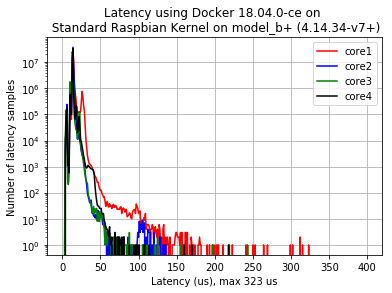
I repeat the latency tests using Docker version 18.0.4ce on host Raspbian kernel 4.14.34-v7+ on the Raspberry v3 B+, the results are the following:
![Standard Raspbian Kernel on Pi 3 B+]()
![Latency on Docker running on Standard Raspbian Kernel on Pi 3 B+]()
Fig. 4 (a): Latency Using Standard
Raspbian Kernel (4.14.27-v7+).Fig. 4(b): Latency Using Docker 18.04.0-ce
running on Standard Raspbian Kernel (4.14.34-v7+).I was not expecting these results. The maximal latency is reduced using Docker from 390us to 323us. If you are interested in the latency results between Preempt-RT vs. Standard Raspbian kernel you have to see this post.
Performance Tests
Raspberry Pi
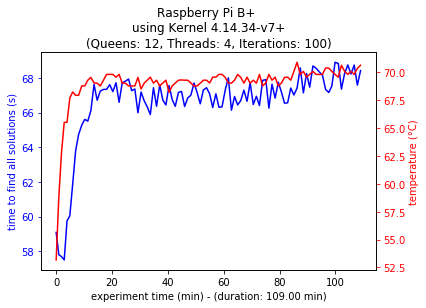
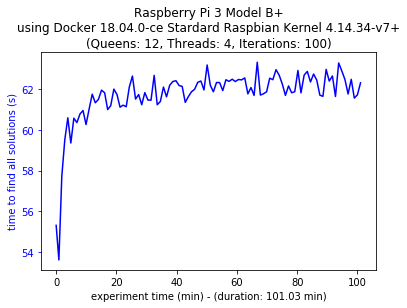
I used the N-Queens Problem to test the performance of the Docker containers. In the Docker container I did not measure the temperature of the Raspberry B+.
![Model B+ Multi-thread Configuration]()
![Model B+ Multi-thread Configuration on Docker]()
Fig. 5a: Multi-thread Configuration on Model B+ Fig. 5b: Multi-thread Configuration on Model B+ on Docker The results show that the calculation of N-Queen problem solutions is 7,31% faster for 100 iterations (101.03 min vs. 109.00 min) using the Docker container (I wasn't expecting that either!). The ambient temperature was almost constant over the experiments.
If you are interested in a performance comparison between Raspberry v3 B and B+ with Preempt-RT and Standard Kernels, you should read the following article.
Beagleboard X15
![Beagleboard X15 Multi-thread Configuration]()
![Beagleboard X15 Multi-thread Configuration on Docker]()
Fig. 6a: Multi-thread Configuration on Beagleboard X15 Fig. 6b: Multi-thread Configuration on
Beagleboard X15 using DockerThe results show that the calculation of N-Queen problem solutions is 6,74% faster for 100 iterations (104.15 min vs. 111.68 min) using the Docker container. The ambient temperature was almost constant over the experiments.
Conclusions
Using Docker for applications does not reduce the performance of the embedded systems (Docker improves it? - No, I think it was only a multi-thread Python application. More testing is needed!). Additionally, it does not increase the Latency of the Kernel. Docker allows you to create micro services that can be distributed and scaled faster without any performance loss.
We use cookies to improve our services. Read more about how we use cookies and how you can refuse them.
")


")

")
")


Empty