 05
05
Jun - 2020M5Stack, MicroPython
5 min | 24248#M5Stack: Introducing the brand new M5Stack ATOM Echo using MicroPython
M5Stack, MicroPython | 5 min | 24248
Table of contentShowLast week, I've received a brand new M5Stack ATOM Echo parallel to the market launch (see Fig. 1). You might already know the M5Stack company. They make robust and open-source development kits with stackable modules. The kits allow you to make rapid and high-quality prototypes.
Today, the M5Stack launches the ATOM Echo. Check out this video, and see how it works with MicroPython:
M5Stack ATOM Echo
M5Stack ATOM Echo is a tiny programmable smart speaker and is part of the M5Stack ATOM series with a size of only 24 x 24 x 17mm (ABS case) and a weight of 10g, and it includes the following:
- SiP - Espressif Systems ESP32-PICO (240MHz dual-core, Wi-Fi & BLE 4.0, Flash 4MB)
- Audio:
- 0.5W Speaker / Amplifier NS4168 I2S
- SPM1423 PDM Microphone
- Expansion:
- 6 GPIO (Dupont Pins) - (4 connected to the mic/amplifier - not usable)
- GROVE/4 Pins - PH2.0 interface (2 I/Os, 5V and GND)
- USB-C
- 1x SK6812 LED
- 1x Infra-red LED
- 1x programmable button (G39 pin)
- 1x reset button
The factory default firmware is a Bluetooth speaker, which uses the A2DP protocol to transmit audio data(call reception is not supported). After power on, the red LED is displayed. When the connection with a Bluetooth device is established, the LED turns green and sounds can be output from the M5Stack ATOM Echo. The LED turns red when the device disconnects. The firmware is compiled on the ESP-IDF platform.
The speaker can be programmed with either the ESP-IDF framework or the Arduino IDE. It is also compatible with MicroPython, like every ESP32 device. However, neither the official nor the M5Stack MicroPython versions support I2S by default. Therefore, you need to extend the version and compile it by following the instructions from the next section. But, first, let's take a final look at the M5Stack ATOM Echo!
![M5Stack ATOM Echo]()
Fig. 1: Hardware description.![M5Stack ATOM Echo]()
Fig. 2: M5Stack size comparison.![M5Stack ATOM Echo]()
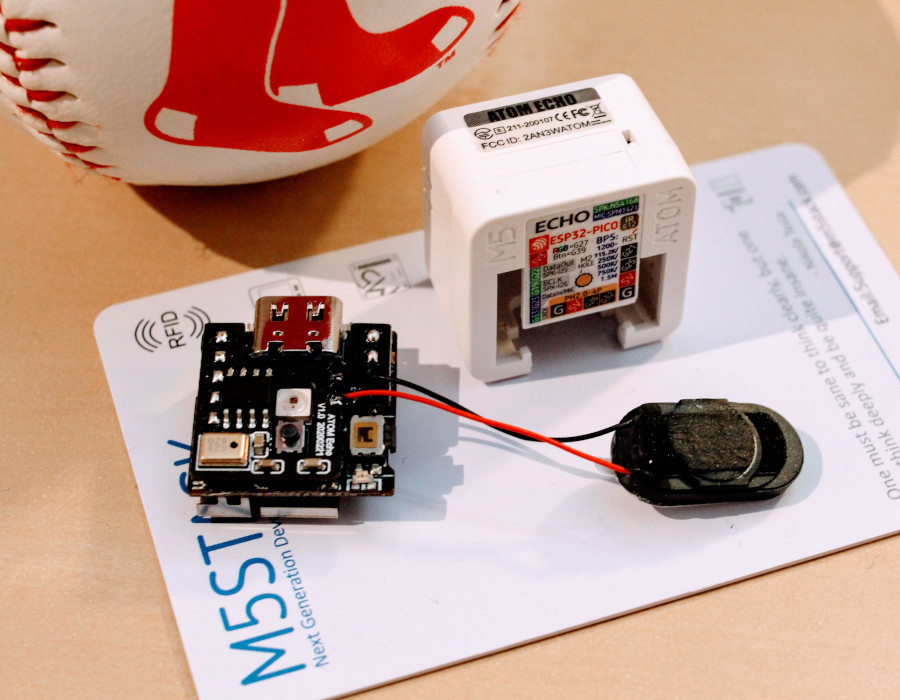
Fig. 3: Closer look to the side of the MIC, I2S amplifier, and LED.
The M5Stack has two small boards interconnected.![M5Stack ATOM Echo]()
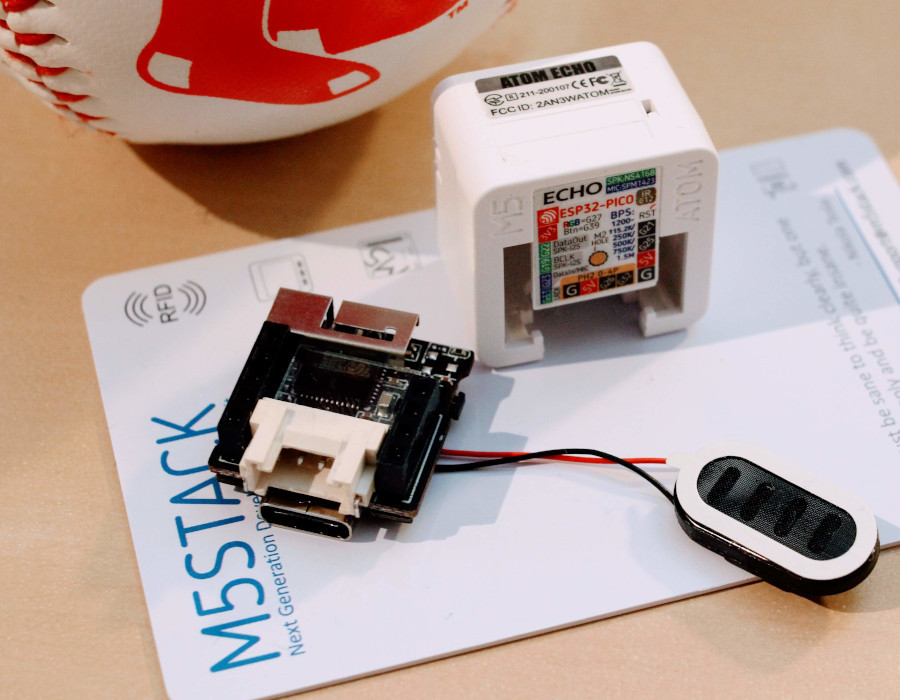
Fig. 4: Closer look to the side of the ESP32-Pico and connections.![M5Stack ATOM Echo]()
Fig. 5: Complete view with original Speaker.![M5Stack ATOM Echo]()
Fig. 6: Complete view with original Speaker.Software & Hardware
The following hardware and software will be used in this tutorial:
MicroPython with I2S support
I took the PR#4170 and updated the code to make it compatible with the new version of MicroPython and ESP-IDF v4.0. The changes were the followings:
mp_raise_ValueError("error message");
# changes to:
mp_raise_ValueError(MP_ERROR_TEXT("error message"));
# and
mp_raise_msg(&mp_type_OSError, "error message");
# changes to:
mp_raise_msg(&mp_type_OSError, MP_ERROR_TEXT("error message"));
Additionally, the driver doesn't support the PDM mode, which is required by the SPM1423HM4H. Therefore, I extended it to include that mode on the code.
lemariva/micropython-i2s-driver is the I2S driver repository for ESP32. I could have forked the MicroPython repository and include the I2S driver. However, I chose to include only the I2S files that are required in this repository so that you can always use the last version of MicroPython and add these files to add I2S support.
To include I2S support to MicroPython, you need to compile the firmware from scratch. To do this, follow these steps:
- Clone the MicroPython repository:
git clone --recursive https://github.com/micropython/micropython.git Copy the files of this repository inside the folder
ports/esp32. If you don't want to replace the filesmodmachine.c,modmachine.handMakefile, make the following modifications to the originals:modmachine.c: add the line{ MP_ROM_QSTR(MP_QSTR_I2S), MP_ROM_PTR(&machine_i2s_type) },in the code block below
// wake abilities(approx. line 256)modmachine.h: add the lineextern const mp_obj_type_t machine_i2s_type;in the code block declaring the
extern constvariables.Makefileadd the line:machine_i2s.c \inside the definition of
SRC_C = \(approx. line 323)
- Compile and deploy MicroPython following the instructions from this tutorial.
I've included a compiled version (using IDF4.x) of the firmware inside the
firmwarefolder (MicroPython commit cae77daf). You can deploy this version following the instructions of the tutorial. The firmware has support for I2S and BLE.If you are reading this because of I2S support and your board has a PSRAM, I recommend that you compile the firmware from scratch following the steps above to include PSRAM to the settings.DIY Instructions
The repository lemariva/uPyM5Echo includes the examples shown in the video of this tutorial.
After flashing the custom MicroPython version, you can upload the example to the M5Stack ATOM Echo using VSCode and following these steps:
- Clone the repository:
git clone https://github.com/lemariva/uPyM5Echo.git - Rename the file
config.sample.pytoconfig.py. - Create three
wavfiles and rename them asaudio_nr0.wav,audio_nr1.wav,audio_nr3.wav(you can use my files, they are inside theaudiosfolder). The files should be mono and the sample frequency 44.1kHz. If you want another frequency, you can modify the parameterSAMPLES_PER_SECOND = 44100inside themain.pyfile. - Upload the
pyandwavfiles using VSCode and the PyMakr Extension. You may need to modify the option"sync_file_types":"py",to"sync_file_types":"py,wav",inside the filepymakr.confto upload thewavfiles. The size of the files together should not be greater than 3MB, otherwise you'll get an error during uploading. If you want to, you can upload thewavfiles separately using theadafruit-ampyPython extension.
You can then connect to the M5Stack via Bluetooth using e.g., the BLE Scanner app and set the BLE Custom Characteristic to 01, 02, or 03 (Byte Array) to play different tracks.
The record-and-play example, which is shown in the video, results from using the
micro_record_play.pyfile.A2DP is not supported by MicroPython. Therefore, you cannot replicate the factory default firmware (BLE speaker) using MicroPython.Conclusions
This article presents the M5Stack ATOM Echo, a tiny programmable smart speaker, and a new member of the M5Stack ATOM series with a size of only 24x24x17mm and a weight of 10g. The article also includes a tutorial to extend the official MicroPython version to support the I2S protocol needed for the I2S amplifier (speaker) and the microphone. Finally, two application examples are included that let you connect to the speaker via Bluetooth and play the uploaded wav tracks, or record and play sounds.
We use cookies to improve our services. Read more about how we use cookies and how you can refuse them.


")


David 08.05.2020
Nice write-up. Thanks!