 23
23
Jun - 2020M5Stack, MicroPython
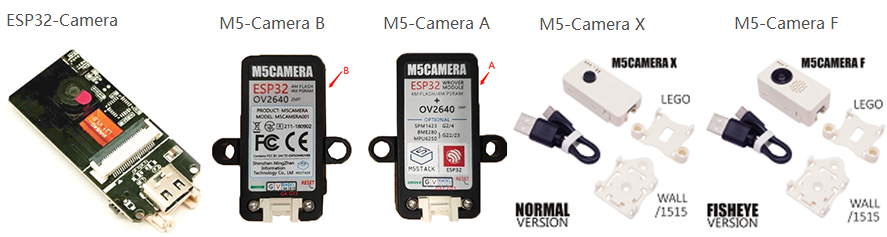
4 min | 25355Table of contentShowThe M5Camera is a camera unit based on ESP32 chip has an OV2640 and also includes a PSRAM. As you may already know, M5Stack is an open-source modular toolkit for IoT developments based on ESP32. There are four versions of this camera (see Fig. 1). I got the M5-Camera B and this is a tutorial to use the camera to generate timelapse videos. However, this module doesn't have a microSD slot. Therefore, the application will publish the photos on an MQTT Broker, so that an MQTT subscriber can read and save them on a disk.
Let's get started, but first, check out this video:
This article is a follow up to this previous one: MicroPython: Support for cameras: M5CAMERA, ESP32-CAM, etc., in which I've explained how to compile and deploy the version of MicroPython with camera support.We will cover these topics in this tutorial:
- Set the M5Camera to take and send photos using MicroPython and MQTT (publisher);
- Run a containerized MQTT Broker;
- Set an MQTT subscriber to receive and save the photos.
![camera_boards.png]()
Fig. 1: M5Stack has four types of camera units Software and Hardware
The following software and hardware will be used in this tutorial:
DIY Instructions
The instructions are divided into the following 3 main groups:
MQTT Brocker
First, a quick introduction to MQTT. MQTT is a lightweight publish-subscribe network protocol that transports messages between devices. The MQTT protocol defines two types of network entities: a broker and clients. An MQTT broker is a server that receives all messages from the clients and then routes the messages to the appropriate destination clients. An MQTT client is any device that connects to an MQTT broker over a network.
![MQTT]()
Fig. 2: MQTT Publish/Subscribe-Architecture. © HiveMQ.com You can install an MQTT Broker directly on your PC, Raspberry Pi, etc. However, it is easier to install Docker and deploy a configured container with an MQTT Broker.
You may already have heard about Docker, but if you don't, don't worry it is very easy and you can follow this tutorial: Tutorial: Docker on Embedded Systems (Raspberry Pi & Beagleboard) to get more information. But, the only thing that you need is the following command to install it:
curl -sSL https://get.docker.com | shIf you already have Docker installed. You can start an MQTT brocker typing the following:
docker pull eclipse-mosquitto
docker run -d --name mosquitto -p 1883:1883 eclipse-mosquitto
You can stop and start the container by typing the following:
docker stop mosquitto
docker start mosquitto
That is all you need to start an MQTT broker. This can run on a Raspberry Pi.
MQTT Subscriber
The subscriber receives the MQTT messages containing photos, processes them, and saves the photos on the disk. To simply test the camera, I opted for Python and used the paho-mqtt library. This can run as an application on a Raspberry Pi or your PC.
To start the MQTT subscriber, follow these steps:
- Clone the repository, typing:
git clone https://github.com/lemariva/MQTT-M5Camera.git - Start a Python virtual environment. A virtual environment is a tool that helps to keep dependencies required by different projects separate by creating isolated Python virtual environments for them.
# install the virtual environment module, if you don't have it pip3 install virtualenv # start the environment virtualenv mosquitto source mosquitto/bin/activate - Install the paho-mqtt library.
pip3 install paho-mqtt - Enter the IP address of the Broker inside the
config.pyfile. - Start the application typing:
python subscriber.pyThe photos will be saved under the
photos/folder.
M5Camera Application
The ESP32 connects to the camera, takes a photo a publishes it on the MQTT Broker. To run this application on the M5Camera, you need to flash the modified version of MicroPython. If you want to compile a firmware, you can follow the steps from this tutorial. Otherwise, you can download the firmware from here, and flash it on your ESP32 board, following these steps:
- Connect the M5CAMERA to a USB port.
- Erase the flash memory, typing the following:
esptool.py --chip esp32 --port /dev/ttyUSB0 erase_flashIf you don't have the
esptooltool installed, you can install it typing:pip3 install esptool - Flash the MicroPython firmware, typing:
esptool.py --chip esp32 --port /dev/ttyUSB0 --baud 460800 write_flash -z 0x1000 micropython_3a9d948_esp32_idf4.x_ble_camera.binYou can find more information on this tutorial.
The timelapse application is available in the lemariva/uPyCam repository.
To upload the application to the M5Camera, you should use VSCode and the PyMakr extension.
- Clone the repository:
git clone -b timelapse-camera https://github.com/lemariva/uPyCam.git - Rename the
config.py.sampletoconfig.pyand configure:wifi_config: the M5Camera needs to be connected to your Wi-Fi, otherwise it cannot send the image.mqtt_config: you need to change the server IP with that of your Broker.
- Upload the code and restart the board. The application will fail because you need to install the
umqtt.simple2, but to do that you need that the M5Camera connects to the Internet. Theboot.pyfile connects the board to Wi-Fi and hopefully to the Internet. - Install the
umqtt.simple2library, using the PyMakr console and typing:import upip upip.install('micropython-umqtt.simple2') - Restart the board again and the application should work! Have fun!
Conclusions
This tutorial includes a MicroPython application that takes photos every 5 seconds (you can change that) and publishes it to an MQTT broker or saves it on a microSD card (ESP32-CAM). The MicroPython firmware was also extended to support the OV2640 camera, which is included in many ESP32 boards.
We use cookies to improve our services. Read more about how we use cookies and how you can refuse them.


Ajdin Majdanac 12.24.2020
Hello Sir or Madam, I would like some guidance with this setup if possible! Currenctly I have been trying to make it work using my laptop and an M5 camera, is a Raspberry PI required? I have gotten the M5 Camera to connect to my WiFi network, but currenctly I'm stuck in a rut.