 27
27
Aug - 2019Raspberry Pi
3 min | 29845Table of contentShowLast week, I published an article about the Raspberry Pi and an e-ink display:
- #Raspberry Pi: an E-Paper display with Widgets (see Fig. 1a).
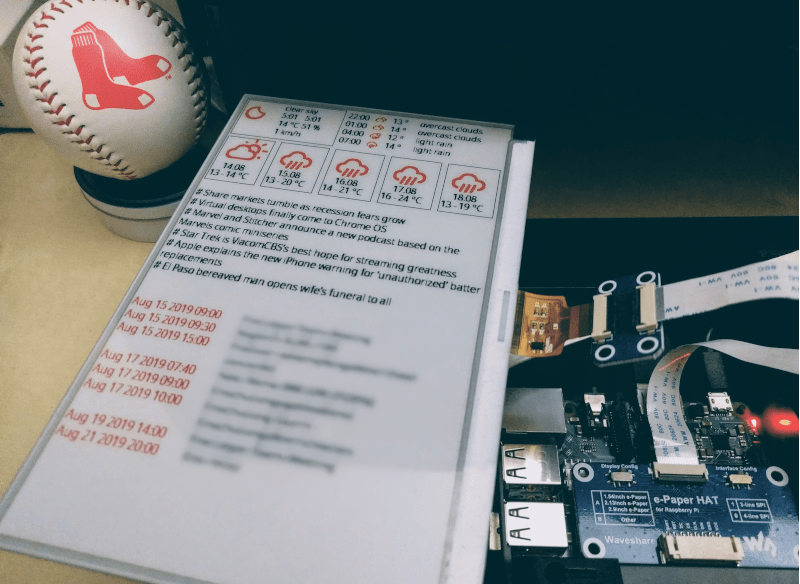
This time, this tutorial is about processing and displaying images on the 7.5" e-ink screen as shown in Fig. 1b.
![Waveshare® 7.5" E-ink Screen connected to a Raspberry Pi]()
![]()
Fig. 1a: E-ink Screen connected to a RPi
running ePaperWidgetsFig. 1b: Banggood's 13th anniversary
original image hereHardware & Software
You find here a list of hardware and software that you could use for this tutorial:
DIY
The 7.5" Waveshare E-Ink screen has only 3 colors (red, black and white). Thus, to display an image on the screen, you need to remap it from a RGB-color scheme to a 3-color scheme. This can be done easily using ImageMagick. Then, download the application, intall it and use the following code to convert the image:
# Create 3 color palette:
magick xc:red xc:white xc:black +append palette.gif
# Image dithering using Floyd-Steinberg:
magick input_image.png -remap palette.gif result_image.png
The first line create a 3-color palette, and the second line remap the
input_image.pngusing the 3-color palette and save the results in a new imageresult_image.png. Note that the imageinput_image.pngshould have the size of your display. In my case it has 640 x 384 px compatible with the 7.5" Waveshare E-ink display. Theresult_image.pnglooks like Fig. 2b![input_image.png]()
![result_image.png]()
Fig. 2a: Banggood Anniversary Image
Original ImageFig. 2b: Banggood Anniversary Image
in Red-Black and WhiteThe display code needs two two BMP images: the first one describes the pixels that will be black, and the second one for the pixels that are going to be red. Thus, you need to split the
result_image.pngimage into two image (red pixels and black pixels). To do that, you can use thesplit_image.pyfile that I've included in the Github repository. The resulting images look like Fig. 3.![layer_0.bmp]()
![layer_1.bmp]()
Fig. 3a: Black Color Layer of the
Banggood Anniversary ImageFig. 3a: Red Color Layer of the
Banggood Anniversary ImageThen, upload the
image2einkfolder from the repository to the Raspberry Pi (or clone the complete repository), rename the images (layer_x.bmp) to7in5b-b.bmp(black) and7in5b-r.bmp(red) and upload them to the folderpicinsideimage2eink. The filemain.pywill read those images and send the pixels to the display. But first you need to active the SPI interface of the Raspberry Pi usingraspi-configand then, you need to install the following dependencies:sudo apt-get install python3-pip pip3 install Pillow pip3 install spidevFinally, run the
main.pyfile typing:python3 main.py. The results are shown in Fig. 1b.Last but not least, check this news about Banggood:
and participate in the official activities as described below:
Banggood 13th Anniversary
The preview stage of Banggood’s 13th Anniversary Sale has officially begun with a cascade of activities and special deals from our partner brands such as Eachine, BlitzWolf, Sonoff, Digoo, Bakeey, and Geekcreit. I would like to invite the fans and customers to guess the meaning behind the 13th anniversary logo (see Fig. 1b or 2a) in the comments section below (and also in your social media - ref. this article too, if you want to... :) ), adding the hashtag #banggood13.
Any creative answers will count. Banggood will randomly select 3 lucky winners who will receive prizes. The first prize is a Sterling engine from Eachine, the 2nd a pair of wireless earphones from BlitzWolf and the 3rd an IP Cam from Digoo.
Winners will be announced on September 12th.
You can find more information using this link: 13th Anniversary Shopping Guide.
We use cookies to improve our services. Read more about how we use cookies and how you can refuse them.


")

")


Empty