 10
10
Jul - 2018Android Things
2 min | 12664This article extends the node tree of ProjectDiva to include an Arduino Pro Mini.
This article explains how to connect a Arduino Pro Mini to the nRF24Things application (Android Things). The code allows sending and receiving messages between the nodes. It uses the well-known nRF24 libraries to create a sensor mesh, where the node 0 (in this case a Raspberry Pi running the Android Things application) actuates as a "DHCP" server and assigns the node addresses in the mesh.
Preview
Requirements
Hardware & Software
Wiring
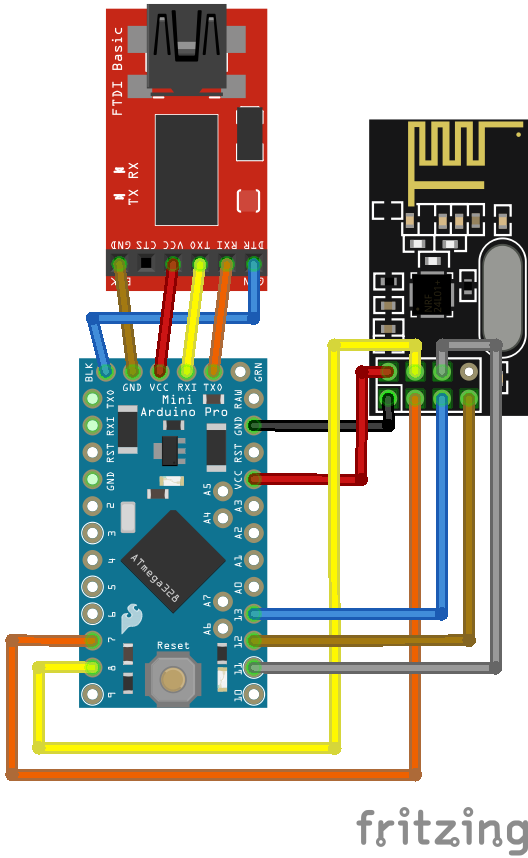
Please check that the Arduino Mini Pro is a 3.3V compatible version. The NRF24L01+ does not support 5V. If you use an Arduino 5V version, you need to not only supply the nrf24l01+ with 3.3V but also the signals (CE, CSN, MOSI, MISO) should be also 3.3V. The FTDI1232 board muss work with 3.3V too. The board that I linked in the section hardware has a jumper to set its voltage to 3.3V.
![WiPy 3.0, MPU6055 & Micro Servo 9g]()
Fig. 1: FTDI-1232, Arduino Mini Pro (3.3V) & NRF24L01+ Instructions
- Connect the boards as described in the Connection section. Check voltage jumpers!
- Install the Arduino Ide and open it.
- Connect the FTDI1232 to your computer.
- Go to the menu "Tools" > "Programmer" and select "AVRISP mkII".
- Go to the menu "Board" and select "Arduino Pro or Pro Mini".
- Go to the menu "Processor" and select "ATMega328P (3.3V, 8MHz)".
- Go to the menu "Sketch" > "Include Library" and open "Manage Libraries"
- Search for RF24 and install the following libraries:
- RF24 by TMRh20 Version 1.3.1
- RF24Network by TMRh20 Version 1.0.8
- RF24Mesh by TMRh20 Version 1.0.51
- Search for RF24 and install the following libraries:
- Go to the folder where the libraries were installed (on Windows -
C:\Users\<user>\Documents\Arduino\librariesand edit the following files:RF24Mesh\RF24Mesh_config.h[line 13]#define MESH_DEFAULT_CHANNEL 76
RF24Network\RF24Network.cpp[line 1247-1248]static uint8_t address_translation[] = { 0xc3,0x3c,0x33,0xce,0x3e,0xe3,0xec }uint64_t result = 0xCCCCCCCCCCL;
- Upload the code with the
Uploadbutton, and have fun!
Credits
Libraries from TMRh20 and maniacbug:
Licenses
Licenses include, but are not limited to the following (check respective files):
- GNU
- Apache 2.0
- etc...
We use cookies to improve our services. Read more about how we use cookies and how you can refuse them.

")

")


")
Empty