") 01
01
Dec - 2019Analytics, Cloud Platforms
4 min | 71328#Portainer: Managing Docker Engines remotely over TCP socket (TLS)
Analytics, Cloud Platforms | 4 min | 71328
This tutorial is about managing a Docker Engine remotely using Portainer connected to the protected Docker daemon socket (
TCP port 2376). By default, you can manage Docker locally through a non-networked UNIX socket (option-v /var/run/docker.sock:/var/run/docker.sockwhile running Portainer). But, if you want the Docker Engine to be reachable through the network in a safe manner, you need to enable TLS by specifying the--tlsverifyflag and pointing Docker’s--tlscacertflag to a CA certificate. Then, the daemon only accepts connections from clients that are authenticated by a certificate signed by that CA certificate.This tutorial accomplishes the following:
- Create a CA, server and client keys with OpenSSL,
- Configure the remote API for dockerd (Docker Engine) to allow external connections,
- Deploy Portainer and connect it to the protected Docker daemon socket.
This tutorial summarizes and combines the following articles:
Thus, if you need further information, check out those links too! and if you've never heard about Portainer, I've an article about it here.
Certificates
You need to install OpenSSL to follow the following steps. I will not go deep into this topic because there are plenty of tutorial about this, that you can find on Google.
Server
To create the CA key and the CA certificate type the following on your terminal:
export HOST=<your-domain-name>

openssl genrsa -aes256 -out ca-key.pem 4096
# enter a pass phrase to protect the ca-key

openssl req -new -x509 -days 365 -key ca-key.pem -sha256 -out ca.pem
Change
<your-domain-name>for the internal/external domain name, where the Docker Engine is running. You can change the valid days (-days 365). Normally for internal certificates, "365-days" could be a too short period and you'll need to re-new often the certificates, which also means more security but, it can be annoying!. Enter the information asked (Country, State, City, Organization, Common Name & Email) and for the Common Name option use the environmental variable$HOSTNow create a server key and certificate signing request (CSR) typing:
openssl genrsa -out server-key.pem 4096

openssl req -subj "/CN=$HOST" -sha256 -new -key server-key.pem -out server.csr
Since TLS connections can be made through IP-address as well as DNS name (
$HOST), you can add IP-addresses (e.g. localhost and network) when creating the certificate. In the following case, I added the10.0.0.200(network) and127.0.0.1(localhost) as example:echo subjectAltName = DNS:$HOST,IP:10.0.0.200,IP:127.0.0.1 >> extfile.cnfSet the Docker daemon key’s extended usage attributes to be used only for server authentication:
echo extendedKeyUsage = serverAuth >> extfile.cnfFinally, generate the server signed certificate:
openssl x509 -req -days 365 -sha256 -in server.csr -CA ca.pem -CAkey ca-key.pem \
  -CAcreateserial -out server-cert.pem -extfile extfile.cnf
Again, you can change the valid days (
-days 365).Client
For client authentication, create a client key and certificate signing request using the following lines:
openssl genrsa -out key.pem 4096

openssl req -subj '/CN=client' -new -key key.pem -out client.csr
To make the key suitable for client authentication, create a new extensions config file:
echo extendedKeyUsage = clientAuth > extfile-client.cnfFinally, generate the client signed certificate:
openssl x509 -req -days 365 -sha256 -in client.csr -CA ca.pem -CAkey ca-key.pem \
  -CAcreateserial -out cert.pem -extfile extfile-client.cnf
Optional: You can protect your keys from accidental damage, removing their write permissions. Moreover, certificates can be world-readable, but you might want to remove write access to prevent accidental damage:
chmod -v 0400 ca-key.pem key.pem server-key.pem
chmod -v 0444 ca.pem server-cert.pem cert.pem
Remote API
Copy the
ca.pem,server-cert.pemandserver-key.pemfiles to a folder that you won't remove e.g.~/.certsmkdir ~/.certs cp ca.pem ~/.certs cp server-cert.pem ~/.certs cp server-key.pem ~/.certsThen, create the file
startup_options.confand its path if they don't exist:mkdir -p /etc/systemd/system/docker.service.d/ sudo nano /etc/systemd/system/docker.service.d/startup_options.confand put the following text inside that file:
# /etc/systemd/system/docker.service.d/override.conf
[Service]
ExecStart=
ExecStart=/usr/bin/dockerd --tlsverify --tlscacert=/home/pi/.certs/ca.pem --tlscert=/home/pi/.certs/server-cert.pem --tlskey=/home/pi/.certs/server-key.pem -H fd:// -H tcp://0.0.0.0:2376
In my case, I managed the Docker Engine of a Raspberry Pi from a Portainer instance running on my PC. Thus, the path to the certificates started with
/home/pi/as you see above.Then, reload the unit files and restart the Docker daemon with the new startup options:
sudo systemctl daemon-reload
sudo systemctl restart docker.service
Deploy Portainer
To remotely connect to the Docker socket protected with TLS, you only need the (
ca.pem),cert.pemandkey.pemfiles. If you don't have Portainer installed follow the instructions on this article.Go to the Portainer web interface, log in and then click on
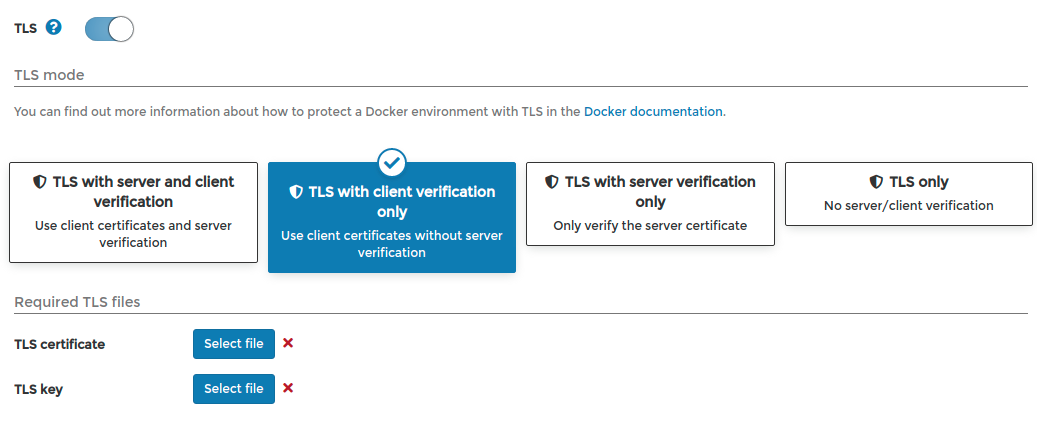
Endpoints(left menu) >+ Add Endpointand select the optionDocker (Docker environment). Complete only the endpointName, andEndpoint URL(in my case10.0.0.200:2376-don't forget the port:2376!) and activate theTLSswitch (see Fig. 1). This enables 4 options, you can choose between both first options:- TLS with server and client verification (Use client certificates and server verification): upload the TLS CA Certificate
ca.pem, TLS certificatecert.pemand the TLS keykey.pem. - TLS with client verification only (Use client certificates without server verification): upload only the TLS certificate
cert.pemand the TLS keykey.pem.
Using the first option, the server verifies the authenticity of the client (using
cert.pemandkey.pem), and the client that of the server (comparingca.pem), while in the second only the server only verifies the authenticity of the client (usingcert.pemandkey.pem).After doing this, click on the
+Add endpointbutton and you will see the endpoint listed on the home page and after clicking on it, you can manage it.![Screenshot from 2019-11-13 23-35-05.png]()
Fig. 1: TLS options! Conclusions
This tutorial explains you how to manage a Docker Engine on a remote computer using Portainer. The connection is via the TCP socket protected using TLS (
port 2376). This means, the client (and the server) needs to verify its authenticity using (a) CA certificate(s). Then, you can manage all Docker Engines using only one running Portainer instance on your PC or a server, thus saving resources on your environment.
We use cookies to improve our services. Read more about how we use cookies and how you can refuse them.
")
")

")
")


Empty