 16
16
Apr - 2019Raspberry Pi
4 min | 14117Last week, the Coral team released updates to the Coral platform to "address customer feedback and make it easier to use the products and tool-chain". The Python API has now the ability to run multiple models in parallel, using multiple Edge TPUs.
Thus, due to the multiple changes, I updated the Docker image
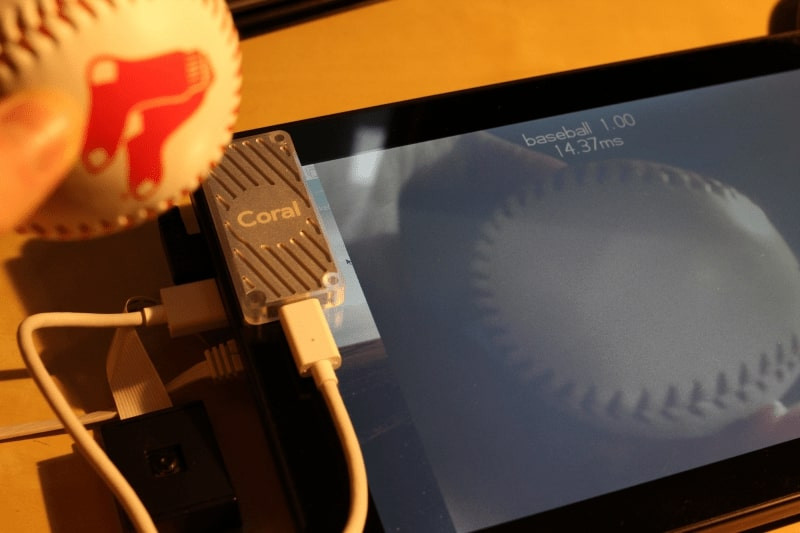
lemariva/raspbian-edgetpuwhich includes the Edge-TPU libraries for Raspberry Pi 3 B+, Jupyter Notebooks and some other interesting libraries (check the Dockerfile).![edge-tpu-coral-usb-accelerator-dockerized-min.png]()
Fig 1: Coral USB Accelerator, Jupyter and some training objects The base Docker image remained
balenalib/raspberrypi3-debian:stretch. I tried to use:busterwhich includes Python 3.7, but somehow the libraries are not compatible and I am getting the errorImportError: No module named '_edgetpu_cpp_wrapper'. I'm quite sure that the shared libraries were compiled with dependencies for Python 3.5.I've updated
supervisorin order to be compatible with Python 3 (Python 2.7 is not required anymore inside the container), and I added a teachable machine as an extra example (continue reading!).If you need any help to Deploy thelemariva/raspbian-edgetpucontainer, or install Docker on Raspberry Pi, please refer to: #Edge-TPU: Coral USB Accelerator + rPI + DockerWhile installing the edge-tpu libraries, the setup displays the following warning:Warning: During normal operation, the Edge TPU Accelerator may heat up, depending on the computation workloads and operating frequency. Touching the metal part of the device after it has been operating for an extended period of time may lead to discomfort and/or skin burns. As such, when running at the default operating frequency, the device is intended to safely operate at an ambient temperature of 35C or less. Or when running at the maximum operating frequency, it should be operated at an ambient temperature of 25C or less. Google does not accept any responsibility for any loss or damage if the device is operated outside of the recommended ambient temperature range.
To get the maximal performance of the device, I answered "Y". This means, if you have problems with temperature, this can be the cause.
.............................................................
Would you like to enable the maximum operating frequency? Y/NHardware & Software
Teachable machine in Jupyter
I've rewritten the teachable edge-tpu machine to execute it using Jupyter. The following code is included in
/notebooks/teachable_jupyter.ipynb. It needs theembedding.pyfile which is also included inside thenotebooksfolder.The Jupyter Notebook can be devided in three parts:
Part A
The following code imports the libraries and initializes the teachable machine:
## imports
# camera
import io
from picamera import PiCamera
import time
# images
from PIL import Image
import matplotlib.pyplot as plt
import numpy as np

# edge-tpu
from embedding import kNNEmbeddingEngine

## parameter configuration
model_path = "test_data/mobilenet_v2_1.0_224_quant_edgetpu.tflite"
width = 224
height = 224

kNN = 3
engine = kNNEmbeddingEngine(model_path, kNN)
Part B
The following code:
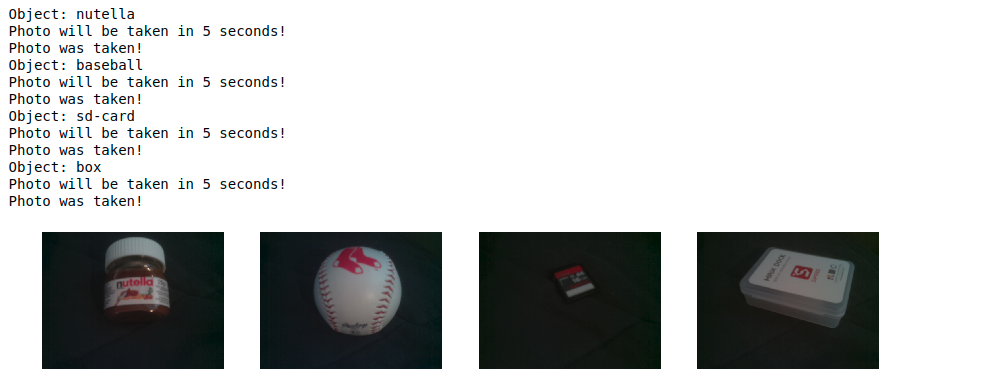
- takes every 5 seconds a photo (
labelsdefined the number of photos) using the Raspberry Pi camera, - converts the JPEG to a PIL image and,
- uses the PIL image with a label to train a
kNNmodel.
The next to last line (
engine.addEmbedding(emb, label)) labels the taken photo with a element (string) of the arraylabels. This means, if you want to classify more objects, you need to include its names in thelabelsarray (and of course put different objects in front of the camera ;)):## learning fig=plt.figure(figsize=(15, 15)) labels = ["nutella", "baseball", "sd-card", "box"] columns = len(labels) rows = 1 count = 1 for label in labels: # take photo stream = io.BytesIO() print("Object: " + label) print("Photo will be taken in 5 seconds!") time.sleep(5) with PiCamera() as camera: camera.resolution = (640, 480) camera.capture(stream, format='jpeg') stream.seek(0) print("Photo was taken!") # convert image to PIL image = Image.open(stream) fig.add_subplot(rows, columns, count) plt.imshow(np.asarray(image)) plt.axis('off') # learning engine emb = engine.DetectWithImage(image) engine.addEmbedding(emb, label) count += 1An output of the script can be found on Fig. 2.
![Training Objects]()
Fig. 2: Training objects: Nutell, Baseball, SD-card and MAiX Dock Box Part C
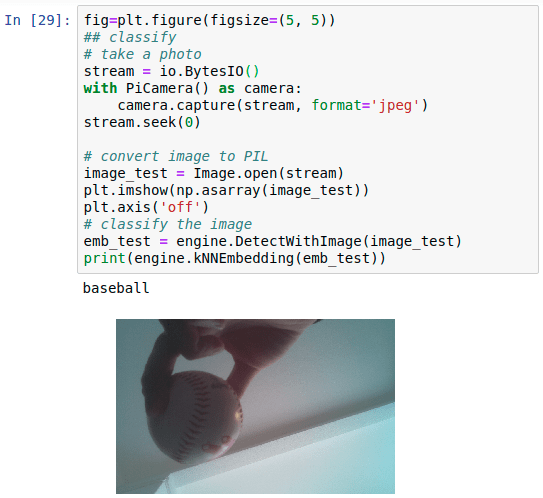
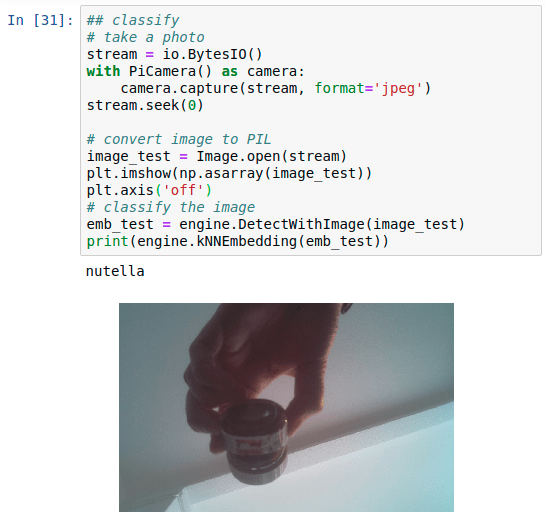
The following code extract corresponds to the object classifier which:
- takes a photo using the Raspberry Pi camera,
- converts the JPEG to a PIL image and,
- detects the trained object and prints the classification label.
fig=plt.figure(figsize=(5, 5))
## classify
# take a photo
stream = io.BytesIO()
with PiCamera() as camera:
    camera.capture(stream, format='jpeg')
stream.seek(0)

# convert image to PIL
image_test = Image.open(stream)
plt.imshow(np.asarray(image_test))
plt.axis('off')
# classify the image
emb_test = engine.DetectWithImage(image_test)
print(engine.kNNEmbedding(emb_test))
Two outputs of the identification can be found on Fig. 3. You can see that the objects are correctly classified while its inclination/position and the background are completely different (my hand is on the photo).
![object_0-min.png]()
![object_1-min.png]()
Fig. 3: Object classification: Baseball (left) and Nutella (right) Last but not least, if you want to clean the
engineand train it with new objects, you just need to execute the following:engine.clear()Conclusions
I've updated the Docker container for the Edge-TPU compatible with Raspberry Pi 3B+. You need to install Docker on the Raspberry Pi, connect the hardware (Coral USB Accelerator & PI Camera) and deploy the Docker container
lemariva/raspbian-edgetpu. The container includes everything that you need to start with the Edge-TPU on the Raspberry Pi. I included Jupyter Notebook, so that you can test the Edge-TPU and develop you application there. A teachable machine example is also include which allows to extend (retrain) the tensorflow models to detect your own objects. I had really fun playing with Jupyter and the Coral USB Accelerator on the Raspberry PI.- takes every 5 seconds a photo (
We use cookies to improve our services. Read more about how we use cookies and how you can refuse them.

")

")
")


Empty