 26
26
Mar - 2019Raspberry Pi
4 min | 26002Table of contentShowIn summer 2018, Google announced two Edge TPU devices for machine learning. These are now available under the Coral brand. Two weeks ago, I bought the Coral USB Accelerator. It is a portable USB accessory that brings machine learning inferencing to existing systems and it is compatible with Raspberry Pi and other Linux systems.
![Coral USB Accelerator]()
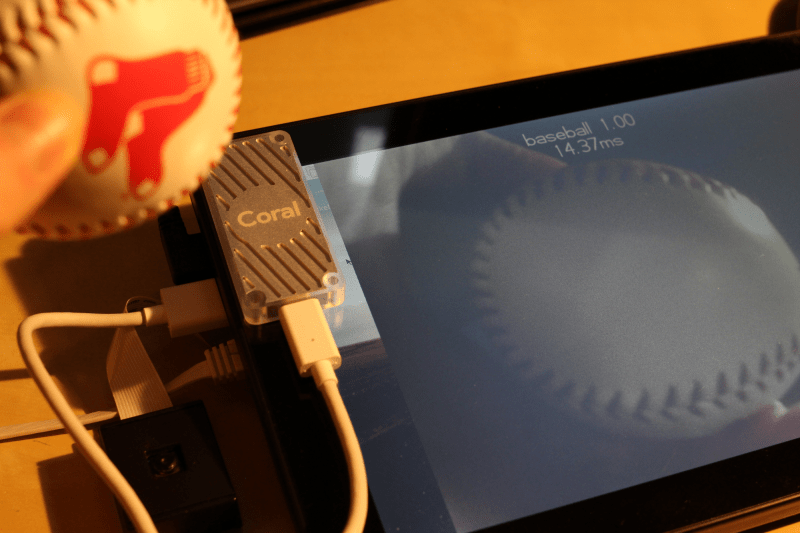
Fig. 1: Coral USB Accelerator, Raspberry Pi Camera and a RasPad I wanted to test the performance of the Edge-TPU on my Raspberry Pi3, and as I have every application running on Docker on my Raspberry Pi, I've created a Docker image with everything inside that you need to start using the Coral USB accelerator. Additionally, I've added an example that uses the PI camera and streams the image to a web-server with the result of the classification printed over the camera image and I included Jupyter with an example too.
This is what we will try to accomplish in this tutorial:
- Install Docker on a Raspberry Pi
- Deploy the
lemariva/raspbian-edgetpuDocker image - Connect to the Docker Container using
sshand - Use Jupyter, or start the image classifier with web-server functionality
Hardware & Software
Get started with Coral and TensorFlow Lite
After installing Raspbian on the Rasbperry Pi. Then, connect the camera to the CSI interface (if you want to analyze life images), the accelerator USB Egde-TPU to a USB port and power on the Raspberry Pi. Then, use
raspiconfigenable the camera interface and reboot the Raspberry. After doing that, you need to install the Docker engine. I wrote a tutorial: #Tutorial: Docker on Embedded Systems (Raspberry Pi & Beagleboard) that can help you. After installing the Docker engine, I recommend you to deploy the Portainer container. This is also explained in that tutorial.Then, if you use Portainer:
- Open the Portainer.io Docker management user interface. (usually
http://<<ip-address-rpi>>:9000) - Enter the following parameters under Containers > Add Container
- Name:
rasbian-google(or anything that you want ;)) - Image:
lemariva/raspbian-edgetpu - Port mapping:
- Host
25(any unused one) -> Container22 - Host
8000(any unused one) -> Container8000 - Host
8888(any unused one) -> Container8888
- Host
- Restart policy :
unless-stopped - Runtime > Privileged mode :
On - Volume Bind >
/dev/bus/usb:/dev/bus/usb
- Name:
- Press the button Actions > Start/Deploy container
If you do not want to use Portainer.io, then run the
lemariva/raspbian-edgetpucontainer using the following line:docker run -d --privileged -p 25:22 -p 8000:8000 -p 8888:8888 --restart unless-stopped -v /dev/bus/usb:/dev/bus/usb lemariva/raspbian-edgetpuWait a couple of minutes, and then if everything is ok, the container should be running. You can connect to it using
sshas in my case (port 25 was mapped):ssh root@<<ipaddress>> -p 25The default password is
root. After logging to the running container usingssh, you can start the image classifier that uses the PI camera typing:python3 /notebooks/web_streaming_classify.py --model /notebooks/test_data/mobilenet_v2_1.0_224_quant_edgetpu.tflite --label /notebooks/test_data/imagenet_labels.txtThen, you can access to the website on e.g.
http://<<ip-address-rpi>>:8000. Parallel access to this website is not working, and if you want to refresh the website, just do it twice ;) Some improvements are needed on this file.Jupyter is also available, you can access the notebooks on e.g.
http://<<ip-address-rpi>>:8888. You need a token that you can get using thesshsession and typing:jupyter notebook list [I 11:59:16.597 NotebookApp] The Jupyter Notebook is running at: http://0.0.0.0:8888/?token=c8de56fa4deed24899803e93c227592aef6538f93025fe01I've included an image classifier example, and also some animal images to test it. If you want to, you can run the Container in iterative mode too.
Note: if you do not want to use sshand you've deployed Portainer, you can use the console provided by Portainer.![Portainer Console]() Just click on the
Just click on the >_icon and then press theConnectbutton.TensorFlow Lite
You can use a pre-trained model, or you can wetrain a model, or you can build a model from scratch, here you get some information.
Pre-trained models
The Coral website provides pre-trained TensorFlow Lite models that have been optimized to use with Coral hardware. I've included the "MobileNet V2" model inside the Docker image. This recognizes 1,000 types of objects. If you’re just getting started, you can just download other models and deploy it to your device.
Retrain a model
You can retrain an existing model and customize Coral’s pre-trained machine learning models to recognize your own images and objects, using a process called transfer learning. To do this, follow the instructions in Retrain an existing model.
Build your own TensorFlow model
If you need to train a model from scratch, you can follow the steps in Build a new model for the Edge TPU. Note that your model must meet the Model requirements.
TensorFlow, other Frameworks (e.g. PyTorch) and Coral Project
Currently, the Edge-TPU only supports TensorFlow Lite models. This means you have to convert
tflitemodels totflite-tpu. If you're a PyTorch user or prefer another framework, you can try to convert your models to TensorFlow using ONNX.Additional Docker Information
I used the base image
balenalib/raspberrypi3-debianfor my image. I did not use theraspberrypi3-pythonbecause I wanted to reduce the image size, and I got an error when I tried to install theedge-tpulibrary.The Docker image uses
supervisord, you can run more than one program in parallel. Firstly, I thought to run also the image classifier parallel tosshdand Jupyter, but then I realized that it was better to build a generic image that can be extended.Conclusions
This post brings five things together: Docker, Jupyter, Raspberry Pi, Pi Camera and the Coral USB Accelerator. If you want to test the portable Edge-TPU accessory, this is an easy way to do that. The Edge-TPU performance is really good. It significantly reduces the time to classify offline images as well as live images from the Pi camera. In the next articles, I'll be posting some results.
We use cookies to improve our services. Read more about how we use cookies and how you can refuse them.

 Just click on the
 ")


")
")

")
Sven 08.20.2020
Hi Guys, thank you for this great tutorial.
I got the following error. Maybe you have a hint for me how to fix it.
best regards,
Sven
LeMaRiva|tech 08.24.2020
Hi Sven, You got the error because the webserver starts running with the container. You need to stop it and then you can execute the line above. Anyways, I updated the image, so that you can try again.
George Frior 06.22.2021
Hi,
I followed the instrcutions above and got the container running no problem.
But there isn't any test_data directory