") 06
06
Apr - 2019Home Automation, Raspberry Pi
6 min | 110309#Zigbee: Xiaomi Sensors using Raspberry Pi (without Gateway!)
Home Automation, Raspberry Pi | 6 min | 110309
Table of contentShowThis tutorial allows you to connect Xiaomi (or Aqara) sensors (e.g. door, pir, temperature, water, switch) to a Raspberry Pi or similar system without using any Xiaomi Gateway.
This is what I will try to accomplish in this tutorial:
- Flash the USB-Zigbee Dongle with the correct FW
- Install a broker to connect to the sensors
- Configure the sensors using the broker
This article is outdated! A new version has been published: Hardware
Xiaomi sensors use Zigbee for the connection which means we need some extra components to connect to them. This is the list of needed hardware:
(**) Note: There is an alternative way to flash the Wireless Zigbee CC2531 using jumpers and a Raspberry Pi. This is explained in this tutorial:#Zigbee: Flashing a CC2531 using a Raspberry Pi (without CC Debugger). In that case, you don't need to buy the SmartRF04EB and the debugger cables. If you choose the option without CC-Debugger, you can skip the section "Flashing the Zigbee Dongle" of this article.Software
We need to flash the CC2531 of the Wireless Zigbee USB-Dongle. That's why we need the SmartRF04EB or a TI CC-Debugger and the debugger cable. You need the last two components only one time in order to flash the Zigbee dongle.
To flash the Wireless Zigbee CC2531 you need the following software and drivers:
To download the SmartRF Flash Programmer, you need to register to Texas Instrument. It's free and it's very simple. If you don't want to register, you can surely find the tool on the Internet, but be aware of virus or/and malware.
Note: When you try to download the file from Texas Instruments and if you don't get it, please check the pop-up blocker (right side on the URL input line). Texas Instrument tries to download the file opening a pop-up using JavaScript and Chrome usually blocks it.Flashing the Zigbee Dongle
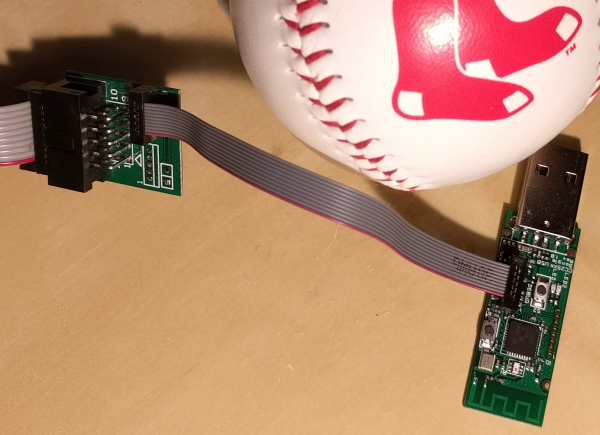
- Connect the SmartRF04EB to the Zigbee dongle as described in Fig. 1. Check that the cable is not twisted. On debugger side, the nose of the connector should be pointing out of the debugger. On the dongle side, the nose should be pointing to the inside of the debugger.
- Connect only the debugger to your PC (you do not need to connect the Zigbee dongle) and open the (SmartRF) Flash Programmer.
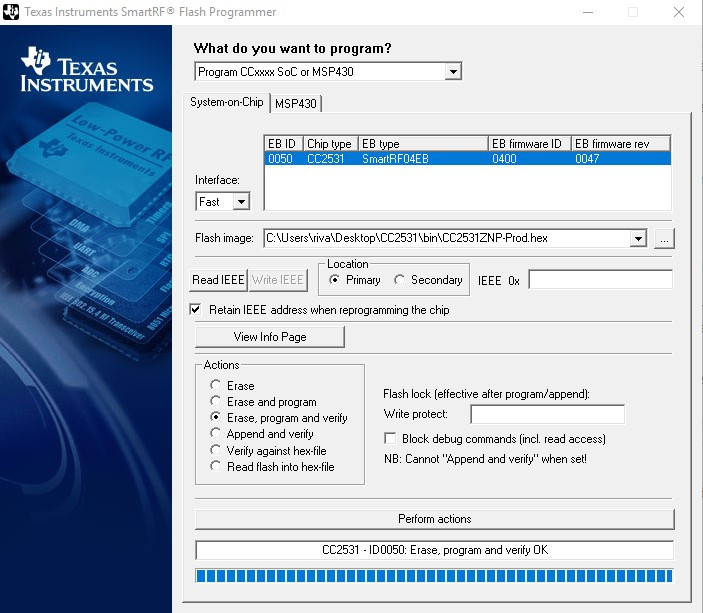
- You should see something like Fig. 2: On the System-on-Chip, the SmartRF04EB should be listed.
- If the SmartRF04EB is not listed:
- Try to reset the SmartRF04EB by pressing its reset button.
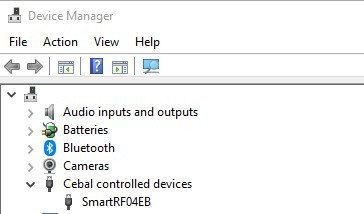
- Or, check under Device Manager (Windows + Pause > Device Manager) if the SmartRF04EB is correctly install. It should look like Fig. 3.
- If you see a ? mark over the device, you should decompress the downloaded Cebal driver file, and let Windows search for the drivers under the
win_64bit_x64folder. After that, open the (SmartRF) Flash Programmer again and reset the SmartRF04EB using its reset button.
- If you see a ? mark over the device, you should decompress the downloaded Cebal driver file, and let Windows search for the drivers under the
- If the SmartRF04EB is listed, the image that you need to flash is located inside the downloaded
Z-Stack-firmware-master.zipfile inside the ZIP file undercoordinator/Z-Stack_Home_1.2/bin/default/CC2531_DEFAULT_yyyymmdd.zip.- Extract the
CC2531ZNP-Prod.hexfile. - Use the
Flash image:locator of the (SmartRF) Flash Programmer to select that extracted file. - Press the
Perform actionsbutton and wait until you getCC2531 - ID0050: Erase, program and verify OK.
- Extract the
After flashing the Dongle, you are ready to connect the Zigbee sensors to your Raspberry Pi. Then, connect the Zigbee dongle to the Raspberry Pi, and follow the next steps.
Note: I used the default version of the Z-Stack coordinator. But:- a. If you have a network of 1 - 30 devices, the Z-Stack_Home_1.2 /bin/default firmware is recommended.
- b. If you have a network of 30+ devices, the Z-Stack_Home_1.2 /bin/source_routing firmware is recommended.
![Zigbee Connector]()
Fig. 1: SmartRF04EB adapter board connected to the Zigbee dongle. ![Zigbee Flashing Dongle]()
Fig. 2: Flashing the Zigbee dongle using (SmartRF) Flash Programmer. ![Zigbee Device Manager]()
Fig. 3: Device Manager - SmartRF04EB correctly installed. Zigbee & Raspberry Pi
I found at least two ways to integrate the Zigbee sensors to the Raspberry Pi.
ioBroker
(GitHub)
This runs on Node.js v8.x, then you need to install it first. If you've already installed another version you can remove it using the following:
sudo apt-get --purge remove node
sudo apt-get --purge remove nodejs
and then, install it with this:
curl -sL https://deb.nodesource.com/setup_8.x | sudo -E bash -
sudo apt-get install -y build-essential libavahi-compat-libdnssd-dev libudev-dev libpam0g-dev nodejs
sudo reboot
Then, install ioBroker typing the following:
curl -sL https://raw.githubusercontent.com/ioBroker/ioBroker/stable-installer/installer.sh | sudo bash -After installing it, you can access its interface using a browser and pointing to
http://<<ip-raspberry-pi>>:8081. It also uses the port 9000 for internal communication, which should not be used, otherwise it is not going to run.Note: npm reports several vulnerabilities of the required libraries installed. For more information you can type `npm audit` to see these with more detail.After installing ioBroker, you need to configure the interface to add the ZigBee adapter.
- Go to
http://<<ip-raspberry-pi>>:8081. - Go to
Adapters(on the left side) and search for the Zigbee adapter plugin and install it (see Fig. 4). - After installing it, go to
Instances(on the left side) and you should have something like Fig. 5. The Zigbee adapter is installed, but it is not running yet (circle yellow). - Go to a terminal and type the following
ls -la /dev/serial/by-id/you are going to get something like thispi@raspberrypi:~ $ ls -l /dev/serial/by-id total 0 lrwxrwxrwx 1 root root 13 Dec 16 23:17 usb-Texas_Instruments_TI_CC2531_USB_CDC___0X00124B0018E1A598-if00 -> ../../ttyACM0 - Click on
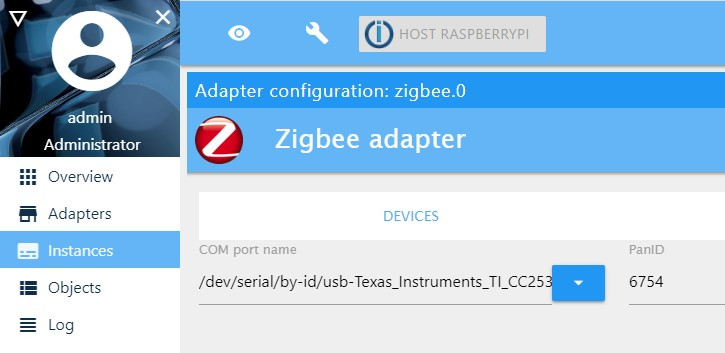
zigbee.0and go to theSettingsTab, and on theCOM port namefield, type the following:/dev/serial/by-id/usb-Texas_Instruments_TI_CC2531_USB_CDC___0X00124B0018E1A598-if00(check Fig. 6). - Click on
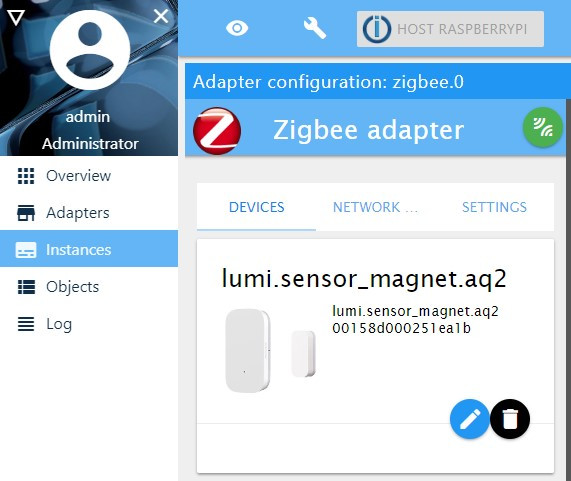
Save and Close, and the circle should be now green. - Now, you can pair your devices. To do that, click again on
zigbee.0and then on the green on the right side. A windows with a countdown should open. - Press the reset button of your Zigbee device with a 2 seconds tact. The pairing should be announced on the opened window.
- More info about ioBroker can be found on its documentation.
![Zigbee Adapter Installing]()
Fig. 4: Zigbee adapter installation. ![Zigbee Adapter Installing]()
Fig. 5: ioBroker running instances. ![Zigbee Adapter Installing]()
Fig. 6: Zigbee adapter settings. ![Zigbee Adapter Installing]()
Fig. 7: Zigbee paring devices. Zigbee2mqtt
(GitHub) This tool connects to the Zigbee Dongle to pair with the Xiaomi sensors. Every time a sensor sends a signal, this tool publishes a MQTT topic to the broker. You can combine this tool with Home-Assistant or Domoticz. The documentation helps you to configure this feature.
If you want to integrate the Xiaomi sensors to Home Assistant, check this article: #Raspberry Pi: Xiaomi Sensors & Home Assistant (Hass.io)To install the tool, simple clone the repository and install it using npm typing the following
# Setup Node.js repository sudo curl -sL https://deb.nodesource.com/setup_10.x | sudo -E bash - # Install Node.js sudo apt-get install -y nodejs git make g++ gcc # Verify that the correct nodejs and npm (automatically installed with nodejs) # version has been installed node --version # Should output v10.X npm --version # Should output 6.X # Clone zigbee2mqtt repository sudo git clone https://github.com/Koenkk/zigbee2mqtt.git /opt/zigbee2mqtt sudo chown -R pi:pi /opt/zigbee2mqtt # Install dependencies cd /opt/zigbee2mqtt npm install- Now that you have setup everything correctly you can start zigbee2mqtt.
cd /opt/zigbee2mqtt
npm start
To run zigbee2mqtt as daemon and start it automatically on boot we will run Zigbee2mqtt with
systemctl.# Create a systemctl configuration file for zigbee2mqtt sudo nano /etc/systemd/system/zigbee2mqtt.serviceAdd the following to this file:
[Unit]
Description=zigbee2mqtt
After=network.target

[Service]
ExecStart=/usr/bin/npm start
WorkingDirectory=/opt/zigbee2mqtt
StandardOutput=inherit
StandardError=inherit
Restart=always
User=pi

[Install]
WantedBy=multi-user.target
Save the file and exit. Verify that the configuration works:
# Start zigbee2mqtt
sudo systemctl start zigbee2mqtt

# Show status
systemctl status zigbee2mqtt.service
Enable the service typing:
sudo systemctl enable zigbee2mqtt.service- Do not forget that zigbee2mqtt requires a MQTT Broker!
- For pairing devices follow this link.
Conclusion
This post allows you to connect Xiaomi sensors to a Raspberry Pi running Raspbian. To do that, you need to flash first a Zigbee dongle using a CC Debugger and the Texas Instrument software. The connected sensors can be added to Home-Assistant or Domoticz in order to control and monitor your home. This option works without any need of installing or configuring the Xiaomi cloud, nor the Xiaomi application on the smartphone. As I mentioned, check this article: #Raspberry Pi: Xiaomi Sensors & Home Assistant (Hass.io) to integrate the sensors to Hass.io.
We use cookies to improve our services. Read more about how we use cookies and how you can refuse them.
")


")

")


Empty