 04
04
Oct - 2017Android Things
5 min | 4908Table of contentShowAs the title says, this is a getting started with Android Things. It should be my first post, but, it's better now than never. I'm posting this to summarize the steps to install Android Things on your Raspberry Pi.
Some parts of this article maybe outdated! I wrote the following new article:
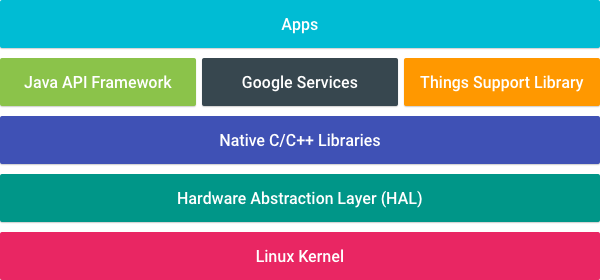
ProjectDIVA: Android Things 0.8.1 getting started!Google announced Android Things on December of 2016. It's a modified version of the Android that we all know, but for Internet of Things (IoT) devices. The architecture of the SDK is described in the following figure:
![Android Things Architecture]()
Fig.: Android Things SDK architecture (Source: Google) As you can see, the core Android framework (the level below the Apps) is extended with additional APIs provided by the 'Things Support Library' (in orange). These APIs enable the integration of the apps with the new IoT devices.
Android Things is compatible with many developer kits. A list can be found here. Besides the NXP and the discontinued (Edison and Joule) Intel boards , the Raspberry Pi 3 Model B is also compatible.
Android Things is still in development phase (-devpreview), which means that there are many (un)known issues. A list of known issues can be found here together with the release notes, others can be found or reported here (search "Android Things" or your something related to your problem).
How to get the Android Things image?
The first versions of Android Things were available to download as a zipped image using a link. There was no connection between you and the downloaded image. Nowadays you get the zipped image using the Android Things Console and you need to have a Google account and create an app image. The good thing about it, you can flash the image on many devices as you want, and you can update your application using the Console with only one click!
The steps to download the zipped image are the following:
- Go to: Android Things Console and sign in using your Google credentials
- Click on: Create a new Product
- Go to: Factory Image
- Select: Empty Bundle (if you don't have any app yet) and the Android Things v. e.g. OIR1.170720.017 for 0.5.1-devpreview
- Click on: Create Build Configuration
- Make a coffee or just wait a couple of minutes until the download of the .zip file containing the .img file starts
- You get the zipped image, unzip it using e.g.:
- 7-ZIP on Windows
- The Unarchiver on Mac
You shouldn't install an image that you find on the Internet without knowing its source. You should already known now that the image can contain applications and as I said, it can be updated using the Android Things Console. The applications/updates are installed without asking you for permissions. That means, if someone want to install a backdoor, or an access to your private network from outside, this is possible!
How to flash the image?
- Find an 8 GB or larger microSD card and insert it into your development computer
- Unzip the .zip file (you need about 4GB), and flash the .img using:
- Win32DiskImage on Windows or
ddcommand on
Click here for more info
Booting
- Insert the flashed microSD card into your Raspberry Pi 3
- Connect an HDMI cable to an external display or use the Raspberry Pi Display
- Connect an Ethernet cable
- Connect an USB cable and power the board
- The Android Things Launcher should show information on the display, including the IP address
How I connect my development computer to the Raspberry Pi?
You need to use the Android Debug Bridge (adb). This is included if you've already installed Android Studio, otherwise you can download and install the last version from here. On Windows, I needed to modify the
Environmental Variablesto include:C:\Users\<your-username>\AppData\Local\Android\sdk\platform-toolsSteps to modify the
Environmental Variableson Windows:- Press
Windows+Pausekeys together (Systemdialog should open -Control Panel\All Control Panel Items\System-) - Click on
Advance system settingson the left panel - Go to
Advancedtab - Click on
Environmental Variablesbutton - Search for
PathinSystem Variables(the lower panel) - Click on
Edit, thenNew - Type the
adbfile location (Usually:C:\Users\<your-username>\AppData\Local\Android\sdk\platform-tools-change<your-username>for the correct path)
You can skip these steps, but then you need to type the full path to
adbeverytime you need to use it.To connect to the Raspberry Pi you need to:
- Open a
cmdon Windows orTerminalon Linux/Mac - Then, type (change
<ip-address>to the IP displayed on your external display)$ adb connect <ip-address> connected to <ip-address>:5555You are then connected to Android Things, using
adb shellyou can access to the Android shell.
Connecting to Wifi
On the Raspberry Pi, you can use the WiFi to connect to your private network router and skip the Ethernet cable, or to connect to another WiFi.
- Open a
cmdon Windows orTerminalon Linux/Mac - Then, type (change
<WiFiSSID>and<Secr3tPassw0rd>for the right values):$ adb shell am startservice \ -n com.google.wifisetup/.WifiSetupService \ -a WifiSetupService.Connect \ -e ssid <WiFiSSID> \ -e passphrase <Secr3tPassw0rd> or in one line: $ adb shell am startservice -n com.google.wifisetup/.WifiSetupService -a WifiSetupService.Connect -e ssid <WiFiSSID> -e passphrase <Secr3tPassw0rd>
Known-Issues that I have/had (September 2017):
- Don't use Android Things DP 0.5.0. It simply doesn't work! It has too many bugs here are some that I described.
Android Things DP 0.5.1:
- it has some issues with Bluetooth. I cannot get the SensorTag-Things to work. It crashes in different positions! I think, it is a problem of Android O. I have a Nexus 5X and after updating it to Android O, I have problems with Bluetooth and my devices (e.g. SensorTags, UPRIGHT-GO) are not found.
- it has problems with the SPI unit, after stopping the application in debugging mode, and starting it again, I get the following error:
Unable to access SPI device
com.google.android.things.pio.PioException: android.os.ServiceSpecificException: SPI0.1 driver failure (code 5)
Rebooting the Raspberry Pi using
adb shell reboot(or un-plugin and plugin the power again) helps.The issue was reported here.
- it has storage management problems too. After using the debugger and the application crashes too many times. I was not able to debug the app any more, I got the error
Session 'app': Error Installing APK. Getting into the shell and typingdf -hthe/dev/fusewas used up to 96%. The/data/misc/crash_reporter/crashfolder increased its size not allowing to install new applications. You can open acmdorTerminaland type the following to resolve the problem (or you can flash the image again -not recommended):
adb connect <ip-address>
adb shell
cd /data/
su
du -h > /storage/emulated/storage.txt    # du (disk usage) reports the size of the directories
                                           # this allows to check if the folder crash_reporter is the problem
cat /storage/emulated/storage.txt       # read the written file
rm -r /data/misc/crash_reporter       # deletes the folder
reboot
The issue was reported here.
Useful links
Developer Kits Android Things compatible IoT devices Android Things Console download Android Things image issues known issues per release issue tracker issues tracker and report 7-ZIP unzip the .zip on Windows The Unarchiver unzip the .zip on Mac Win32DiskImage flash the image using Windows ddcommandflash the image using Linux ddcommandflash the image using Mac flashing the image for more info Android Debug Bridge (adb) download the adb to connect to Raspberry Pi Android Studio download Android Studio to write, debug and build Android applications
We use cookies to improve our services. Read more about how we use cookies and how you can refuse them.

Empty