 20
20
Jul - 2018Real Time Systems
8 min | 72164#Raspberry Pi: Real Time System - Preempt-RT Patching Tutorial for Kernel 4.14.y
Real Time Systems | 8 min | 72164
Table of contentShowThe Preempt-RT tutorial article is the most visited post on my blog. Therefore, I decided to update the tutorial to make it cleaner, and to introduce some other possible modifications and tips for solving problems.
Preempt-RT is a popular patch for the Linux kernel to transform Linux into such a real-time operating system. There is another option to get this done, and that's Xenomai (tutorial and performance tests here).
Tiejun Chen, the main responsible for the official Raspberry-Pi-RT branch, has published a video about Preempt-RT here. It includes tips, results and tests.
Getting the Sources
For this tutorial, you need a host computer running Linux. In my case, I am using Ubuntu 18.04 LTS, but the tutorial should work with any version of Linux.
Very important: Most of this tutorial (configuring and compiling the Kernel) is performed on a host computer (x86/x64) running Linux, not on the Raspberry Pi!. Only the deployment is realized on the Raspberry Pi.If you are looking for a tutorial or performance results for kernel 4.19.y or you have a Raspberry Pi 4B check this article:
#Raspberry Pi 4B: Preempt-RT Kernel 4.19.y - Performance TestRequirements
To start in a clean way, make a subdirectory, e.g.
rpi-kernelunder yourhomedirectory:~$ mkdir ~/rpi-kernel ~$ cd ~/rpi-kernel ~rpi-kernel$ mkdir rt-kernelThe subdirectory
rt-kernelis for the compiled files.Then, clone the following repositories:
~/rpi-kernel$ git clone https://github.com/raspberrypi/linux.git -b rpi-4.14.y-rt
~/rpi-kernel$ git clone https://github.com/raspberrypi/tools.git
The Raspberry PI kernel source will be downloaded to the
linuxsubdirectory (1.5-2 GB) and the Raspberry PI cross-compilers to thetoolssubdirectory (1 GB).The
toolsdirectory contains several toolchain versions that are needed to compile the kernel sources:- tools/arm-bcm2708/arm-bcm2708hardfp-linux-gnueabi
- tools/arm-bcm2708/arm-bcm2708-linux-gnueabi
- tools/arm-bcm2708/gcc-linaro-arm-linux-gnueabihf-raspbian
Switching the Branch
The kernel source repository includes several kernel versions. If you've cloned the complete linux kernel repository (without the
-bargument), you need to switch to therpi-4.14.y-rtbranch to compile the Preempt-RT patched kernel, otherwise you are already on the right branch:~/rpi-kernel$ cd linux ~/rpi-kernel/linux$ git checkout rpi-4.14.y-rt Branch 'rpi-4.14.y-rt' set up to track remote branch 'rpi-4.14.y-rt' from 'origin'. Switched to a new branch 'rpi-4.14.y-rt'Configuration
Toolchain
You need to set the following variable before starting to configure and/or compile the kernel source:
~/rpi-kernel$ export ARCH=arm
~/rpi-kernel$ export CROSS_COMPILE=~/rpi-kernel/tools/arm-bcm2708/gcc-linaro-arm-linux-gnueabihf-raspbian/bin/arm-linux-gnueabihf-
~/rpi-kernel$ export INSTALL_MOD_PATH=~/rpi-kernel/rt-kernel
~/rpi-kernel$ export INSTALL_DTBS_PATH=~/rpi-kernel/rt-kernel
On build systems that support it (x64 - check e.g.
cat /proc/version-), you can use the 64-bit cross compiler tools (Rich: Thanks for your suggestion!) and set the environmental variableCROSS_COMPILEwith the following:~/rpi-kernel$ export CROSS_COMPILE=~/rpi-kernel/tools/arm-bcm2708/gcc-linaro-arm-linux-gnueabihf-raspbian-x64/bin/arm-linux-gnueabihf-The other env. variables remain as defined above.
Note: Check "Tip and Solution (6)" if you have problems with the relative path (`~`).The variables set the following:
ARCH: the system architecture;CROSS_COMPILE: the path to the toolchain. If you cloned thetoolrepository into another directory, you need to change this path.INSTALL_MOD_PATH: the path, into where the compiled kernel modules (MOD) are going to be installed.INSTALL_DTBS_PATH: the path, into where the compiled DTB (Device Tree Blob) files are going to be installed.
Notes:
- If you decided to clone, or compile the kernel in other directory, you need to modify these paths. Otherwise, you are going to get errors while compiling or configuring the kernel.
- Leave no spaces near the
=. - You can check the variable contain typing e.g.
echo $INSTALL_MOD_PATH. - If you close the terminal or sub-window in Terminator, you need to set the variables again.
Building the Kernel Configuration
Depending on your current Raspberry Pi hardware, you need to set the
KERNELvariable andmakethe right configuration following this:Raspberry Pi 1/1.2 B(+), A(+), Zero (W):
~/rpi-kernel$ export KERNEL=kernel
~/rpi-kernel$ cd ~/rpi-kernel/linux/
~/rpi-kernel/linux/$ make bcmrpi_defconfig
Raspberry Pi 2, 3 B(+):
~/rpi-kernel$ export KERNEL=kernel7
~/rpi-kernel$ cd ~/rpi-kernel/linux/
~/rpi-kernel/linux/$ make bcm2709_defconfig
for the Raspberry Pi 4B check this article:#Raspberry Pi 4B: Preempt-RT Kernel 4.19.y - Performance TestThis is very important, otherwise you are going to waste your time compiling a kernel that is not going to boot on your system.
Check/Modify the Configuration (Optional)
The Preempt-RT branch is configured to compile the patched kernel. Before this branch exists, you needed to configure the kernel after patching the sources. This is not needed anymore, but you can still tune your kernel, or you can check the actual configuration. To do that, type:
~/rpi-kernel/linux/$ make menuconfigIf you get the error
make menuconfig' requires the ncurses libraries, install thencurseslibrary using:~/rpi-kernel/linux/$ sudo apt-get install libncurses-devThe most important configurations are:
- Enable
CONFIG_PREEMPT_RT_FULL: Kernel Features → Preemption Model (Fully Preemptible Kernel (RT)) → Fully Preemptible Kernel (RT) - Enable
HIGH_RES_TIMERS: General setup → Timers subsystem → High Resolution Timer Support - Set
CONFIG_HZto 1000Hz (read the notes!): Kernel Features → Timer frequency = 1000 Hz
Notes:
- If you don't find the
CONFIG_PREEMPT_RT_FULLoption, you didn't switch the branch, and you are still on the master branch. CONFIG_PREEMPT_RT_FULLandHIGH_RES_TIMERSare set correctly per default.CONFIG_HZis set to 100 Hz per default. If you need lower latencies, you can change it to 1000Hz, as I described above. Choosing 1000 Hz instead of 100 Hz will speed up the scheduling interval and things will get more responsive since latencies get lowered. The scheduling interval of the IRQ decreases too (be careful with this).
Compiling the Kernel
To compile the kernel you need to type the following:
~/rpi-kernel/linux$ make -j4 zImage
~/rpi-kernel/linux$ make -j4 modules
~/rpi-kernel/linux$ make -j4 dtbs
~/rpi-kernel/linux$ make -j4 modules_install
~/rpi-kernel/linux$ make -j4 dtbs_install
Choose the right
-jXparameter according to the number of processors that your host computer has. In my case 4.Take a coffee or may be 2! ;)
Note:
- The last line returned after installing
modules_installreports the kernel version that you compiled, e.g.:DEPMOD 4.14.52-rt34-v7+You are going to need this information for the kernel deployment.
Then, make just a blob of data at the end of the kernel image typing:
~/rpi-kernel/linux$ mkdir $INSTALL_MOD_PATH/boot
~/rpi-kernel/linux$ ./scripts/mkknlimg ./arch/arm/boot/zImage $INSTALL_MOD_PATH/boot/$KERNEL.img
Transfer the Kernel
After the compilation is completed, compress all files to tranfer them to the Raspberry Pi (read the item 5 of "Tips and Solutions" if you want that your Preempt-RT patched kernel lives alongside your normal kernel):
~/rpi-kernel/linux$ cd $INSTALL_MOD_PATH
~/rpi-kernel/rt-kernel$ tar czf ../rt-kernel.tgz *
Then, transfer the resulting '.tgz' file to the Raspberry Pi using
scpand your ssh credentials:~/rpi-kernel/rt-kernel$ cd .. ~/rpi-kernel$ scp rt-kernel.tgz pi@<ipaddress>:/tmpChange
<ipaddress>to the corresponding IP of your Raspberry Pi.Installing the Kernel Image, Modules & Device Tree Overlays
Before you start doing this, be sure that you've already saved the important data from your Raspberry Pi (may be you should do a MicroSD card backup). The following commands replace the kernel, modules & device tree overlays without making any backup. That means, if it doesn't work because errors ocour, then you are not going to be able to boot your Raspberry Pi as usual. You can get your files from the MicroSD (e.g. connecting to your host computer), but the hardware is not going to boot. Be also aware there could be compatibility issues with some drivers. This tutorial helps you to install the kernel version 4.14.y. Discussion for kernel compatibilities are here.
If you are sure to continue, type the following on the Raspberry Pi:
~$ cd /tmp
/tmp$ tar xzf rt-kernel.tgz
/tmp$ cd boot
/tmp/boot$ sudo cp -rd * /boot/
/tmp/boot$ cd ../lib
/tmp/lib$ sudo cp -dr * /lib/
# thanks for your comment Bart!
/tmp/lib$ cd ../overlays
/tmp/overlays$ sudo cp -d * /boot/overlays
/tmp/overlays$ cd ..
/tmp$ sudo cp -d bcm* /boot/
Add the following entry to
/boot/config.txt:Raspberry Pi 1/1.2 B(+), A(+), Zero (W):
# Add the following option:
kernel=vmlinuz-4.14.52-rt34+
Raspberry Pi 2, 3 B(+):
~$ sudo nano /boot/config.txt
# Add the following option:
kernel=vmlinuz-4.14.52-rt34-v7+
Change the version number corresponding to the kernel version that you've compiled.
Reboot the Raspberry Pi and if all the stars are aligned, you get the Preempt-RT kernel working! I am just kidding, It should work without any problems! ;P. You can test if the kernel is working, typing:
~$ uname -r
4.14.52-rt34-v7+
Isolcpus (Optional)
In multi-processor realtime systems, it is sometimes desirable to isolate some CPUs in the system to enhance their capability to maintain realtime performance. This can be help you to isolate 1 CPU from the regular tasks and assign it an important interruption or task.
To isolate a CPU or multiple CPUs, you need to add this line to the
boot/cmdline.txtfile.~$ sudo nano /boot/cmdline.txt # Add one of the following options at the end of the line isolcpus=3 # isolate the CPU nr 3 isolcpus=1,2,3 # isolate the CPUs nr 1, 2 & 3To define the affinity of interruptions to a specific CPU type e.g.:
~ $ sudo echo 3 > /proc/irq/62/smp_affinity
~ $ sudo echo 3 > /proc/irq/62/smp_affinity_list
Making a
catof/proc/interruptsto display its contents:~ $ cat /proc/interruptsallows seeing which interruptions are getting more scheduled, and which CPU is answering these interruptions.
To assign your task to a CPU(s)
taskset -c 3 python # only one CPU taskset -c 1,2,3 python # multiple CPUsTasksetis used to set or retrieve the CPU affinity of a running process given its PID or to launch a new COMMAND with a given CPU affinity.
Latency Results
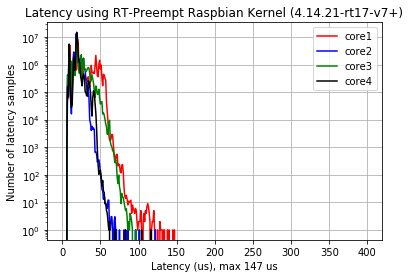
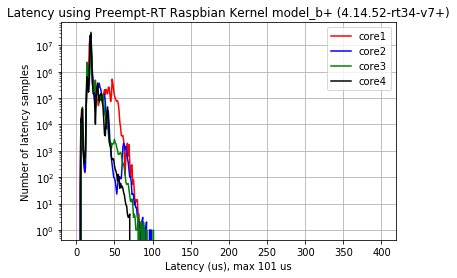
The latecy results are improved using the new Preempt-RT patched kernel 4.14.52-rt34-v7+.
![Model B+ Latency Results]()
![Model B+ Latency Results]()
Fig. 1a: Latency results 4.14.21-rt17-v7+ Fig. 1b: Latency results 4.14.52-rt34-v7+ The latency results were calculated using the suite RT-Tests, and the test were configured as described here.
Multithread Performance Results
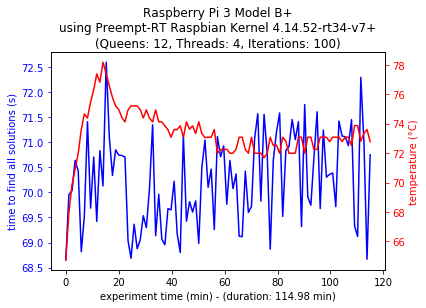
But, the new Preempt-RT patched kernel 4.14.52-rt34-v7+ does not improve the results obtained with the version 4.14.27-rt21-v7+. :(
![Model B+ Multi-thread Configuration]()
![Model B Multi-thread Configuration]()
Fig. 2a: Multi-thread Configuration on Model B+ Fig. 2b: Multi-thread Configuration on Model B+ The performance test results were calculated using the Multi-thread N-Queens Problem solver and configured as described here.
Tips and Solutions
This time I left
CONFIG_HZset to 100 Hz (per default), and the kernel booted without any problem, and the Raspberry Pi didn't hang everytime I wanted to download something. If you are having problems with this. This can help you, the problem is the usb interruption:- Add the following entries to
/boot/cmdline.txt(the patch should resolve this, but may be it doesn't work for you)~$ sudo nano /boot/cmdline.txt # Add the following options at the end of the first line: dwc_otg.fiq_enable=0 dwc_otg.fiq_fsm_enable=0 dwc_otg.nak_holdoff=0
- Add the following entries to
You can also disable the Low Latency Mode (llm) for the MicroSD card:
~$ sudo nano /boot/cmdline.txt
# Add the following option:
sdhci_bcm2708.enable_llm=0
If you get the following error:
root@ubuntu:/home/user/rpi-kernel/linux# make -j4 zImage
./scripts/gcc-version.sh: line 26: /root/rpi-kernel/tools/arm-bcm2708/gcc-linaro-arm-linux-gnueabihf-raspbian/bin/arm-linux-gnueabihf-gcc: No such file or directory
you didn't set the variable
CROSS_COMPILEto the right path. Or you didn't download the toolchain.Errors like these:
raspberrypi-firmware soc:firmware: Get Throttled mailbox call failed
bcm2835_thermal soc:thermal: invalid response
bcm2835_thermal soc:thermal: Could not get registers: -22
or
Timed out waiting for device dev-disk-by\........ Dependency failed for /boot Dependency failed for local File System Timed out waiting for device dev-ttyAMA0.device you are in emergency mode- can be related with the wrong compiled kernel. That means, you compiled a kernel for a Raspberry Pi 3, and you deployed it on Raspberry Pi/Zero, or viceversa.
- or you need to copy the
overlaysandbcmfiles again:# copy the following: /tmp/lib$ cd ../overlays /tmp/overlays$ sudo cp -d * /boot/overlays /tmp/overlays$ cd .. /tmp$ sudo cp -d bcm* /boot/It usually happens when the Raspbian kernel on your SD is version 4.9. (Thanks Bart for your comment!).
If you don't want to replace the actual kernel, you can make the following modifications:
- rename the new compiled
kernel7.imgfile to e.g.kernel7_rt.imgbefore you gzip the directory, - copy the gzip file to the Raspberry Pi, and install the kernel as usual, but add the following to
/boot/config.txt:# Add the following option: kernel=kernel7_rt.imgThis allows you to boot with the Preempt-RT patched kernel, if you want to go back to your normal kernel, modify the option to
kernel=kernel7.img. (Rich: Thanks for your suggestion!).
- rename the new compiled
If you get the following error:
scripts/link-vmlinux.sh: line 61: ~/rpi-kernel/tools/arm-bcm2708/gcc-linaro-arm-linux-gnueabihf-raspbian-x64/bin/arm-linux-gnueabihf-ar: No such file or directorytry using the absolute path to the directory and avoid using relative path (
~) (Thanks Hans J. for your E-Mails!).
We use cookies to improve our services. Read more about how we use cookies and how you can refuse them.


")

")


")
Michael Welch 07.25.2018
I am getting this error:
"./scripts/gcc-version.sh: line 26: /root/rpi-kernel/tools/arm-bcm2708/gcc-linaro-arm-linux-gnueabihf-raspbian/bin/arm-linux-gnueabihf-gcc: No such file or directory"
Except that instead of "line 26: /root" etc., my message says "line 26: /home/mike/" etc. Was I supposed to be running this as root, putting my directories in the root tree? I have copied the exact path from the error message into a command prompt, and it just goes there without any error gripes, and "ls" shows me that arm-linux-gnueabihf-gcc is indeed in the directory. If I just enter "arm-linux-gnueabihf-gcc" at the command prompt it will give me a fatal error for lack of an input file, so I know that arm-linux-gnueabihf-gcc is a legit compiler file.
What could I have done wrong?
Rich Dubielzig 07.27.2018
Thanks for the walkthrough. It's nice to see these things described step-by-step. A few suggestions:
~/rpi-kernel$ git clone https://github.com/raspberrypi/linux.git -b rpi-4.14.y-rt --depth=3 ~/rpi-kernel$ git clone https://github.com/raspberrypi/tools.git --depth-3
This caused both repo downloads to shrink to < 200MB
On build systems that support it, you can use the 64-bit cross compiler tools: ~/rpi-kernel$ export CROSS_COMPILE=~/rpi-kernel/tools/arm-bcm2708/gcc-linaro-arm-linux-gnueabihf-raspbian-x64/bin/arm-linux-gnueabihf-
You don't need to wipe out your existing boot images. The contents of the lib directory in your boot image is modules/4.14.52-rt34-v7+ which can live alongside the other kernel modules in /lib/modules. If you copy your built kernel7.img to /boot/kernel7_rt.img, you can keep your original kernel7.img and add this line to config.txt: kernel=kernel7_rt.img If you want to move back to the non-realtime, you can just comment out the "kernel" line in config.txt and reboot.
everetto89 07.29.2018
Thanks a lot for your tutorial. Unfortunately, I'am getting an error by checking out the git repository:
~/rpi-kernel/linux $ git checkout rpi-4.14.y-rt error: pathspec 'rpi-4.14.y-rt' did not match any file(s) known to git.
Until that point I'm doing everthing as described in the tutorial. Has the kernel name maybe changed? I'm using Linux Mint 64-bit for cross compiling.
It would be a great help if we can fixing this error! Thanks a lot for your help in advance.
Christian
Bart 09.23.2018
Thank you for the great article
I get stuck with the error you describe in tips and tricks #4 unfortunately. When rebooting after patching I get: bcm2835_thermal soc:thermal: invalid response bcm2835_thermal soc:thermal: Could not get registers: -22
I have a Raspberry Pi 3 Model B+, with Raspbian with kernel 4.9.something. Can I start from this kernel or do I need to update first to the exact kernel version?
I compiled, which resulted in a patched kernel with the output line DEPMOD 4.14.66 (instead of 4.14.52 as you described) so I added to /boot/config.txt the line with 4.14.66. does that sound right?
Now what I find odd (though I have no experience with this) is that it seems that for the patched kernel tgz file only the boot and lib folders are used, while e.g. the dtb files do not seem to be used. And these seem to be mentioned in the error.
Can you give me your advice?
Thank you!
Bart
sorg 10.04.2018
Hello, I'm having the same errors starting on the step of "make -j4 zImage". I tried 4 times and got the same error messages. "home/pi/rpi-kernel/tools/arm-bcm2708/gcc-linaro-arm-linux-gnueabihf-raspbian-x64/bin/arm-linux-gnueabihf-gcc: 1: /home/..../bin/arm-linux-gnueabihf-gcc: Syntax error: "(" unexpected" and: "home/...../.....gcc: Cannot execute binary file: Exec format error" -> indicated on lines 26 and 27 as far as I could see. I am using a Raspberry PI3 B+ running Raspbian Lite (which is basically Debian for RaspberryPI) and it supposed to be "-j4" once it's a quadcore, right?
Thank you for your attention
Ashlin 10.24.2018
Hi! Thanks for this great tutorial! One thing I noticed is that when I compiled and installed the modules and dtbs, nothing was written to ~/rpi-kernel/rt-kernel. By the time all of the compilations were complete, this folder only contained boot/kernel7.img. I think this is incorrect because when unzipping the files on the pi, there is supposed to be lib and overlays directory in /tmp, which I do not get. Is this a problem? When I rebooted, uname -r showed 4.14.74-rt44-v7+, which seems correct
Mark 12.06.2018
While building the kernel with make zImage i did get the error:
/bin/sh: 1: bc: not found Kbuild:43: recipe for target 'include/generated/timeconst.h' failed make[1]: [include/generated/timeconst.h] Error 127 Makefile:1084: recipe for target 'prepare0' failed make: [prepare0] Error 2 make: *** Waiting for unfinished jobs....
I was able to be solve it with: $: sudo apt-get install bc
Michele 12.31.2018
Hi, thank for your guide. I have followed your tutorial for a Raspberry Pi B+ model (4.14.90+). I tried the last rt-kernel (DEPMOD 4.14.81-rt47+). I compiled and installed the kernel and everything seems to work fine, but the booting freezes after reboot.
Do you have any suggestion?
mdtahar 02.02.2019
Hello, i install the 4.14.93-rt49 version on my rpi 2B, and i tryed to compile a hello word programme but i can't find the rtl.h and rtl.mk file, i look in /usr/include/ and i didn't find the rtlinux folder. please help me.
Florent 03.19.2019
Hi, thank you for your guide. I have followed it until i got an error after entering the command: make -j8 dtbs_install Unfortunately it gets me this error:
Can you help me?
Matheus 09.04.2019
Update: In "Building the Kernel Configuration", use the commands "export KERNEL=kernel7l", "cd ~/rpi-kernel/linux", and "make bcm2711_defconfig" to build for RPi 4. Worked for me with 4.19.y-rt.
Matheus 09.04.2019
Update: In "Building the Kernel Configuration", use the commands
to build for RPi 4. Worked for me with 4.19.y-rt.
B0bbyR4y 09.08.2019
Great Tutorial. Love it! Keep it up!
B0bbyR4y 09.08.2019
Great Tutorial! Keep it up! Blogs with great tutorials like this are rare. Formidable! :-)
John Talbot 10.23.2019
Great article. I did not know about Isolcpus so thanks. After booting the rpi-4.19.y-rt kernel that I built on my Pi 3B+, I got the following error messages on the screen
I was first confused by
bcm2708_fb, but it was a read hearing. I googled the error and determined fb stood for frame buffer. I diffed a working .config file with the one created bybcm2709_defconfig. After a process of elimination, I found that changingCONFIG_FB_SIMPLEtoo undefined solved the problem.I am letting you know, just in case someone else ever has this issue.
Thanks for the great article, John