 15
15
Nov - 2020Cloud Platforms, M5Stack, MicroPython
12 min | 241791#M5Stack: Fresh air checker can help you to stay safe from #COVID-19
Cloud Platforms, M5Stack, MicroPython | 12 min | 241791
Table of contentShowWinter is coming and the air-quality inside a closed room could be an index used to estimate the amount of aerosols in it, and hence the risk of Covid-19 infection. In other words, a system of CO2 traffic lights could help to spot potential corona-aerosols!
Where there are many people in a room, there is a lot of exhalation (approx. eight liters of air per minute per nose). This air contains CO2 (carbon dioxide). Long before Covid-19, in Germany, the German Environment Agency suggested that a concentration of CO2 in a classroom should not exceed 1000 ppm (parts per million) (Guidelines for Indoor Air Hygiene in School Buildings - 2008). Therefore, every measurement over this threshold was/is considered "hygienically evident" (1000-2000 ppm) or "hygienically unacceptable" (>2000 ppm). For your reference, the fresh air outside contains a CO2 concentration between 350-500 ppm.
The idea of setting up CO2 measuring devices during the Covid-19 pandemic is not about measuring such extreme values. A CO2 measuring device would be an orientation when the air in the room should be exchanged i.e. ventilated (with the windows wide open for several minutes).
![VM f1-micro instance running]()
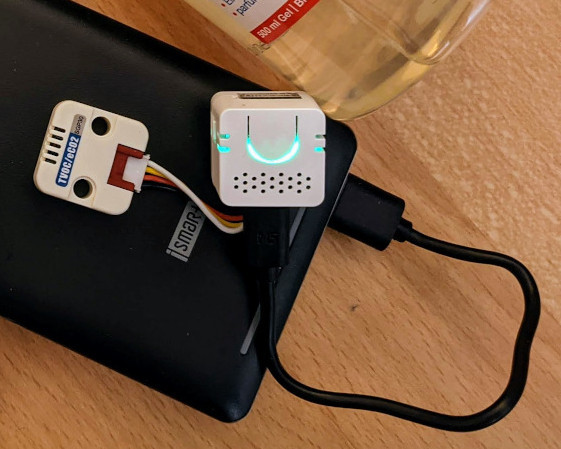
Fig. 1: Sensor unit (M5Stack ATOM Echo and SGP30 Sensor)This tutorial helps you to build DIY CO2 measuring devices (see Fig. 1) and connect them to your smartphone. The measurements can be an aid for Covid-19 prevention. The idea is that if there is a lot of exhaled CO2 in the air, there are also a lot of aerosols in the air. These smallest particles, to which Sars-CoV-2 viruses from the respiratory tract attach themselves, can float in the room air and can spread over several meters. A high concentration of aerosols increases the risk for everyone else in the room to become infected.
You can read more about the correlation between CO2-concentration and the potential risk of Covid-19 infection in this paper: Risk assessment of aerosols loaded with virus based on CO2-concentration.Hardware and Software
The following hardware and software will be used in this tutorial:
DIY Sections
I divide this project into three parts:
- The sensor that acquires the data;
- The server microservice that concentrates and publishes (eventually analyzes, processes, and saves) the data;
- Website to read the data.
As I used the M5Stack ATOM Echo, 4 possibilities to communicate the measurement are available:
- RGB Led
- Audio
- RestAPI (Local IP)
- Google Cloud Platform (GCP) Pub/Sub and RestAPI (Global IP).
The last option enables you to integrate more than one sensor and process the data. But of course, it is more complicated to configure. I will use only certain services to remain under the "always free tier" limits on GCP. However, as a consequence, the performance of data streaming will be reduced, which is not a problem for this project. If you've decided to save the data, you'll need to pay some cents. The
config.pyallows you to enable and disable the different options (RestAPI, audio, and GCP).DIY: Setup Sensor Firmware
The M5Stack ATOM family devices are based on an ESP32 PICO. Therefore, it is possible to program them using MicroPython. I'm sure you've heard about MicroPython, but if you haven't, just refer to this article.
Flashing MicroPython
The M5Stack ATOM family has only 512 KB of RAM. So, to reduce the memory usage, I've frozen some modules (all the files under the folder
frozen/), especially the ones related to keys, encryption, and webserver. Additionally, the ATOM Echo needs the I2S interface to send data to the audio amplifier IC for the speaker. The original MicroPython version doesn't include the driver yet. So, I've extended it using this repository. The resulting firmware is located here. You can download it and flash it following these instructions:- Install
esptool, if you haven't yet, follow these instructions. Usually, you only need to type:pip install esptool - Connect the M5Stack ATOM (ECHO) to a USB port of your PC and erase the flash typing:
esptool.py --port /dev/ttyUSB0 erase_flash - Flash the new firmware typing:
esptool.py --chip esp32 --port /dev/ttyUSB0 --baud 115200 write_flash -z 0x1000 micropython_b7883ce_esp32_idf4.x_i2s.bin
If you need detailed information about these steps, check out this tutorial: Tutorial: Getting Started with MicroPython on ESP32, M5Stack, and ESP8266. If you're running Windows just change the lines to:
python3 -m esptool --chip esp32 --port COMXX [...]Sensor Application
To measure the CO2 concentration, I used the SGP30. The sensor is still active, but it has a replacement, which is not easy to find integrated into a board :(. The SGP30 is inside the TVOC/eCO2 M5Stack unit and it is easy to integrate to the M5Stack Cores using the PH2.0-4P socket (Plug&Play).
The SGP30, like all VOCs / gas sensors, has varying readings! For general environmental uses, it will give you a good idea of trends and comparison. The SGP30 does have built-in calibration capabilities. The eCO2 is calculated based on H2 concentration, therefore, it is not a 'true' CO2 sensor for laboratory use.I recommend using VSCode and the Pymakr extension to program and upload code to ESP32 boards running MicroPython firmware. A tutorial is available on this link: MicroPython: Visual Studio Code (VSCode) as IDE.
Before you upload the application to the M5Stack, you need to modify some files and eventually create a
.pemkey. But, first of all, clone the repository typing:git clone https://github.com/lemariva/uPyCO2.gitRGB LED and Audio
Rename the file
config.py.exampletoconfig.py. As I mentioned before, there are 4 possibilities to communicate the measurements. If you've decided to go offline, set the values:'gcp': False, 'restapi': False,and eventually
'audio': True, to get the alarms visual and/or auditory. The thresholds are available with the labels:'warning': 600, 'danger': 1000After getting the measurements, the M5Stack goes for deep sleep for about 10 seconds
'deepsleepms': 10000.RestAPI (Local IP)
If you also want to go online, you need to add the Wi-Fi credentials of your router/access-point under:
wifi_config = {
    'ssid':'',
    'password':''
}
If you want the local network version, just activate the flag
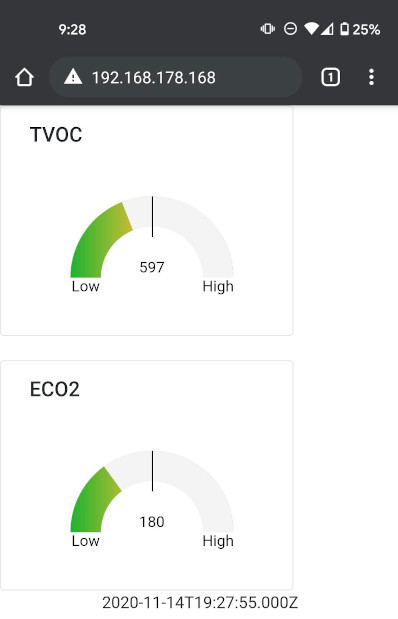
'restapi': True,. The M5Stack starts a web server and you can check the IP address of the M5Stack (reported on the VSCode terminal or your router) to get the measured values like Fig. 2 and Fig. 3.![RestAPI website]()
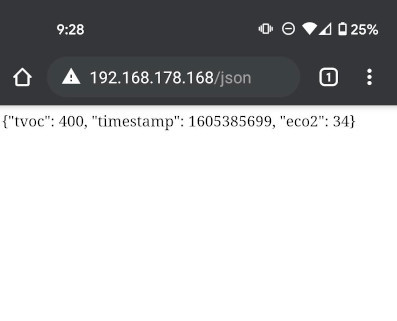
Fig. 2: Sensor website.![Grant the service account permissions]()
Fig. 3: Sensor RestAPI (local IP).The M5Stack doesn't go for a deep sleep in this case, because it loses the values and stops the webserver. Therefore, a "light" sleep is started.
Google GCP (Pub/Sub) and RestAPI (Global IP)
For the GCP version, you need to have a Google Account. Then, go to the Google Cloud Console.
The CO2 sensor needs a
.pemkey to authenticate on Google IoT Core. To do create that, follow these steps:- Type the following on a Terminal on your host PC to create a public/private key pair:
openssl genrsa -out rsa_private.pem 2048 openssl rsa -in rsa_private.pem -pubout -out rsa_public.pem - Then, create a Registry and add a Device in the GCP, as described in the Cloud IoT Core documentation. Add to the device the public key (
.pub) created in the previous step. I described these steps in detail in this tutorial. - Using
pip, install thersapackage on your host PC. This is needed to translate the RSA key for the device configuration.pip install rsa - Run the following line inside the folder
uPyCO2python utils/decode_rsa.py >> config.pyThe translated key will be appended at the end of the
config.pyfile. - Update the
config.pyfile, move the key you've appended to the end of the file to the JSON keyprivate_key(jwt_config['private_key']), and set also the Google Cloud Configuration section (google_cloud_config) of the file based on the Project ID, Registry ID and Device ID you set up in step 2. It should look like this example:google_cloud_config = { 'project_id':'core-iot-sensors', 'cloud_region':'europe-west1', 'registry_id':'esp32-iot-sensors', 'device_id':'m5stack-air-condition', 'mqtt_bridge_hostname':'mqtt.googleapis.com', 'mqtt_bridge_port':8883 } jwt_config = { 'algorithm':'RS256', 'token_ttl': 43200, #12 hours # Use utiles/decode_rsa.py to decode private pem to pkcs1. 'private_key':(205325754945..............) }
I have included some images and more details in an early tutorial this year. If you need more information, follow this link: MicroPython: GCP getting air-quality data from an M5Stack ATOM
DIY: Setup Microservice Application
The microservice application (source code inside the folder
gcp/) will run in a VM instance on GCP.Google offers the f1-micro instance in the "always free tier" with a limitation of 720 hours/month, which means 30 days. This means you can run one instance of this VM machine within your account for free. The f1-micro offers 1 virtualized CPU core (with burst capability to help with sudden load spikes) and 614MB of memory. These specs don't sound great, but they are enough for this project if you can extend the RAM. This is possible using a SWAP file as RAM.
I will be using the VM instance that I created for the project: GCP: Implementing Real-Time data pipelines - from ingest to datastore. Therefore, follow the instructions from that tutorial under the topics:
- Create a VM instance
- SWAP on VM instance
- Docker on VM
Subscription Pub/Sub
To see the published messages, you need to subscribe to the topic that you've created while setting the device in the previous section. You can use the Google Pub/Sub API to make the subscription.
To achieve that:
- Click on the
Navigator Menuand scroll down toPub/Suband then activate the API. - Click on the listed topic, e.g.
projects/core-iot-sensors/topics/esp32-iot-tvoc-eco2-topic. - Click on the
Create Subscriptionbutton. - Type a name for the subscription e.g.
esp32-iot-tvocand select the optionPullfor theDelivery Type. - Click on the
Create button.
You'll need the subscription name for the microservice to get the published messages. You can just rename the file
.env.sampleto.envand set the environmental variablesPROJ_NAME=andPROJ_SUBS=with the "Project Name ID" and the "Subscription Name" values. In my case, the file looks like:GOOGLE_APPLICATION_CREDENTIALS=/home/service_account.json PROJ_NAME=core-iot-sensors PROJ_SUBS=esp32-iot-tvoc PORT=8080Service Account (GCP Key)
You may notice the
GOOGLE_APPLICATION_CREDENTIALSenv. variable in the.envfile, so you will need also a Service Account key.To create a Service Account and get the JSON key file, follow these steps:
- Open the Service Accounts page in the Cloud Console.
- Click Select a project, choose your project, and click Open.
- Click Create Service Account.
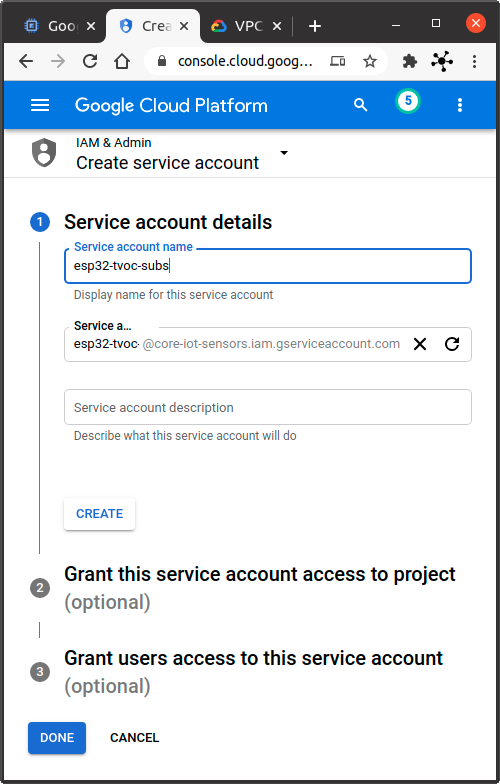
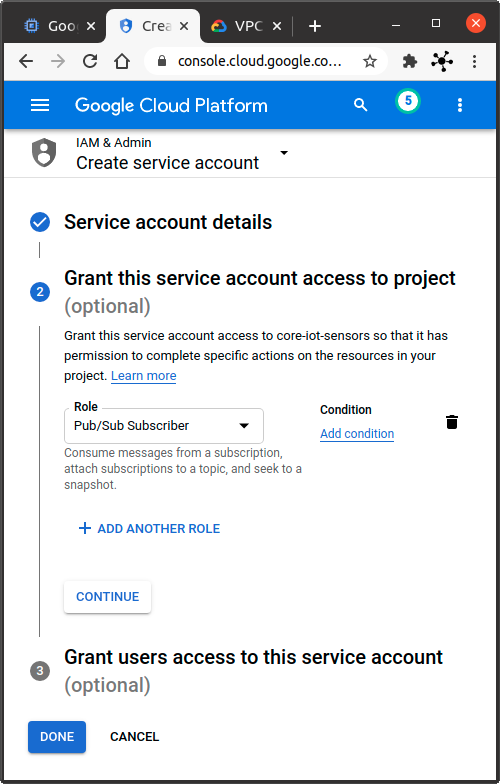
- Enter a service account name (friendly display name) and then click on Create (see Fig. 4).
- Grant the service account the following permissions (see Fig. 5) and click on Done:
- Pub/Sub Subscriber
- Click on the created Service Account
- Click on Add Key, Create new key and select JSON on the overlay and click on Create (see Fig. 6).
- Rename the downloaded file to
service_account.jsonand move it inside the foldergcp/resources/.
You can find more information about this topic here.
![Create a service account]()
Fig. 4: Create a service account.![Grant the service account permissions]()
Fig. 5: Grant the service account permissions.![Create a JSON key file]()
Fig. 6: Create a JSON key file.Compiling the project
In this subsection, you'll configure the project and set up an environment to upload the Docker files to the GCP to build the image using Cloud Build. You get 120 Build-minutes/day free to build images on GCP. Every extra minute will cost you USD0.003.
Having said that, you'll need the Google Cloud SDK. To install it, follow the instructions presented here.
To build the Docker image, you need to login to GCP using the SDK typing the following on a Terminal:
gcloud auth loginThis opens a browser, in which you select your Google account and give the SDK permission to access your account. If everything works, you'll see a webpage saying "You are now authenticated with the Google Cloud SDK!"
Then, you can select the project using:
gcloud config set project <<project-name>>and submit the files to build the Docker image typing (inside the
gcp/folder):gcloud builds submit --config cloudbuild.yamlyou'll get something like this:
Creating temporary tarball archive of 11 file(s) totalling 10.0 KiB before compression.
Uploading tarball of [.] to [gs://core-iot-sensors_cloudbuild/source/1[...]6dd.tgz]
[...]
FETCHSOURCE
Fetching storage object: gs://core-iot-sensors_cloudbuild/source/[...]6dd.tgz#1604861150327172
Copying gs://core-iot-sensors_cloudbuild/source/1[...]6dd.tgz#1604861150327172...
/ [1 files][  5.6 KiB/  5.6 KiB]
Operation completed over 1 objects/5.6 KiB.
BUILD
Already have image (with digest): gcr.io/cloud-builders/docker
Sending build context to Docker daemon   21.5kB
Step 1/13 : FROM python:3.7-buster
3.7-buster: Pulling from library/python
[...]
DONE
------------------------------------------

ID                                    CREATE_TIME                DURATION  SOURCE                                                                                          IMAGES                                      STATUS
e1e95d81-f864-40a6-be4d-cc5c727cb12b  2020-11-08T18:45:50+00:00  1M18S     gs://core-iot-sensors_cloudbuild/source/1[...]6dd.tgz  gcr.io/core-iot-sensors/upyco2-esp32:1.0.0  SUCCESS
As you can see in the log above, building the image took me about 78 seconds.
To check the built images, go to the Container Registry page in the Cloud Console:
DIY: Deploy the Microservice Application
After creating the Docker images, you can use docker-compose to deploy the micro-service application. But first, you need to give the VM machine access to the Container Registry and set up environment variables for the Docker containers.
Service Account (GCP key)
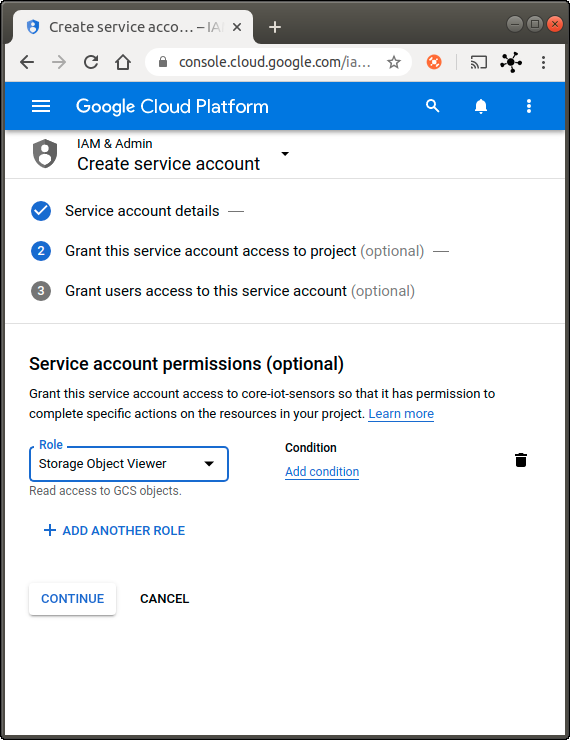
As you may have already noticed, you'll need a Service Account to access the Container Registry. To create a service account and get a JSON key file, follow the steps described above. This time, just grant the
Storage Object Viewerpermission to the Service Account as shown in Fig. 7.![Create service account]()
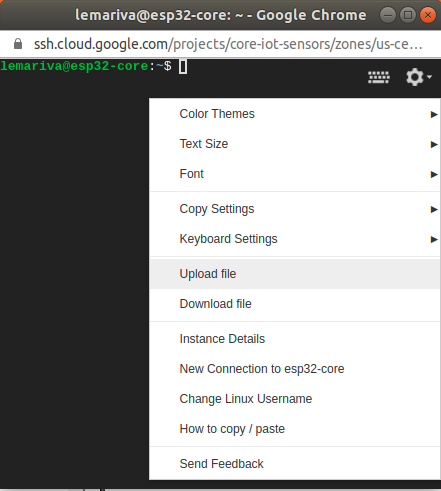
Fig. 7: Create a service account to access the Container Registry.![Upload files to the VM]()
Fig. 8: Upload files to the f1-micro VM instance.![VM f1-micro instance running]()
Fig. 9: VM f1-micro instance running.After creating and downloading the key, follow these steps to upload the key to the f1-micro VM:
- Click on the SSH button from the f1-micro VM instance listed on the Google Compute Engine control panel (see Fig. 9).
- Upload the downloaded file by clicking on the Gear > Upload file option (see Fig. 8).
- Authenticate to the Container Registry typing the following on the SSH Terminal:
docker login -u _json_key -p "$(cat [FILENAME].json)" https://[[HOSTNAME]]Replace
[FILENAME]with the uploaded filename and[HOSTNAME]is gcr.io, us.gcr.io, eu.gcr.io, or asia.gcr.io, according to where your registry is located. You will get something like this:WARNING! Using --password via the CLI is insecure. Use --password-stdin. Login SucceededMore info here. If you prefer a secure way to store your credentials, check the following tutorial.
Start the Application
The microservice can offer a RestAPI over HTTP or HTTPS. To get the last one, you need to have a domain in which you can edit the
AorAAAregister of the DNS configuration. I've included twodocker-compose.ymlfiles:docker-compose.yml: it runs only theupyco2-serviceand offers the RestAPI a Website using the port 8080.docker-compose-https.yml: it runs two microservices (upyco2-serviceandNginx). TheNginxservice offers HTTPS and forward the queries using a revese proxy to theupyco2-serviceservice. If you want this option, rename the file todocker-compose.ymland follow the instructions of this tutorial: Nginx: Docker, Flask and Let's encrypt (SSL).
HTTP Microservice
To launch the application you need to upload the
docker-compose.ymland the.envfile to the VM instance in GCP. Buf first,- Modify the project name (
core-iot-sensors) inside thedocker-compose.ymlto match your GCP project name. - Create a folder e.g.
co2-measurementinside the VM using the SSH terminalmkdir co2-measurement - Upload the
.envanddocker-compose.ymlto the folder using the Gear > Upload file option (see Fig. 9). If you don't see the .env file (linux), use the right-click on the file browser and activate theShow hidden Filesoption. The files will be uploaded to the$HOMEfolder, therefore you need to move them inside the folder: - Move the files inside the
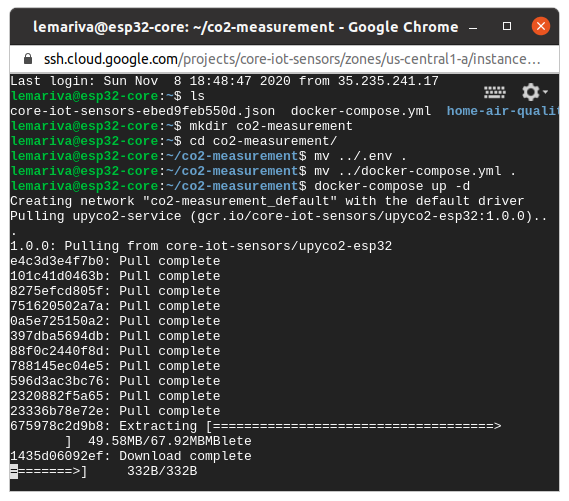
co2-measurementfolder:cd co2-measurement mv ~/.env . mv ~/docker-compose.yml . - Start the microservice application by typing:
docker-compose up -dinside the folder where the
docker-compose.ymlfile is located (see Fig. 10).
Setup the Firewall
To access the RestAPI, you should forward a port through the firewall to the VM instance. To do that, you need to set up a new rule (or use the rules: default-allow-http, default-allow-https):
- Open the Firewall Setting under the VPC network.
- Click on the Create Firewall Rule button.
- Enter:
- Name e.g. default-http-alt
- Target tags e.g http-allow-alt
- Source IP ranges e.g. 0.0.0.0/0 for all the internet, or your specified IP of your PC.
- Under Specified protocols and ports, activate the TCP box and add the port that you want to forward to the VM instance, e.g. 8080.
- Click on Create.
You can find more information about this topic here.
Then, you need to edit the configuration of your VM instance to add Network tags to it. To do that:
- Open the VM instances menu
- Click on the VM instance's name.
- Click on the Edit button.
- Enter the name of the firewall rule that you've created before in the field Network tags (see Fig. 11).
- Scroll down and click on Save.
![Starting the microservice application]()
Fig. 10: Starting the microservice application.![VM instance settings]()
Fig. 11: VM instance settings.DIY: Smartphone Report
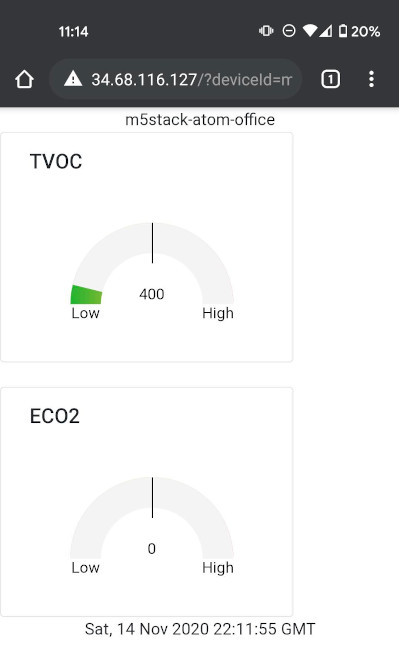
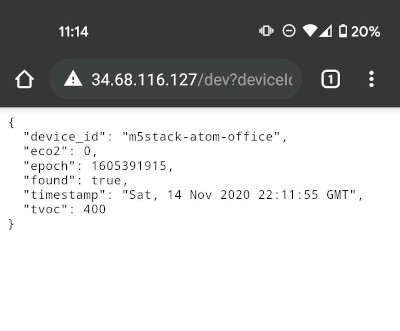
You can use your browser to check the website or the RestAPI like shown in Fig. 12 and 13. As I mentioned before, using the GCP enables you to integrate more than one sensor and process the data. Therefore, to get the data of a sensor, you need to visit the following URLs:
- RestAPI:
http://[IP-ADDRESS]/dev?deviceId=[DEVICE_ID] - Website:
http://[IP-ADDRESS]/?deviceId=[DEVICE_ID]
Replace the
[IP-ADDRESS]with the External IP described in Fig. 9 and[DEVICE_ID]with the Device ID that you configured on the Google IoT Core.![GCP Website]()
Fig. 12: GCP Website.![VM instance settings]()
Fig. 13: GCP RestAPI.On your Android, you can use the Gauge Widget application, but it requires an HTTPS URL. On iOS, you can use Scriptable app. The following tutorials include the steps that you need to activate SSL and use Gauge Widget or Scriptable app:
- Nginx: Docker, Flask and Let's encrypt (SSL)
- M5Stack: Widgets on your Smartphone help to stay safe from #COVID-19
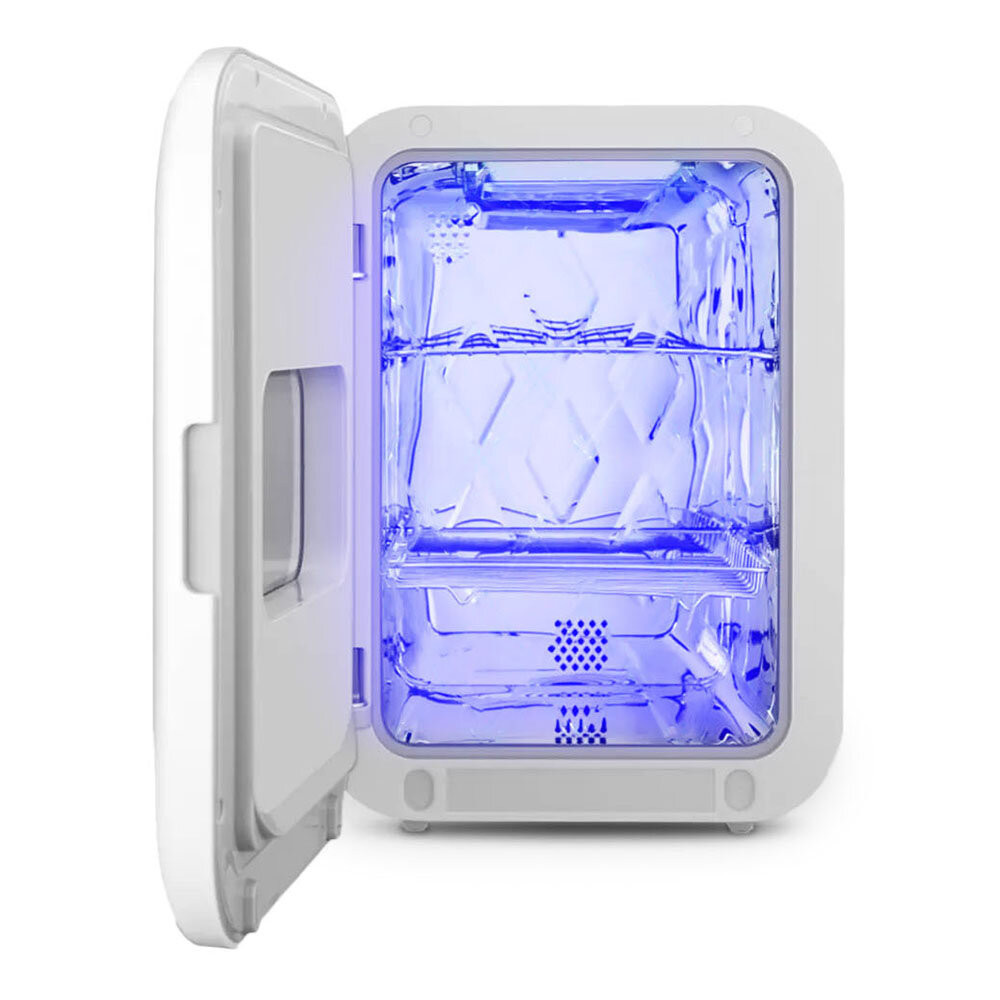
Double Sterilization: O2 and Ozone Cabinet
If you are looking to disinfect your masks, I can recommend the following article: Xiaomi Smartda UV Disinfection Cabinet.
![Cabinet]()
It's from the Xiaomi family. It has two lamps (UV lamp and Ozone lamp) and an air-drying functionality up to 55°C. The cabinet is easy to use with touch buttons on the front.
We use cookies to improve our services. Read more about how we use cookies and how you can refuse them.


")

")


Empty