 17
17
Oct - 2020General
5 min | 40500Table of contentShowLast week, I was working on a C++ application on a remote machine in the cloud, and I didn't want to install all the compiling and debugging tools/libraries/dependencies on the host OS, but I wanted to have all of them in a container. I found that VSCode has the capability to target a container for application building and/or debugging :).
This article is a documentation for me that I will use every time that I need to compile a C++ application. The steps are divided in three main groups:
- You need to build a Docker image with the tools/dependencies/libraries etc.. A container will be started using this image and the source code will be linked using the volume option of Docker. This container will be accessed via SSH to compile the application;
- You'll need to setup a task that will compile the application code;
- You'll need to setup a launch task that will debug the application.
To compile and debug applications on VSCode, you should install the following extensions:
If you need some help to install extesions on VSCode, please follow the official tutorials.
Creating a container to use with VS Code
Create a
Dockerfileinside a folder and add the following in that file:FROM debian:bullseye LABEL description="Container for use with Visual Studio" # install build dependencies to build and debug RUN apt-get update \ && apt-get install -y g++ build-essential make cmake gdb gdbserver \ rsync zip openssh-server git # install application dependencies RUN apt-get install -y libopenblas-dev liblapack-dev python3-dev \ libncurses5-dev libncursesw5-dev libasio-dev libboost-all-dev # configure SSH for communication with Visual Studio RUN mkdir -p /var/run/sshd RUN echo 'root:root' | chpasswd \ && sed -i 's/#PermitRootLogin prohibit-password/PermitRootLogin yes/' /etc/ssh/sshd_config \ && sed 's@session\s*required\s*pam_loginuid.so@session optional pam_loginuid.so@g' -i /etc/pam.d/sshd RUN mkdir -p /source WORKDIR /source CMD ["/usr/sbin/sshd", "-D"] EXPOSE 22I like to use Debian images because of Debian simplicity. You should consider that this Docker image should have all libraries that you need to compile your application. In this case, for example, you see that I included two
apt-get install -ylines. The first one is required to remotely build and debug applications. The second one includes the libraries required for my C++ application. The following lines install and enable SSH with user and passwordroot:rootand expose the port 22.To build this image, type the following on a terminal inside the folder, in which you created the
Dockerfilefile:docker build -t gdb-cpp-image .The image will be built with a name
gdb-cpp-image. To run a container based on this image so that VS Code can debug processes in it, type the following on a terminal inside the folder, in which your source code is located:docker run -d -p 2222:22 --security-opt seccomp:unconfined -v $PWD:/source --name gdb-cpp-image gdb-cpp-imageThe
-dparameter detaches the Docker container from the terminal. The-pparameter links the port 2222 to the exposed 22 port of the container. As debugging requires running privileged operations, you'll run the container in unconfined mode, thus the--security-optset toseccomp:unconfined. The-vparameter creates a bind mount that maps the local file system ($PWD- print working directory) into the container (/source). Therefore, you need to be inside the source code folder while you run this command, or you can change the$PWDvalue with a full path to the source directory.Building C++ in a container with VS Code
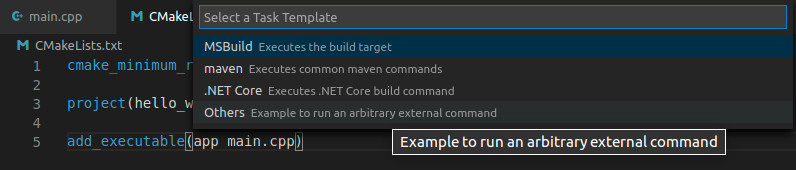
First, let’s configure a building task. The task is usually defined in a
tasks.jsonfile inside the.vscodefolder. Therefore, to configure/create it in a new project, pressCtrl+Shift+Band follow the prompts until you get to "Others" (see Fig. 1). If you have already a running project, you can create this file by yourself.![Task on VSCode]()
Fig. 1: Create a new Task on VSCode.Replace the content of the
tasks.jsonwith the following code:{ "version": "2.0.0", "tasks": [ { "label": "build-in-container", "type": "shell", "command": "/usr/bin/sshpass", "args": [ "-p", "root", "ssh", "root@localhost", "-p", "2222", "/source/build.sh" ], "problemMatcher": [ "$gcc" ], "group": { "kind": "build", "isDefault": true } } ] }The label value tells VSCode that this is a building task (you can use another name) and the type defines that a command in the shell task. The command here is sshpass (which needs to be installed on your OS -
sudo apt-get install sshpass). The arguments are passing the parameters tosshpassto login usingsshto the container with the correct password (root), port (2222) and the run script after the log-in (/source/build.sh). As you may have noticed, you need to create thisbuild.shfile aside your source code. The content of that script reads as follows:mkdir -p /source/build && \ cd /source/build && \ cmake ../ -DCMAKE_BUILD_TYPE=Debug && \ make -j4Don't remove the
-DCMAKE_BUILD_TYPE=Debugflag, otherwise you won't be able to debug the compiled code.You can see that this script just invokes
CMakeinside the/source/builddirectory, then builds the project. The trick is that we are invoking this viasshinside the container. After this is set up, you can run a build at any time from within VSCode, as long as your container is running.Debugging C++ in a container with VS Code
To bring up the Debug view, click the Run icon (
Ctrl+Shift+D) in the Activity Bar andcreate a launch.json fileand select the optionC/C++: (gdb)from the prompt.![Debug file on VSCode for Debugging]()
Fig. 1: Create a new launch on VSCode.The Pipe Launch configuration starts a tunnel using SSH to connect to a remote machine and pipe debug commands through. Replace the content of the
launch.jsonwith the following code:{ "version": "0.2.0", "configurations": [ { "name": "(gdb) Launch", "type": "cppdbg", "request": "launch", "program": "build/app", "args": [], "stopAtEntry": true, "cwd": "/source", "environment": [], "externalConsole": true, "sourceFileMap": { "/source": "${workspaceFolder}" }, "pipeTransport": { "debuggerPath": "/usr/bin/gdb", "pipeProgram": "/usr/bin/sshpass", "pipeArgs": [ "-p", "root", "ssh", "root@localhost", "-p", "2222" ], "pipeCwd": "" }, "MIMode": "gdb" } ] }As you may notice, the
pipeTransportincludes the same arguments as thetask.jsonfile. But this time, the absolute paths to the commands are required. The important lines to consider are the following:"cwd": "/source",: this is the workspace folder inside the container. In my case, I used the bind mounted folder."program": "build/app",: this is a relative path to your executable/compiled application. This means, from the workspace folder, to the excecutable file. In my case the compiled file is located at/source/build/appinside the container. Thus, the the program variable reduces tobuild/app."sourceFileMap": { "/source": "${workspaceFolder}" },: this is required to map the running application to the source code, so that you can create breakpoints on your code and you can check the variables. The/sourcepath is inside the container, the${workspaceFolder}is the absolute path to your code. VSCode replace the${workspaceFolder}with the correct path.
Hit F5 to start debugging in the container. The provided
launch.jsonis configured to break on entry ("stopAtEntry": true,) so you can immediately see that it is working.Clean up your workspace
When your project is ready, you can stop the container using:
docker stop gdb-cpp-imageand if you need it again, just type:
docker start gdb-cpp-imageConclusions
This setup helps you reducing your time while writing, compiling, and debugging C++ applications. Mastering your IDE and using portable development and debugging tools (Docker based) might be one of the best investments in your professional development (check out Fig. 3).
![Is It Worth the Time?]()
Fig. 3: Is It Worth the Time? ([source](https://xkcd.com/1205/))
We use cookies to improve our services. Read more about how we use cookies and how you can refuse them.


")
")
")


")


Empty