 03
03
Sep - 2019Cloud Platforms
7 min | 23806Table of contentShowThe last days, I was looking for an online project management tool with bug tracking system. The best platform that I know is Jira from Atlassian. Jira offers a bug tracking and agile project management, however, it costs between $8.33 and $10 (annual/monthly payment) for the standard version with under 10 accounts. We use Jira in Finealyze and I am very happy with it, but I was looking for a free alternative for myself. Then, I found OpenProject, which describes itself as "the leading open source project management software".
OpenProject is offered in three different ways: Community, Cloud and Enterprise. I was interested in the first option, because it is free and but you have to install it on premise. There is also a Dockerized version available.
I thought, I don't want to run it on my PC, I want to run it on the Cloud. Thus, I look for free tier packages of the Cloud solutions, and I knew that Google offers $300 free credit for new customers to spend on Google Cloud Platform (GCP) products during the first 12 months. But, I've already used that free credit on the last 12 months, thus it wasn't interesting for me. However, they offer always free products too. And in there, I found the Compute Engine (last year this wasn't included in the "always free tier" for users in Europe. Now, it is! Thanks Google!) with:
- 1 non-preemptible f1-micro VM instance per month in one of the following US regions:
- -Oregon: us-west1
- -Iowa: us-central1
- -South Carolina: us-east1
- 30 GB-months HDD
- 5 GB-month snapshot storage in the following regions:
- -Oregon: us-west1
- -Iowa: us-central1
- -South Carolina: us-east1
- -Taiwan: asia-east1
- -Belgium: europe-west1
- 1 GB network egress from North America to all region destinations per month (excluding China and Australia)
The f1-micro offers 1 virtualized CPU core (with burst capability to help with sudden load spikes) and a meagre 614MB of memory. These specs don't sound great, but reach they for my goal? Let's see!
Creating a new VM instance on GCP
To create a new VM instance, head on over to the Google Cloud Console and sign up. Read through the onboarding guide (if you want to) and then head on over to the Google Compute Engine control panel. Maybe you need to activate the API. Then:
- Click the create Instance button.
- Configure the VM hardware as described in Fig. 2.
- Region: us-west1, us-central1 or us-east1
- Generation: First
- Machine type: f1-micro (1 vCPU, 614 memory)
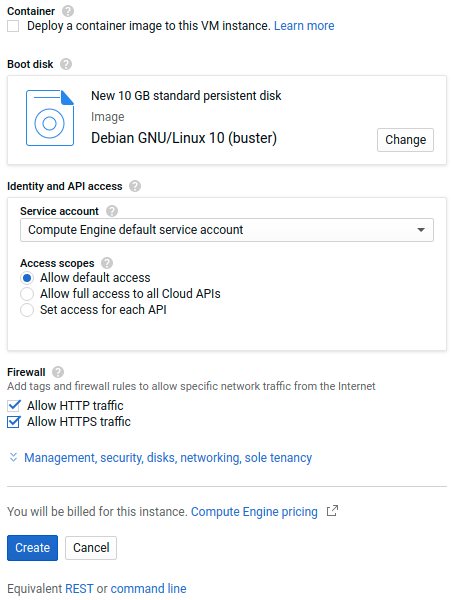
- Configure the VM software and Firewall as described in Fig. 3.
- Boot disk: I choose the last Debian version (v.10 - Buster)
- Firewall: Tick allow HTTP and HTTPS traffic.
- Click create and wait for Google to create your VM instance.
![gcp_nr1.png]()
Fig. 2: VM hardware configuration ![gcp_docker_nr2.png]()
Fig. 3: VM disk, OS and Firewall configuration As you can see on the right side of the configuration panel (see Fig. 4), it is written that "the first 744 hours of f1-micro instance usage are free this month". Thus, 744hs/24hs = 31 days. Then, this machine will cost $0 (hopefully).
![docker_gcp_nr3.png]()
Fig. 4: VM estimate costs This could change quickly, thus check Google Free Tier. And the following cite could be also interesting:
Your Always Free f1-micro instance limit is by time, not by instance. Each month, eligible use of all of your f1-micro instances and associated external IP addresses are free until you have used a number of hours equal to the total hours in the current month. Usage calculations are combined across the supported regions. GPUs and TPUs are not included in the Always Free offer. You will always be charged for GPUs and TPUS that you add to instances.
If everything runs OK, you are going to get something like in Fig. 5.
![docker_gcp_running.jpg]()
Fig. 5: VM f1-micro instance running Allocating a SWAP on VM instance
The f1-micro has only 614MB thus, a swap space is needed. In this tutorial, I add
1Gof swap, if you want to create a bigger swap, replace1Gwith the size of the swap space that you need. But, this is more than enough for OpenProject and the NginX.Connect to the machine using the SSH button shown in figure 5 and then, the following steps show how to add a swap space on Debian 10:
- Start by creating a file which will be used for swap:
sudo fallocate -l 1G /swapfile - Only the root user should be able to read and write to the swap file. Issue the command below to set the correct permissions:
sudo chmod 600 /swapfile - Use the
mkswaptool to set up a Linux swap area on the file and activate the swap file by typing:sudo mkswap /swapfile sudo swapon /swapfile - Make the change permanent by opening the
/etc/fstabfile:sudo nano /etc/fstaband add the following
/swapfile [...](see below) line at the end of the file:# /etc/fstab: static file system information # [...] /swapfile swap swap defaults 0 0 - To verify that the swap is active use either the
swaponor the free command as shown below:lemariva@docker:~$ sudo swapon --show NAME TYPE SIZE USED PRIO /swapfile file 1024M 182.3M -2lemariva@docker:~$ sudo free -h total used free shared buff/cache available Mem: 583Mi 488Mi 42Mi 4.0Mi 52Mi 22Mi Swap: 1.0Gi 370Mi 653Mi
Docker
After allocating the swap space, you need to install the Docker Engine and
docker-composeto deploy OpenProject. I wanted to use OpenProject with SSL (self-signed from the begining - this means, the data is encrypter but the browser says that the certificate is not validated), but the Dockerized OpenProject version does not support SSL by default. Thus, I run a NginX server on a Container, with SSL configured, which I use to set up a simple "ProxyPass" rule to direct traffic to the OpenProject container.The Docker installation can be easily performed on Debian using:
curl -sSL https://get.docker.com | shThen, add your username to the Docker group using:
sudo usermod -aG docker <username>After installing Docker, you need to install
python3-pipto then, installdocker-composeas:sudo apt-get update sudo apt-get install python3-pip pip3 install docker-composeSMTP server
OpenProject recommend using an external SMTP server to send emails. A good choice is SendGrid, which offers a free plan with up to 100 emails per days. Just sign up on the website, and once your account is provisioned, generate a new API key and copy it somewhere (it looks like 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) you'll need inside the
docker-compose.ymlfile.Docker-compose
As I mentioned, I needed a NginX server for the SSL support. Thus, I configured the following
docker-compose.ymlfile that starts two services:OpenProjectandNginX. TheNginXis exposed to the internet (ports 80 & 443) and the port 8080 of theOpenProjectis only locally (Docker internal sub-networks) available. TheNginXservice works as a proxy and routes theOpenProjectservice to the Internet. The file looks like this:version: "3" services: openproject: image: openproject/community:latest environment: EMAIL_DELIVERY_METHOD: smtp SMTP_ADDRESS: smtp.sendgrid.net SMTP_PORT: 587 SMTP_DOMAIN: "lemariva.com" SMTP_AUTHENTICATION: login SMTP_ENABLE_STARTTLS_AUTO: "true" SMTP_USER_NAME: "apikey" SMTP_PASSWORD: "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" volumes: - ./openproject/pgdata:/var/openproject/pgdata - ./openproject/logs:/var/log/supervisor - ./openproject/static:/var/openproject/assets expose: - "8080" #ports: # - "8080:8080" nginx: image: nginx:latest volumes: - ./nginx/nginx.conf:/etc/nginx/nginx.conf - ./nginx/cache/:/etc/nginx/cache - ./nginx/ssl:/etc/nginx/ssl ports: - "80:80" - "443:443" depends_on: - openprojectThus, you need to have the following folder structure:
- OpenProject
    - openproject
        - pgdata
        - logs
        - static
    - nginx
        - cache
        - ssl
            openproject.key
            openproject.crt
        - nginx.conf
    - docker-compose.yml
The files
openproject.crtandopenproject.keyare the SSL certificate and the corresponding private key and thenginx.conffile looks like this:worker_processes 1; events { worker_connections 1024; } http { client_body_buffer_size 10K; client_header_buffer_size 1k; client_max_body_size 8m; large_client_header_buffers 2 1k; proxy_cache_path /etc/nginx/cache keys_zone=one:500m max_size=1000m; server { proxy_cache one; proxy_cache_key $request_method$request_uri; proxy_cache_min_uses 1; proxy_cache_methods GET; proxy_cache_valid 200 1y; location / { proxy_pass http://openproject:8080; proxy_set_header Host $host; proxy_redirect http:// https://; } listen 80; listen 443 ssl; ssl_certificate /etc/nginx/ssl/openproject.crt; ssl_certificate_key /etc/nginx/ssl/openproject.key; } }DIY
You can find the above files in the following GitHub repository: lemariva/openproject-docker.
Go inside the VM instance using the SSH button (see Fig. 5) and clone the repository using:
sudo apt-get install git  # git is usually not installed
git clone https://github.com/lemariva/openproject-docker.git
Then, run the
directory_structure.shfile to create the folder structure typing:chmod +x directory_structure.sh -/directory_structure.shor create the folder structure described above. Then, go to
nginx/ssland create the self-signed SSL certificates using:openssl genrsa -out openproject.key 2048 openssl ecparam -genkey -name secp384r1 -out openproject.key openssl req -new -x509 -sha256 -key openproject.key -out openproject.crt -days 3650If you have a domain, you can use letsencrypt to get CA valid certificates.
Configure the
SMTP_PASSWORDinsidedocker-compose.ymlwith the API key that you got from SendGrid. Do not change theSMTP_USER_NAME: "apikey". It should be "apikey". Then, use thescreento start a screen session as:sudo apt-get install screen screenand type the following
docker-compose upinside the directory, where thedocker-compose.ymlto start the services. To detach from the screen, hit onCtrl+Aand then pressD. To enter to the screen again, type:screen -r.Wait some minutes, and open a browser pointing to the external IP that your VM instance got (see Fig. 5) and log with the standard credentials: user:
admin, password:adminand change them ASAP. Do this really quick, otherwise the service can be hacked! and you need to delete the database files underopenproject/to start again!. Go tohttps://<ip-address>/settings/editand change the protocol from HTTP to HTTPS.Conclusions
This tutorial helps you to install OpenProject on GCP. You can run it locally or you can deploy it on a Cloud Platform. If you have some patience, the f1-micro instance of GCP is a good alternative and it is free. You'll get some/a lot of "504 Gateway Time-out" errors, but nothing that you cannot solve with a page refresh ;). Multiple users/access is beyond the limits of the VM instance.
OpenProject is a nice project management tool, however the boards are not available in the free/community version (only on enterprise-edition). But, you can still work with work packages, gantt chars and backlogs/scrums with tasks boards too :).
- 1 non-preemptible f1-micro VM instance per month in one of the following US regions:
We use cookies to improve our services. Read more about how we use cookies and how you can refuse them.


")
")


")
Empty