 13
13
Feb - 2020LoRa/LoRaWAN, MicroPython
8 min | 29741#Tutorial: ESP32 running MicroPython sends data over LoRaWAN
LoRa/LoRaWAN, MicroPython | 8 min | 29741
Table of contentShowLoRa is a wireless data communication technology that enables you to transmit data over a very-long-range (more than 10 km in rural areas) with low power consumption. It uses license-free sub-gigahertz radio frequency bands as the 169 MHz, 433 MHz, 868 MHz for Europe, and 915 MHz for North America.
In October 2018, I published an article about LoRa and ESP32, and I uploaded a project to GitHub. The project includes a SX127x driver for ESP32 running MicroPython. However, since LoRa defines the lower physical layer, the upper networking layers were lacking, and it was only possible to send data between nodes. That's where LoRaWAN comes in. LoRaWAN is one of several protocols that was developed to define the upper layers of the network. LoRaWAN defines the communication protocol and system architecture for the network, while the LoRa physical layer enables the long-range communication link.
![application_micropython.png]()
Fig. 1: Payload received from a device As you may have realized, this article is about LoRaWAN and ESP32 running MicroPython. Therefore, I upgraded the project to support LoRaWAN. I've modified the original project to clean the SX127x driver and I extended it to include the activation method ABP, which enables the ESP32 to connect to the "The Things Network (TTN)" to send data (see Fig. 1).
I have not started the LoRaWAN project until now, because I didn't have a LoRaWAN gateway. I could build one using a Raspberry Pi, but I wanted to be sure that ESP can work with conventional gateways. Moreover, in Hannover, there are not many gateways available. Last month, I got a Dragino LG02 gateway from Digitspace (read this article), and then I planned to update the project. Unfortunately, the LG02 Dragino is thought for private LoRa protocol, and it's not recommended for LoRaWAN uses because it only supports one single frequency. This means the gateway is only able to receive packets sent using the same radio parameters (frequency & DR) as configured in its settings. Thus, I configured the ESP32 to only send data over channel 0 on the frequency 868MHz (Europe).
In this article, I will try to go through the following:
- DIY Project - LoRaWAN on ESP32 running MicroPython
- A guide for the TTN configuration
- The Dragino LG02 Gateway
- Getting Started with MicroPython (an update from my article)
As you may notice, I've inverted the list of topics. Topic 1 and 2 are relevant to this article, 3 and 4 are general and can be also used for other projects.
Hardware and Software
In this article, the following hardware and software are used or recommended:
(*) be careful with TTGO v2.1.6. Some boards are a risk of fire if you charge a battery.Important
Attach the antenna before supplying the LoRa boards. If the antenna is not connected, this may damage the LoRa chip.DIY Project - LoRaWAN on ESP32 running MicroPython
Clone the repository:
git clone -b LoRaWAN https://github.com/lemariva/uPyLoRaWAN.gitand rename the file
ttn_config.sample.pytottn_config.py. Inside this file, you need to define the following variables:DEVADDR: Device AddressNWKEY: Network Session KeyAPP: App Session Key
You get these values, from the TTN console, when you register a new device under an application, as explained in the next section. Inside the
main.pychange also thedevice_pinsdictionary to the corresponding of your board. Finally, the variablepayloadis the data that will be sent.After modifying the files, upload the code using VSCode and the PyMark extension to the ESP32 running MicroPython. You can follow this tutorial to install these tools: MicroPython: Visual Studio Code as IDE.
A guide for the TTN configuration
Follow these steps closely if you have never set up an ABP device before.Before your device can communicate with TTN, you'll need to create an application. But, first, you'll need to register an account. Navigate to this page, to set up an account.
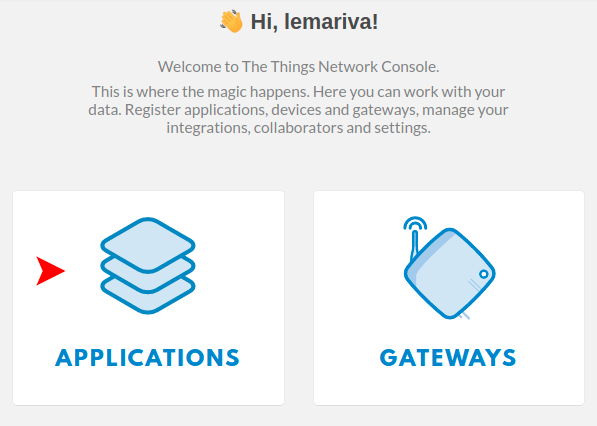
Once logged in, go to the TTN console. There you can register applications to add new devices, or you can also add gateways. Click on
APPLICATION(Fig. 2) and then onADD APPLICATION![applications.png]()
Fig 2: Creating a new application on TTN Fill out the Application ID that identifies your application (Fig. 3), enter a description (optional) and configure the handler to match the region in which you are. In my case:
ttn-handler-eu. TTN provides multiple regions for handler registration.![add_application.png]()
Fig 3: Setup an application on TTN Once created the application, you'll be forwarded to the Application Overview. Using that overview enables you to firstly add new devices, to secondly check data coming into and out of the application, and thirdly to add integrations for external services. In this case, click on Register Device and you'll be redirected to the Register Device Page.
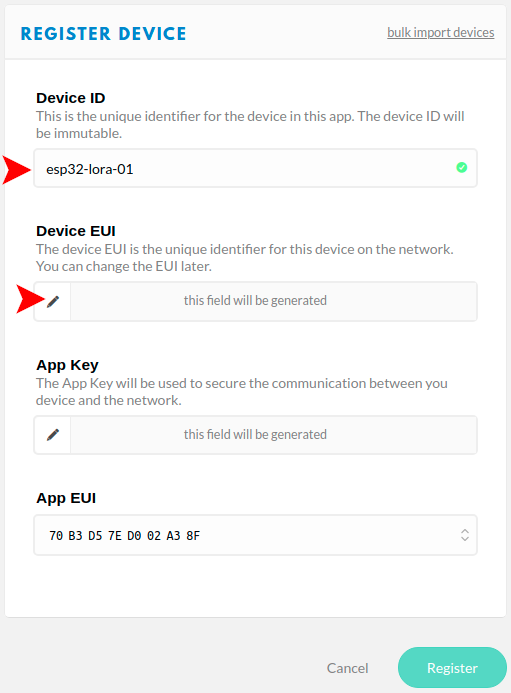
In the Register Device page (Fig. 4), fill out the Device ID, which should be a unique string to identify the device, and click on the "mix" icon to auto-generate a Device EUI. The App Key will be randomly generated by TTN, and finally, select the App EUI (used to identify the application) from the dropdown list. Then, click on register and you'll be redirected to the Device Overview page.
![register_device.png]()
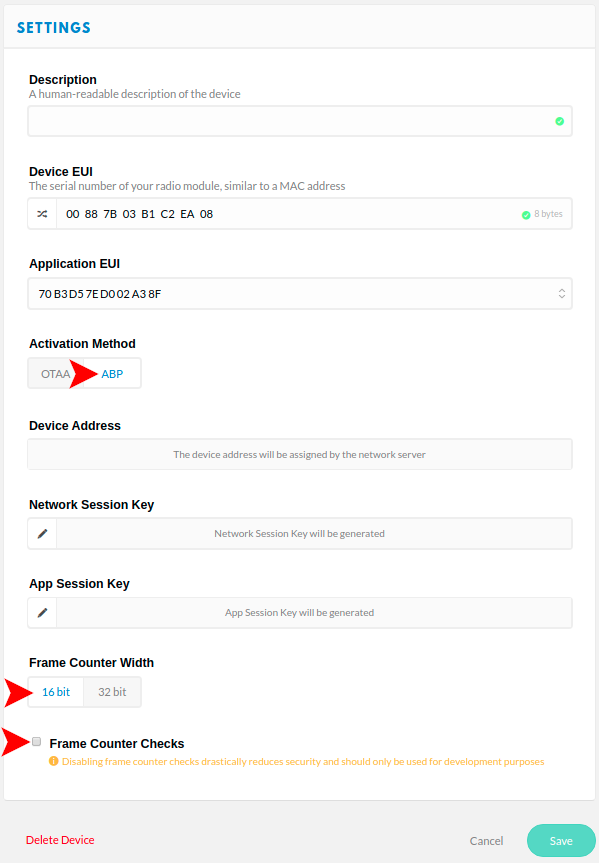
Fig 4: Register a device on TTN You need to change some settings (Fig. 5), thus click on the Setting button, and change the Activation Method from Over-the-Air-Activation (OTAA) to Activation-by-Personalization (ABP). Then, switch the Frame Counter Width from 32 bit to 16 bit and disable the Frame Counter Checks. TTN will display a security warning, ignore it, and click Save, otherwise you are not be able to connect with the ESP32.
![settings.png]()
Fig 5: Change the device settings on TTN After these steps, the application is set up, and the device is registered to the application.
The downlink (from TTN to the device) is not working for me right now, but I don't know if it is my gateway forwarder or the ESP32 device. If you can test the code on an ESP32 connected to a different gateway and it works, please write a comment!The Dragino LG02 Gateway
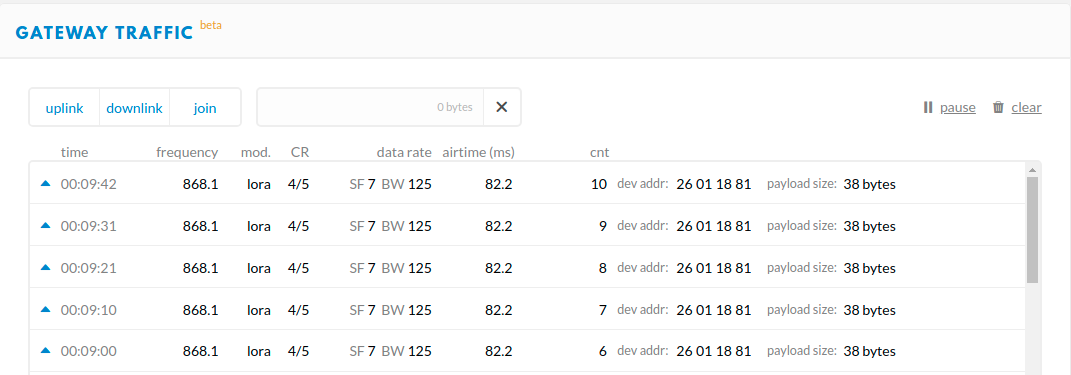
Since Dragino LG02 only supports one single frequency, it will only be able to receive the packets that are sent on the same Radio Frequency set up in LG02 Radio 1. But, as the LG02 has two LoRa channels, it supports one uplink channel and one downlink channel.To configure the Gateway as a LoRaWAN forwarder and register it into the TTN console, check page 20 from the User Manual. In Fig. 6, you can see the traffic on the gateway reported on the TTN.
![gateway_traffic.png]()
Fig. 6: Gateway traffic on TTN Getting Started with MicroPython
If you are new to MicroPython, I quote the official MicroPython page for you:
MicroPython is a lean and efficient implementation of the Python 3 programming language that includes a small subset of the Python standard library and is optimized to run on microcontrollers and in "constrained environments".
If you have one of the boards listed above (or another one with an ESP32), you can flash the MicroPython firmware on that chip. Then, you have two options: you can compile it yourself, or you can download a pre-compiled firmware and flash it.
Flashing a pre-compiled Firmware
This is the easiest way to get the MicroPython running on an ESP32. However, you get only what you download. So you cannot extend the version or freeze any new module.
If you are not familiar with Linux, this is your best option:
- Install Python >=3.6 on your PC (Guide)
- On Windows install it with PIP support
- On Linux install pip too:
sudo apt-get install python3-pip
- Go to the MicroPython download website
Download the firmware:
- if you have a board with pSRAM, download a GENERIC-SPIRAM firmware;
- if you need BLE, download the firmware built with ESP-IDF v4.x
There are many versions: stable ones, and a nightly release. You can choose one of them. I prefer the last stable release.
- Install the
esptool.pytool following these instructions:# on Linux pip install esptool # or usually on Windows python -m pip install esptool(source)
- Using the
esptool.pytool and type the following lines:# On Linux: esptool.py --chip esp32 --port /dev/ttyUSBx erase_flash esptool.py --chip esp32 --port /dev/ttyUSBx --baud 460800 write_flash -z 0x1000 <file_name>.bin # On Windows: python -m esptool --chip esp32 --port COMx erase_flash python -m esptool --chip esp32 --port COMx --baud 460800 write_flash -z 0x1000 <file_name>.binThe first line erases the entire flash, you need this if you are flashing MicroPython for the first time on the board.
Compiling MicroPython
If you want to compile your MicroPython version from scratch, follow these instructions:
- Install the pre-requirements:
sudo apt-get install git wget libncurses-dev flex bison gperf python python-pip python-setuptools python-serial python-click python-cryptography python-future python-pyparsing python-pyelftools cmake ninja-build ccache libffi-dev libssl-dev Download the ESP-IDF framework (I'm using here the new version V4.x):
mkdir ~/esp/ cd ~/esp/ git clone https://github.com/espressif/esp-idf.git cd esp-idf git checkout 310beae373446ceb9a4ad9b36b5428d7fdf2705f ## the above hash is defined by the variable ESPIDF_SUPHASH_V4 in the file: # https://github.com/micropython/micropython/blob/master/ports/esp32/Makefile git submodule update --init --recursive ## if you don't clone the submodules (recursive) # you'll get the following error while compiling MicroPython: # xtensa-esp32-elf/bin/ld: cannot find -lrtc- Download and install the toolchain:
wget https://dl.espressif.com/dl/xtensa-esp32-elf-linux64-1.22.0-80-g6c4433a-5.2.0.tar.gz
cd ~/esp/
tar -xzf ~/Downloads/xtensa-esp32-elf-linux64-1.22.0-80-g6c4433a-5.2.0.tar.gz
export PATH="$HOME/esp/xtensa-esp32-elf/bin:$PATH"
export IDF_PATH="$HOME/esp/esp-idf"
## Don't use the install.sh option, it didn't work for me and
# I got a lot of errors while compiling MicroPython
Clone MicroPython and compile the cross-compiler:
git clone https://github.com/micropython/micropython.git
cd micropython/mpy-cross
make

cd ../ports/esp32
(Optional) Modify the setup to include support for BLE. If you have a board with pSRAM, change
GENERICtoGENERIC_SPIRAM:nano boards/GENERIC/mpconfigboard.mk ## boards/GENERIC/mpconfigboard.mk # add the following line at the end SDKCONFIG += boards/sdkconfig.ble- Select the board version (change this to
GENERIC_SPIRAMif your board has pSRAM):export BOARD=GENERIC - Compile the submodules and MicroPython:
make submodules make - Flash the MicroPython firmware on the ESP32, which should be already connected to a USB port:
make deploy
Freeze modules on MicroPython
As I mentioned, you can freeze modules and include them into the firmware. This reduces the memory use on MicroPython and makes your code faster. To do that, copy the module files that you want to freeze into
micropython/ports/esp32/modules. Then, repeat step 7 and 8. You should see something like this:Use make V=1 or set BUILD_VERBOSE in your environment to increase build verbosity. Building with ESP IDF v4 MPY sx127x.py GEN build-GENERIC/frozen_content.c CC build-GENERIC/frozen_content.c LINK build-GENERIC/application.elf text data bss dec hex filename 1151395 269960 46244 1467599 1664cf build-GENERIC/application.elf Create build-GENERIC/application.bin esptool.py v2.8-dev Create build-GENERICM/firmware.bin bootloader 22528 partitions 3072 application 1421488 total 1487024In this case, the SX127x driver (
sx127x.py) was included. The module is compiled (MPY) and added to the MicroPython firmware as a frozen module. Then, you don't need to upload it using the PyMakr extension and you can import/use it as usual. In the example case:from sx127x import TTN, SX127xFonts files and drivers are good candidates for this procedure.
Uploading code to the board
I recommend using VSCode and the Pymakr extension to program and upload code to the ESP32 boards running MicroPython firmware. A tutorial is available on this link: MicroPython: Visual Studio Code (VSCode) as IDE.
Furthermore, you can get IntelliSense, autocompletion, dependency management, and linting capabilities on VSCode installing the
micropy-cli. A tutorial about the extension is available on this link: MicroPython: VSCode IntelliSense, Autocompletion & Linting capabilities.Conclusions
This article is about bringing LoRaWAN to ESP32 boards running MicroPython. In October 2018, I re-wrote a driver to support LoRa on ESP32 running MicroPython. This time, I cleaned the driver and added support to LoRaWAN. I tested the connection using the Dragino LG02. Although the gateway is limited (it only supports one frequency, but two channels -full-duplex-), it works well for my tests and has allowed me to connect the device to the TTN.
The article includes a setup guide to register devices on the "The Thing Network", and an updated version of the article: "Getting Started with MicroPython".
We use cookies to improve our services. Read more about how we use cookies and how you can refuse them.


")


EMILIO ZUBELZU MACHADO 03.12.2020
Hola Mauro Felicitaciones por el trabajo, he podido conecter el ttgo con el dragino shield v1.4 y raspberry pi. Mi pregunta es: Cómo hago para desencriptar el paquete que recibo y convertirlo a datos legibles? El paquete contiene lecturas de un acelerometro. Felicitaciones nuevamente y 1000 disculpas por la molestia Atte Emilio Machado
Alvaro 08.26.2020
Hey LeMaRiva! Great work! I have tested your project and the uplinks works! However, i am not able to get downlink working. Have you any advances on that?
Thank you so much! Best regards!
Marcelo Correa 10.06.2020
Anyway to debug the implementation? As I did I only see the 3 lines of "PHYPayload". I am unable to see nothing on the gateway. How to see if the radio is working? Regards,
Benno 05.28.2021
Thanks for the tutorial! Is there any way to change this example from ABP to OTAA? That would be easier in terms of switching to the v3 stack.