 17
17
Sep - 2018Cloud Platforms, MicroPython
7 min | 31818#Zerynth: ESP32 & Google IoT Core - Part 1: Sending data to the Cloud
Cloud Platforms, MicroPython | 7 min | 31818
Table of contentShowThere are lot of tutorials about connecting the ESP32 to a cloud service, but I planned to connect these boards using MicroPython directly to the cloud. That means, I didn't want to use a hardware or software bridge. I wanted to use the Google IoT Core, but MicroPython doesn't support JSON Web Token (JWT), which is needed for the device authentication. I tried to write the library myself, but it didn't work, because of the needed dependencies and the small memory available on the ESP modules. But, I found Zerynth. Zerynth supports JWT and using it, it is possible to connect the ESP32 directly to the Google IoT Core. The company Zerynth defined its product as "the middleware for IoT and Industry 4.0" and the ecosystem was stable as far as I tested it. The IDE (Zerynth Studio) can be a little bit improved, but it works well enough.
Zerynth is neither free nor open-source but every new user gets a welcome pack with 10 Zerynth VM licenses with FreeRTOS (5 Starter and 5 Premium) for free (more info here). If you need to register more sensors, you can use the store to purchase the additional licenses.
I didn't get any money to promote Zerynth, I just wanted to use Python to connect the ESP32 directly to the Google IoT Core and this was the only option that I've found. If you know another one, please comment this post or send me a message. Thanks!This tutorial is separated in two main tasks. On one hand, we need to install Zerynth and program the ESP32 to connect to the Google IoT Core, on the other hand, we need to configure Google IoT Core to receive the data published by the nodes. As I said, Zerynth is not free, but in my case, the welcome pack is enough for me. Google offers a 12 Month $300 free credit to get started with any Google Cloud Platform (GCP) product and additional Always Free products during and past the free trial. The free usage limits for the listed products do not expire, but are subject to change.
Hardware & Software
Installing Zerynth
To start working with Zerynth you need to download the Zerynth Studio. The IDE is available for Windows x64, Linux x64 and Mac OS X. I tested the versions for Linux and Windows. Both worked well.
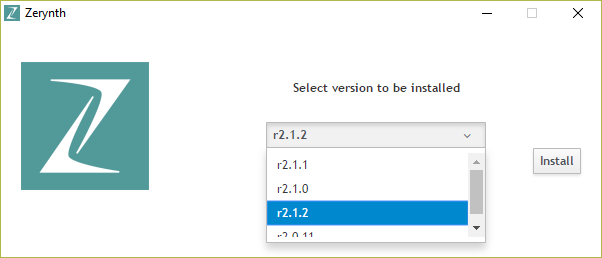
After installing the Zerynth Studio, you need to download the libraries. When you launch the Studio and after accepting the licensing agreements & Co., the IDE asks you which version of the libraries you want to install (select the Online download). At the moment of writing this tutorial, the last version is r2.1.2. Be aware that the default selected option is not the last available version, you need to open the dropdown list, and search for the last version (see Fig. 1).
The libraries are downloaded under
C:\Users\<your username>\zerynth2on Windows and/home/<username>/.zerynth2on Linux and the download process is really slow. Grab a cup of coffee!After you downloaded the libraries, you can start Zerynth and you need to sign up to get the free licenses.
![Zerynth: Library selection]()
Fig. 1: Zerynth - Selecting and installing libraries r2.1.2. Download Examples and Project Code
Zerynth has a lot of examples to test using the ESP32 and ESP8266 modules. You can find them here.
I uploaded the code for this tutorial on GitHub. Clone or download the repository.
Note: The connection to the Google Cloud Platform is only possible with the ESP32. The ESP8266 doesn't support this feature due to its limited memory.
You need to modify the following files to deploy the code on your ESP32 module:
private.hex.key: this file is the sensor/device private key to connect to Google IoT Core.device.conf.json: this file include the sensor/device configuration.
and don't forget to modify the
SSIDandWPA2Passvariables inmain.pyto connect to your Wi-Fi router.Google Cloud Platform (GCP): The Set Up
Follow these steps to configure your GCP:
- Go to the GCP and if you haven't done it yet, start the free trial.
- Go to the Cloud Resource Manager and create a New Project (see Fig. 2) e.g.
core-iot-sensors. - Go to the Cloud Console and if your project is not selected, select it using the dropdown selector (see Fig. 3).
![Google Cloud Platform: New Project]()
Fig. 2: GCP - Create a new Project. ![Google Cloud Platform: Enable APIs and Services]()
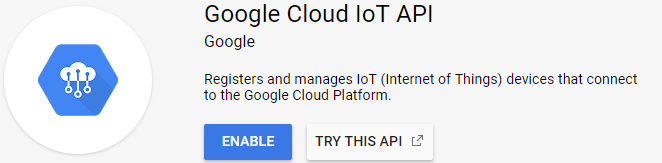
Fig. 3: GCP - Google Cloud Console - Project Selection and Enable APIs and Services. You need to enable the Google IoT Core. To do that, follow these steps:
- Click on the
Enable APIs and Servicesbutton (see Fig. 3) and search forGoogle Cloud IoT. - Click on the API and then on the
Enablebutton (see Fig. 4).
![Google Cloud Platform: Google IoT Core]()
Fig. 4: GCP - Google Cloud IoT - Enable API. Google IoT Core: Configuration
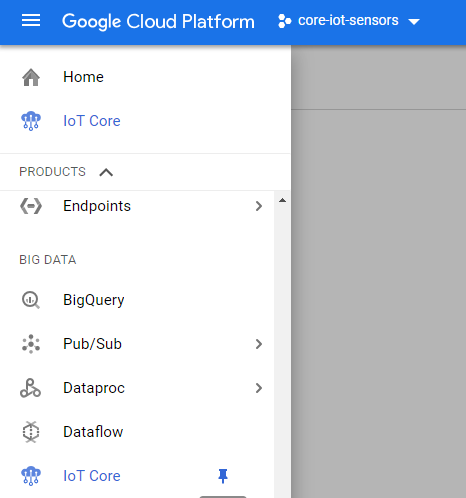
After enabling the Google IoT Core, you need to configure the registry and the sensors hub. Using the Navigator Menu (the three lines button on the link side), scroll down up to the IoT Core dashboard link (see Fig. 5). You can pin the link using the pin logo, to find it quicker.
![Google Cloud Platform: Navigation Menu & Google IoT Core]()
Fig. 5: GCP - Navigation Menu & IoT Core. Registry
The IoT Core enables you to create a device registry, which allows you to group devices and set properties to all the sensors inside it. After creating this, you can add the sensors to the registry. To do that:
- Click on the
Create a device registrybutton. - Provide a registry name (e.g.
esp32-iot-sensors), select your region (e.g.europe-west1) and the protocol (for this tutorial you need onlyMQTT). - Create a
Default telemetry topicfor the registry (e.g.esp32-iot-sensor-topic). - We don't need to configure the additional parameters (Device state topic / Add CA certificate)
- Click on
Create.
Device
After creating the device registry, you can add sensors to it. The sensors authenticate against the IoT Core using a private key, we need to provide the public key to the IoT Core.
To create a Public/Private key combination we use OpenSSL. On Ubuntu you can install it using:
sudo apt-get install opensslOn Windows you can compile the sources, or you can use some informal binary repositories here. I use the version from
slproweb(the installer is not signed). You can check the downloaded file using VirusTotal. It doesn't guarantee that the file is virus free, but it gives you some quietness. Please don't install it underProgram Files, install it directly onC:\. The blank between Program & Files can complicate the process.On Windows use a command prompt
cmdand go to thebinfolder inside the installation folder (e.g.cd c:\OpenSSL-Win64\bin). Or you can add this path to the Environment Variables. On Linux stay where you need to create the key files.To get the private and public key, type the following:
openssl ecparam -genkey -name prime256v1 -noout -out ec_private.pem

# on Linux:
openssl req -x509 -new -key ec_private.pem -days 1000000 -out ec_public.pem -subj "/CN=unused"
# on Windows and answer the questions:
openssl req -x509 -new -key ec_private.pem -days 1000000 -out ec_public.pem -config "C:\OpenSSL-Win64\bin\openssl.cfg"
On Windows after
--config, you should type the path to the openssl.cfg under thebinfolder.You have now the private and public keys. If you need further help to generate these keys, you can read the Google Cloud IoT guidelines.
Now, open the public key
ec_public.pemfile and copy the contain of the file. It should look something like this:-----BEGIN CERTIFICATE----- MIICaTCCAg+ [...] -----END CERTIFICATE-----Then, go to the IoT Core Dashboard, click on the registry name that you created, and add a new device:
To do that:
- Click on the
Create Devicebutton. - Provide a device id (e.g.
esp32-devkit1) - Select the public key format: ES256_X509 and paste the copied contain of the
ec_public.pemfile inside the box. - (optional) Provide a
Device metadatavariable:- e.g.
publish_periodwith value 5000
- e.g.
- Click on the
Createbutton.
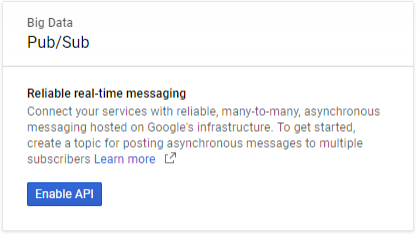
Subscription
To see the published messages, you need to subscribe to the sensor topic. You can use the
Pub/SubAPI.To do that:
- Click on the Navigator Menu and scroll down up to
Pub/Suband then activate the API (see Fig. 6). - Click on the listed topic, e.g.
projects/core-iot-sensors/topics/esp32-iot-sensor-topic. - Click on the
Create Subscriptionbutton. - Type a name for the subscription e.g.
esp32-sensorsand select for theDelivery Typethe optionpull. - Click on the
Createbutton.
![Google Cloud Platform: Pub/Sub API]()
Fig. 6: GCP - Pub/Sub Topic API activation. Zerynth: Device Configuration
The key needed for connecting to the IoT Core must be an ECDSA private key in hex format. If a private key has been generated with the options described above, it is consequently stored as a pem file, the needed hex string can be extracted from the OCTET STRING field associated value obtained from the following command:
openssl asn1parse -in ec_private.pemYou get something like this on the command prompt/terminal:
    0:d=0  hl=2 l= 119 cons: SEQUENCE
    2:d=1  hl=2 l=   1 prim: INTEGER           :01
    5:d=1  hl=2 l=  32 prim: OCTET STRING      [HEX DUMP]: 72766 [...]
   39:d=1  hl=2 l=  10 cons: cont [ 0 ]
   41:d=2  hl=2 l=   8 prim: OBJECT            :prime256v1
   51:d=1  hl=2 l=  68 cons: cont [ 1 ]
   53:d=2  hl=2 l=  66 prim: BIT STRING
You need to copy the key after
[HEX DUMP]. That's the private key that you need to paste in theprivate.hex.keyfile.In the file
device.conf.jsonyou need to set up the following variables:{ "project_id":"core-iot-sensors", "cloud_region":"europe-west1", "registry_id":"esp32-iot-sensors", "device_id":"esp32-devkit1" }The
main.pyfile reads the sensor data (pressure and temperature) and sends the values to the IoT Core using MQTT. It is important that you change theSSIDandWPA2Passvariables to the corresponding of your Wi-Fi router. The ESP32 needs Internet to send the MQTT messages to the Google IoT Core.Compile and Upload files
After opening the project and configuring the
private.hex.keyanddevice.conf.jsonyou can compile and upload the code.To do that:
- Connect the ESP32 DevKit to an USB port and select it from the dropdown menu
Device:. - Select the device under
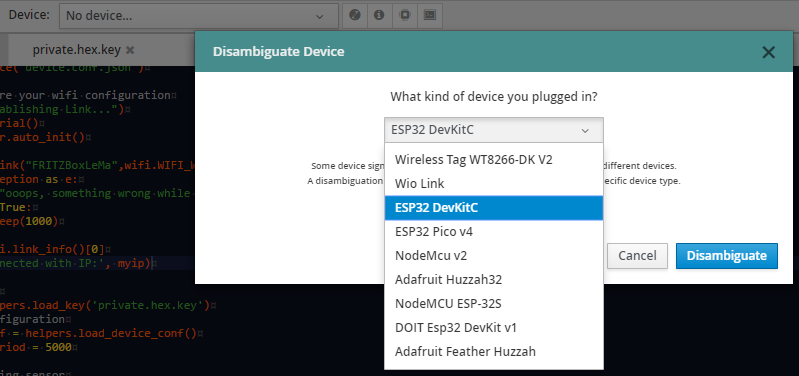
Ambiguous Devices. Some device signatures can be ambiguous and you need to solve the ambiguity (see Fig. 7). In my case, I'm using the ESP32 DevKitC. - Click on the
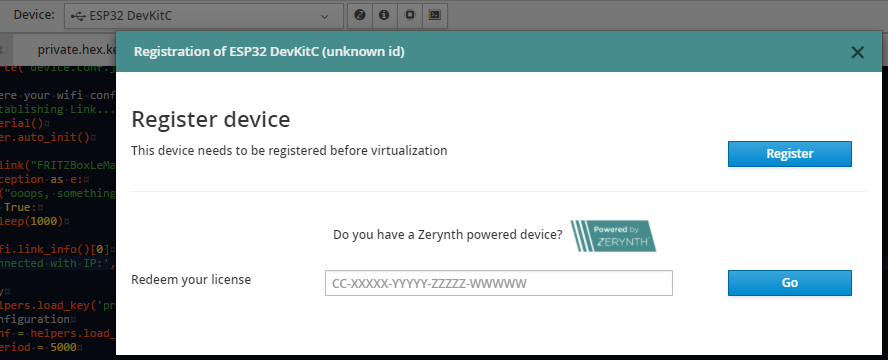
Register/Create VM/Virtualizebutton (the first button after the device dropdown). - Register your ESP32 DevKitC clicking on
Register(see Fig. 8). It takes a couple of seconds. - Click again on the
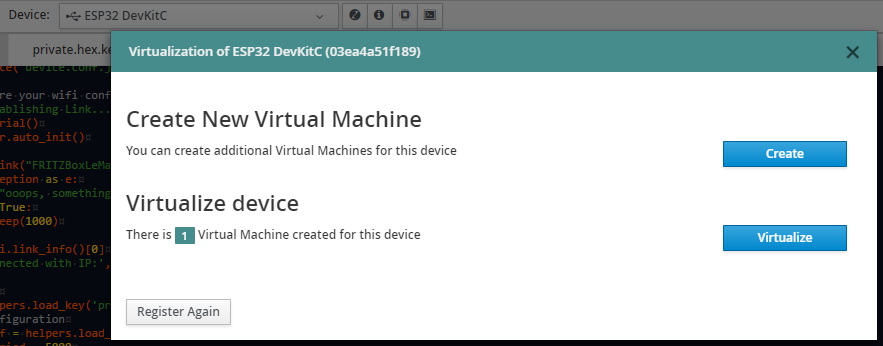
Register/Create VM/Virtualizebutton. - Click on
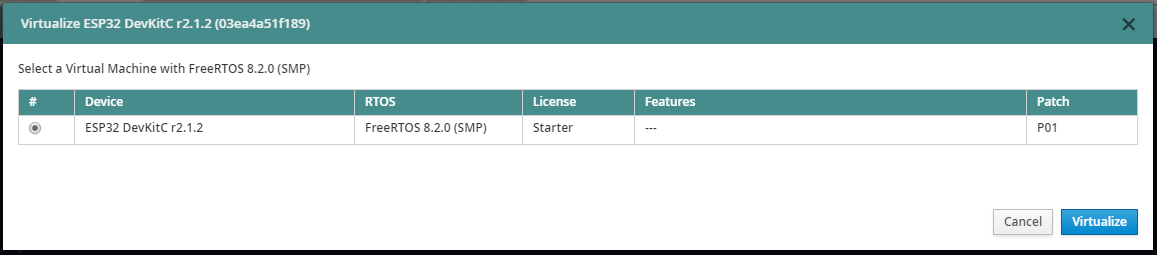
Virtualize(see Fig. 9), then select the Virtual Machine and click onVirtualize(see Fig. 10). It takes again a couple of seconds.
![Zerynth: Device selection]()
Fig. 7: Zerynth - Ambiguous Device List. ![Zerynth: Device Register]()
Fig. 8: Zerynth - Register the Device. ![Zerynth: Create VM]()
Fig. 9: Zerynth - Create a VM. ![Zerynth: Select VM version]()
Fig. 10: Zerynth - Virtualize the Device. After doing those steps you can upload the code clicking on the
Uplinkbutton (an arrow pointing up), orBuild>Uplink.If you get the following error:
[info] Got header: 33540000...
[error] No answer to probe
You didn't virtualize the device. Then, repeat steps 5 and 6.
If everything works, you can start a console going to
Device>Console, and you'll see something like this:Temp: 21.7999992 C and Pres: 101286 Pa Publish random sample.Google IoT Core: Reading the data
To see if everything is working, you can pull the data of the created subscription. To do that, you need to install or unzip the Google Cloud SDK. You can get the SDK here. After installing it or unziping it, you can type the following on a terminal or command prompt. On Windows, be sure that the Environment Variables are set correctly:
- Login to the Cloud, and select the API project typing:
gcloud init - Read the subscription
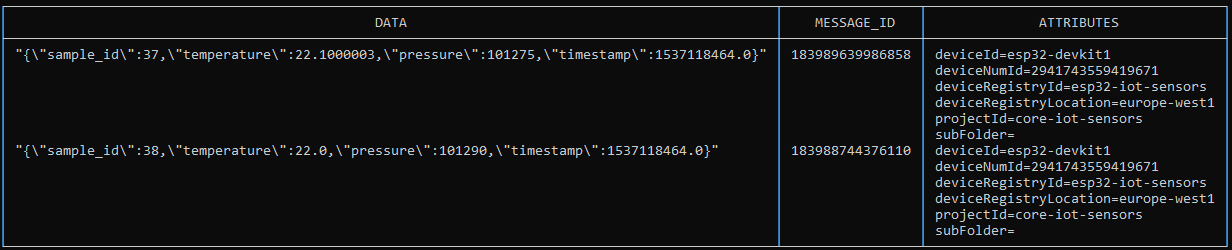
esp32-sensorsdata typing:gcloud beta pubsub subscriptions pull --auto-ack esp32-sensors --limit=1000
If you get something like Fig. 11, that means: everything is working!
![Google Cloud SDK: Data Received]()
Fig. 11: Google Cloud SDK - Subscription data.
We use cookies to improve our services. Read more about how we use cookies and how you can refuse them.


")


Empty