 09
09
Dec - 2018Analytics
8 min | 52470Table of contentShow- Installing Docker
- Editor
- Docker Taxonomy
- Data Science Scenarios
- Extra Links
- Conclusions
Today, I am opening a new section on my blog, and this time it is about analytics. As you may know, I've been working in research on IIoT and analytics for the last years, but up to now my blog has only shown my hobbyist projects. I want to change the focus of my website a little bit and add something about data analytics, machine learning, Docker technology etc. Everything that I will be publishing in this section is not new. There are many tutorials and great YouTube videos that explain these topics too, but I am going to focus on building an end-to-end data science project using some of the projects that I made using MicroPython and Android Things as sensors, using Docker and the Google Cloud Platform.
This post is a short guide for using Docker as an environment for data science. Docker allows you to almost say goodbye to OS troubles and welcome to portability!
![Docker logo]()
Fig. 1: Docker logo One of the most time consuming and annoying part that you have when you try to share your work with your co-worker is to install and setup all libraries and packages of your environment, ie. if you've developed some cool algorithm or pipeline to process data and you want that your co-worker does the evaluation process, he or she needs to install all the libraries that you've locally (or in an environment) installed. You can also add as a problem, that your co-worker needs an specific version of a library that is not compatible with your code because it is an old version. Or, he/she is working on Windows and you are on Linux and you cannot find the right libraries to install on Windows. Then, your new friend should be Docker! and as I said before, say goodbye to OS troubles and welcome to portability!
Containerization has risen up in last years as a ready to use solution to work around platform differences and across applications from single user development environments (e.g. Jetbrains) to highly distributed production environments (e.g. Google Cloud).
In this article I'll explain Docker as a container service and give you the steps you need to get started with building your custom development platform for data science. You can get started ASAP deploying an already existing image, if everything inside it satisfies all your needs, or, you can build some layers on top of the image to make it even more convenient for your specific use case using a Dockerfile.
![Docker]()
Code: https://github.com/lemariva/data-science-project Installing Docker
There are many tutorials that help you install Docker. The Docker documentation helps you to install Docker on Windows, Ubuntu and MacOS. On the Windows installation you can choose to use Windows containers or Linux containers. I preferred Linux containers, because its technology is more mature and better supported than Windows containers. If you using Google Cloud or AWS, there are predefined images, which have already Docker installed.
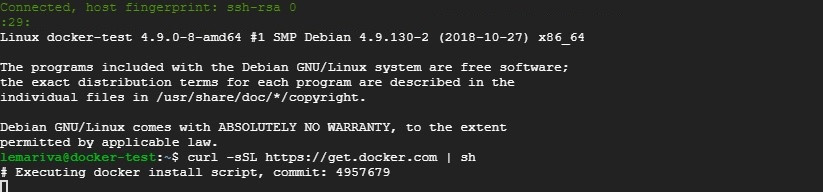
But, the easy way to install Docker under Linux is typing the following on a Terminal (see Fig. 2):
$ curl -sSL https://get.docker.com | sh**Note:** The next article of this section will be about installing Docker on the Google Cloud Platform. I'll be working with the smallest VM-instance that Google offers. It costs about USD$4.88/Month, if you use it (or keep it running) 24/7.![Installing docker on a VM running on GCP]()
Fig. 2: Installing Docker on a VM running on GCP Editor
For creating Dockerfiles and speeding up the process I use Visual Studio Code. I used to use Atom, but the code completions in real time by Visual Studio Code are more powerful. I've installed also the Docker extension. Visual Studio Code allows connecting to Jupyter Notebooks. More about that in a next article.
Docker Taxonomy
To avoid any doubts while reading the article, I start with some definitions. You can skip this next section, if you have enought experience with Docker, its terms and concepts.
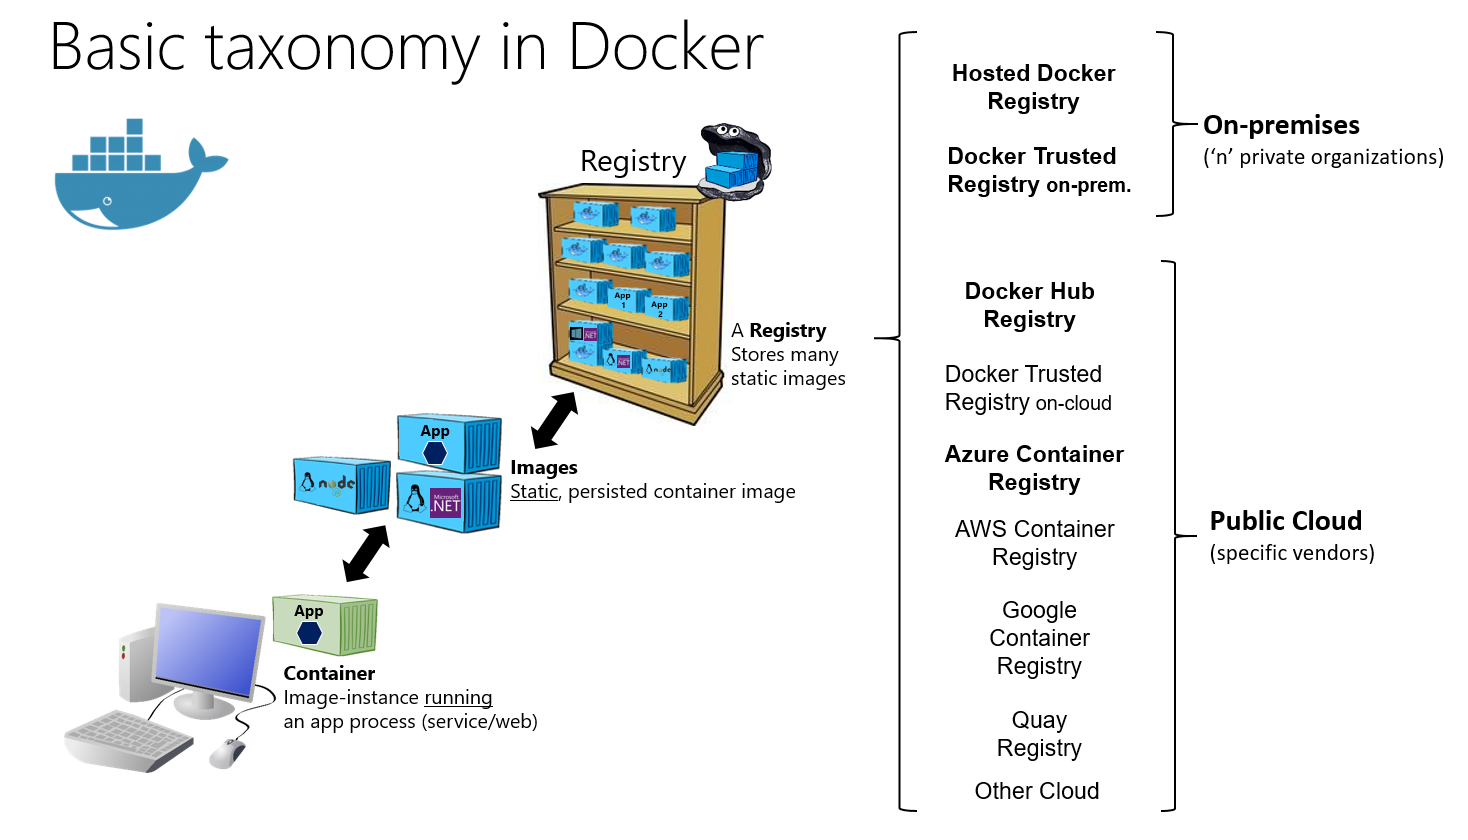
Fig. 3 shows the basic taxonomy of Docker terms and concepts as well as the multiple registry offerings from different vendors.
![Basic Taxonomy in Docker]()
Fig. 3: Basic taxonomy of Docker terms and concepts (source) Dockerfile
This is the starting point of the dockerization process. The Dockerfile defines the configuration of an application and specifies the libraries and packages needed. This tells the image builder what the image should look like. An example (check GitHub for all needed files e.g.
app.py):FROM python:3.7.1-stretch LABEL mantainer=@lemariva COPY . /app WORKDIR /app RUN pip install flask && \ mkdir -p /var/data/ EXPOSE 5000 ENTRYPOINT ["python"] CMD ["app.py"]This containers uses
flask, a micro web framework written on Python. After you run the container, you can visithttp(s)://<<ip-address>>and the webapp displays your IP address and saves it inside the file/var/data/visitors.txt. Then, if you go tohttp(s)://<<ip-address>>/visitors, you get the file content.Docker Image
Images are created via the Dockerfile. The image is a type of a snapshot of the application and can be stored and managed in a Docker registry. You pull an image to start a container. In object-oriented "thinking", this would be like a class. To build an image with the above written
Dockerfile:$ docker build taxonomy/ -t lemariva/flaskDocker Container
The standard and isolated unit in which an application is packaged together with the libraries, packages, configuration files etc. At run time, the Docker engine pull a Docker image and spins up a container. In object-oriented "thinking" this would be like an instance/object of the defined class (Docker image). To run the above created image type the following:
$ docker run -p 80:5000 lemariva/flaskIf you want to run the container detached, add the option
-d. Every time that you run a container with the above line, thevisitor.txtfile does not exist, and if you stop the container and remove it, it will be deleted. If you want to access the file after you stop the container, you need to restart the container using its container id (see Fig. 4).![Docker Restart stopped container]()
Fig. 4: Restart a stopped container Docker Volume
Volumes are the preferred way to persist data in Docker containers and services. If you save data inside your container, and then you kill that running container to start a new one, all the saved data will be gone. Volumes is a way to save persistent data and make it available to a container. Adding a volume to preserved the
visitor.txtfile look like this:$ docker volume create flask_visitors $ docker run -p 80:5000 -v flask_visitors:/var/data/ lemariva/flaskUsing the option
-v flask_visitors:/var/data/ lemariva/flaskyou link the container directory/var/datawith the created volumeflask_visitors. Now, every time that you restart the container, you have access to the createdvisitor.txtfile.Docker Registry
A service where Docker images are stored, secured and managed. Multiple versions of an image (application) called 'tags' can be stored within repositories (folders) within a registry. Uploading the created Docker image to the Docker Hub can be done typing the following (after sign up, log in using console etc.):
$ docker push lemariva/flaskData Science Scenarios
Approach A: Start clean with a base Linux distro of your choice (from Scratch)
This option means you've decided to start you Docker image from scratch i.e. you select your preferred Linux distro and install every software tailored to your needs. This is the optimal solution if your disk space is reduced. You are having complete control over every single software being installed and you can install the specific version for every tool that you need. A sample of a dockerfile for this approach is shown below:
FROM ubuntu:18.04
RUN apt-get update && \
    apt-get install python3-pip python3-dev -y && \
    ln -s /usr/bin/python3 /usr/local/bin/python && \
    pip3 install --upgrade pip && \
    rm /var/lib/apt/lists/* -vrf
This image will use Ubuntu 18:04 as base image and have
python3-pipandpython3-devas added packages. That's all you need on the Dockerfile. The name of the file should beDockerfileinside a folder named e.g.docker-pythonand you can build the image typing the following:$ docker build docker-python -t lemariva/approach_aThis creates an image with tag
lemariva/docker-python. To run this image interactive (see Fig. 5) type the following:$ docker run -it --entrypoint /bin/bash lemariva/approach_aType
exitto exit the interactive mode.![Docker interactive Started]()
Fig. 5: Docker Image started interactive Approach B: Use an (official) available image with all tools that you need
This is the best way to start with Docker specially in Data-Science projects. I recommend you to start from here. But, use only official (or semi-official) images i.e. nobody is going to check, if the image that you pull from the registry has malware, virus or trojan etc. The guys at Jupyter Docker Stacks offer a set of ready-to-run Docker images containing Jupyter applications and interactive computing tools. Fig. 6 shows you the tree with the Docker images that are available. Each child contains every tool in the parent image.
![Jupyter Docker Stacks]()
Fig. 6: Docker image tree by Jupyter Docker Stacks To use one of those images e.g. tensorflow-notebook, use the docker run command and the image will be downloaded if it's not already present as:
$ docker run -it -p 8888:8888 jupyter/tensorflow-notebookThe
-pargument tunnel the docker image port 8888 (second argument) to your system port 8888 (first argument), so you can fire up Jupyter in your browser (under e.g.http://localhost:8888if you are running Docker on your PC).Tensorflow has also its images here. To start a tensorflow container, type the following:
$ docker run -it -p 8888:8888 tensorflow/tensorflowor, if your host PC or your server has a NVidia GPU, install the nvidia-docker and run:
$ nvidia-docker run -it -p 8888:8888 tensorflow/tensorflow:latest-gpuNote: if you start the above containers without the option
-itand with option-d(detached) you do not see the needed Jupyter token. You can add the following argument to the docker run:$ docker run -d -p 8888:8888 jupyter/tensorflow-notebook -e PASSWORD=<<password>>and use the
<<password>>value instead of the Token. The-eargument allows defining the password of the Jupyter notebook as an environment variable. If you still want to use a Token, you do not need this option and you can see the Token typingdocker logs <<container id>>after getting the container id usingdocker container ls -aor using the id reported after typingdocker run -d -p ...(see Fig. 7).![Jupyter Docker Stacks]()
Fig. 7: Getting Jupyter token from running container The "Jupyter Docker Stacks" containers save the notebooks under
/home/jovyan/work/. Thetensorflow/containers save them under/notebooks/. To make your data persistent you need to link these directories to a Docker volume or to a path on the host that runs the Docker engine.Volume Approach
$ docker create volume notebooks_data

$ docker run -d -p 8888:8888 -v notebooks_data:/home/jovyan/work/ jupyter/tensorflow-notebook
# or
$ docker run -d -p 8888:8888 -v notebooks_data:/notebooks/ tensorflow/tensorflow
This approach works on Windows and Linux. Your data is secure inside the
notebooks_datavolume and if you update or remove the container, you are not going to lose your data.Link Approach
$ docker run -d -p 8888:8888 -v /home/lemariva/notebooks:/home/jovyan/work/ jupyter/tensorflow-notebook
# or
$ docker run -d -p 8888:8888 -v /home/lemariva/notebooks:/notebooks/ tensorflow/tensorflow
This approach works on Linux. On Windows you need to make link a share folder. This links the host folder
/home/lemariva/notebooks/with the corresponding notebook folder inside the container.Adding libraries throught Jupyter
If you need to install some extra libraries and your Jupyter is running as
ROOT(it is not the case on the containers fromjupyter/), you can use a Notebook, and type:!sudo apt-get update !sudo apt-get install <<package>> !pip install <<package>>But, if you update or remove the container, you lose everything that you added. Thus, it is better to extend the (official) image to get the packages you need.
Approach C: Extend an (official) image, which has almost all tools that you need to add your requirements
This approach is like Approach A, but this time you're not starting from scratch. You start from an existing image in this case
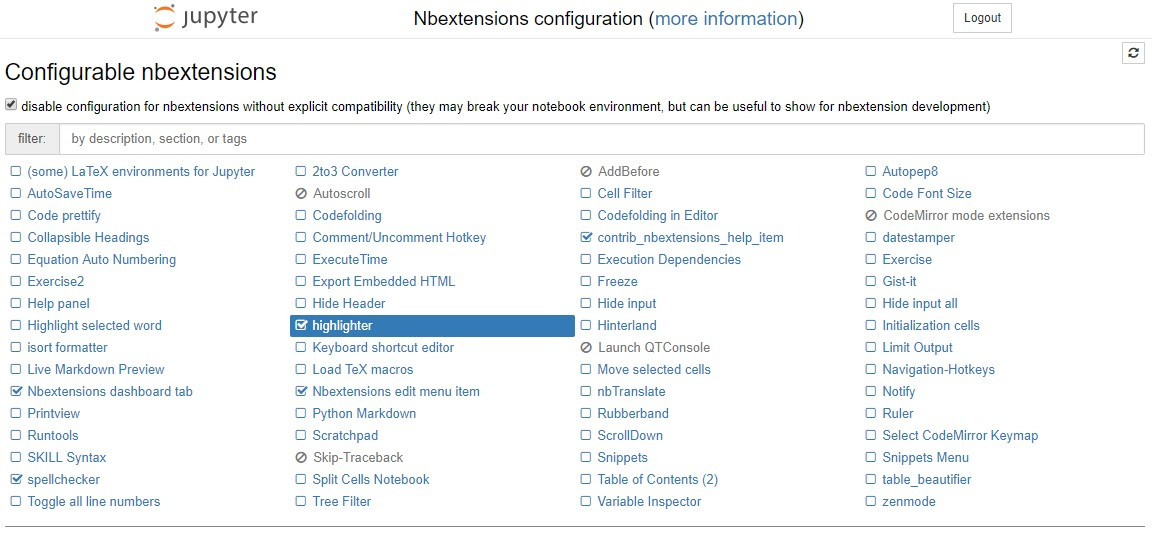
jupyter/tensorflow-notebook, and you add e.g. thejupyter_contrib_nbextensionpackage like in this Dockerfile:FROM jupyter/tensorflow-notebook USER $NB_USER RUN pip install jupyter_contrib_nbextensions && \ jupyter contrib nbextension install --USERFig. 8 shows the Jupyter notebook extensions available visiting
http://<<ip-address>>:8888/nbextensions.![Jupyter Nbextensions]()
Fig. 8: Jupyter Nbextensions If you need to add packages to the system (e.g.
nano), you need to change the user toROOTas defined in this Dockerfile:FROM jupyter/tensorflow-notebook USER ROOT RUN apt-get update && \ apt-get install nano USER $NB_USER RUN pip install jupyter_contrib_nbextensions && \ jupyter contrib nbextension install --USERExtra Links
- A gallery of interesting Jupyter notebooks is available here.
- A collection of common dockerized services for a company is available here.
- Docker Cheat Sheet is available here.
Conclusions
This post presents Docker as a solution for portability in data science environment, and it also includes Docker definitions and concepts. Three data science scenarios are presented: a clean start from Scratch and the image wound be the smallest one; or you start from an existing one from the Docker Hub registry; or you extend an existing one to add your needs. Extra links with some resources are presented.
The next article will be about installing Docker (or using an VM with pre-installed Docker) on GCP.
We use cookies to improve our services. Read more about how we use cookies and how you can refuse them.


")


")
")

Empty