") 05
05
Sep - 2019Raspberry Pi, Real Time Systems
7 min | 118762#Raspberry Pi 4B: Real-Time System using Preempt-RT (kernel 4.19.y)
Raspberry Pi, Real Time Systems | 7 min | 118762
Table of contentShowThe Preempt-RT patching article is one of the most visited articles in my blog. However, that article needed a small update: Raspberry Pi 4B is out there and with Raspbian Buster, a new version of kernel is available: 4.19.y.
I also uploaded the compiled and patched kernel to lemariva/RT-Tools-RPi. You can follow all these steps and compile the kernel by yourself or you can download the files from the repository and deploy the kernel on your Raspberry Pi 4B.
This tutorial is the second of a series of three that evaluate the performance of the Raspberry Pi 4B. This time the performance of the standard and Preempt-RT kernels is evaluated and compared. The planned articles are the following:
- -The first article was about comparing the Raspberry Pi 4B and 3B+: #Raspberry Pi 4B: How much faster is the new CPU?.
- -This article compares the Raspberry Pi 4B running standard and Preempt-RT kernels.
- -The performance of the Raspberry Pi 4B and 3B+ with standard kernel
will beis compared with and without active cooling: #Raspberry Pi 4B: Sometimes it's cool to be hot -or warm, to be exact ;)
The tutorial is written in a compact way. A full version with more explanations can be found in the previous article:#Raspberry Pi: Real Time System - Preempt-RT Patching Tutorial for Kernel 4.14.y. If you have any problems, check the
Tips and Solutionssection of this and the previous article.Hardware & Software
In these articles, the following software and hardware are used:
Getting the Sources
For this tutorial, you need a host computer running Linux. In my case, I am using Ubuntu 18.04 LTS, but the tutorial should work with any version of Linux.
Very important: I reapeat it again, but this time, I use some colors! Most of this tutorial (configuring and compiling the Kernel) is performed on a host computer (x86/x64) running Linux, not on the Raspberry Pi!. Only the deployment is realized on the Raspberry Pi.Requirements
To start in a clean way, create a directory, e.g.
rpi-kernelunder yourhomedirectory and a subdirectoryrt-kernelinside that directory for the compiled files as:~$ mkdir ~/rpi-kernel ~$ cd ~/rpi-kernel ~rpi-kernel$ mkdir rt-kernelThen, clone the following repositories:
~/rpi-kernel$ git clone https://github.com/raspberrypi/linux.git -b rpi-4.19.y-rt
~/rpi-kernel$ git clone https://github.com/raspberrypi/tools.git
The Raspberry PI kernel source will be downloaded to the
linuxsubdirectory (1.5-2 GB) and the Raspberry PI cross-compilers to thetoolssubdirectory (1 GB).Configuration
Toolchain
You need to set the following variable before starting to configure and/or compile the kernel source:
~/rpi-kernel$ export ARCH=arm
~/rpi-kernel$ export CROSS_COMPILE=~/rpi-kernel/tools/arm-bcm2708/gcc-linaro-arm-linux-gnueabihf-raspbian-x64/bin/arm-linux-gnueabihf-
~/rpi-kernel$ export INSTALL_MOD_PATH=~/rpi-kernel/rt-kernel
~/rpi-kernel$ export INSTALL_DTBS_PATH=~/rpi-kernel/rt-kernel
Building the Kernel Configuration
Depending on your current Raspberry Pi hardware, you need to set the
KERNELvariable andmakethe right configuration following this:Rasbperry Pi 1/1.2 B(+), A(+), Zero (W):
~/rpi-kernel$ export KERNEL=kernel
~/rpi-kernel$ cd ~/rpi-kernel/linux/
~/rpi-kernel/linux/$ make bcmrpi_defconfig
Rasbperry Pi 2, 3 B(+):
~/rpi-kernel$ export KERNEL=kernel7
~/rpi-kernel$ cd ~/rpi-kernel/linux/
~/rpi-kernel/linux/$ make bcm2709_defconfig
Rasbperry Pi 4B:
~/rpi-kernel$ export KERNEL=kernel7l
~/rpi-kernel$ cd ~/rpi-kernel/linux/
~/rpi-kernel/linux/$ make bcm2711_defconfig
This is very important, otherwise you are going to waste your time compiling a kernel that is not going to boot on your system.
Compiling the Kernel
To compile the kernel you need to type the following:
~/rpi-kernel/linux$ make -j4 zImage
~/rpi-kernel/linux$ make -j4 modules
~/rpi-kernel/linux$ make -j4 dtbs
~/rpi-kernel/linux$ make -j4 modules_install
~/rpi-kernel/linux$ make -j4 dtbs_install
Choose the right
-jXparameter according to the number of processors that your host computer has. In my case 4. Take a coffee or may be 2! ;)The last line returned after installing
modules_installreports the kernel version that you compiled, e.g.:DEPMOD 4.19.59-rt23-v7l+You'll need this information for the kernel deployment. Then, make just a blob of data at the end of the kernel image typing:
~/rpi-kernel/linux$ mkdir $INSTALL_MOD_PATH/boot
~/rpi-kernel/linux$ ./scripts/mkknlimg ./arch/arm/boot/zImage $INSTALL_MOD_PATH/boot/$KERNEL.img
~/rpi-kernel/linux$ cd $INSTALL_MOD_PATH/boot
~/rpi-kernel/rt-kernel/boot$ mv $KERNEL.img kernel7_rt.img
Transfer the Kernel
After the compilation is completed, compress all files to tranfer them to the Raspberry Pi:
~/rpi-kernel/linux$ cd $INSTALL_MOD_PATH
~/rpi-kernel/rt-kernel$ tar czf ../rt-kernel.tgz *
Then, transfer the resulting '.tgz' file to the Raspberry Pi using
scpand your ssh credentials:~/rpi-kernel/rt-kernel$ cd .. ~/rpi-kernel$ scp rt-kernel.tgz pi@<ipaddress>:/tmpChange
<ipaddress>to the corresponding IP of your Raspberry Pi.Installing the Kernel Image, Modules & Device Tree Overlays
Before you start doing this, be sure that you've already saved the important data from your Raspberry Pi (may be you should do a MicroSD card backup). This tutorial helps you to install the kernel version 4.19.y. Discussion for kernel compatibilities are here.
If you are sure to continue, type the following on the Raspberry Pi:
~$ cd /tmp
/tmp$ tar xzf rt-kernel.tgz
/tmp$ cd boot
/tmp/boot$ sudo cp -rd * /boot/
/tmp/boot$ cd ../lib
/tmp/lib$ sudo cp -dr * /lib/
/tmp/lib$ cd ../overlays
/tmp/overlays$ sudo cp -d * /boot/overlays
/tmp/overlays$ cd ..
/tmp$ sudo cp -d bcm* /boot/
Add the following entry to
/boot/config.txt:# Add the following option: kernel=kernel7_rt.imgReboot the Raspberry Pi and if all the stars are aligned, you get the Preempt-RT kernel working! I am just kidding, It should work without any problems! ;P. You can test if the kernel is working, typing:
~$ uname -r
4.19.59-rt23-v7l+
Performance Test
Again, I used Visual Studio Code (VSCode) and the Remote-SSH extension (read the VSCode part of this article) to connect to the Raspberry Pi and install Python3-pip, git and the Python3 needed extension as:
pi@raspberry:~# sudo apt-get install python3-pip git
pi@raspberry:~# pip3 install tqdm
Then, the performance of the Raspberry Pi 4B resolving the N-queens problem (multi/single-thread) can be measured using the following code:
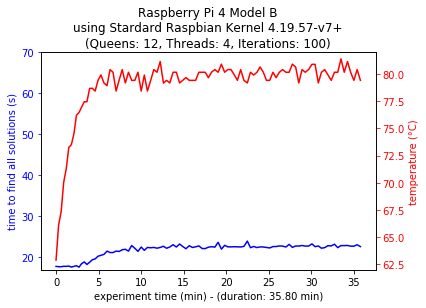
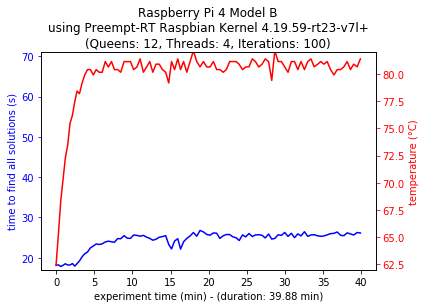
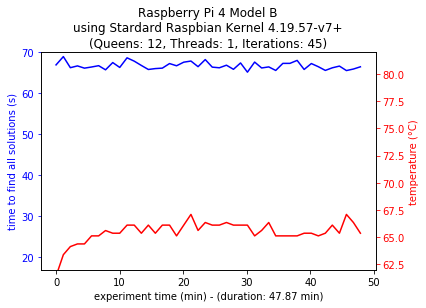
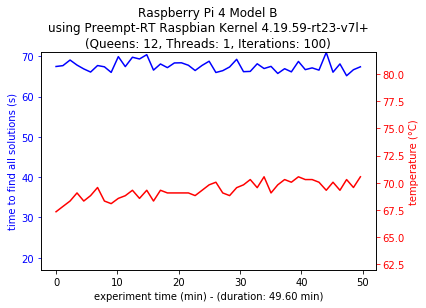
pi@raspberry:~# git clone https://github.com/lemariva/N-Queens-Problem.git
pi@raspberry:~# cd N-Queens-Problem
# multi-thread (N=12, Threads=4, Repetition=100)
pi@raspberry:~/N-Queens-Problem# python3 queenpool_multithread.py multithread_output.csv 12 4 100
[...]

# single-thread (N=12, Threads=1, Repetition=100)
pi@raspberry:~/N-Queens-Problem# python3 queenpool_multithread.py singlethread_output.csv 12 1 100
[...]
A comparison of the performance between standard and Preempt-RT patched kernel in multi- and single-thread configuration can be found in Fig. 1 and 2, respectively. The sub-figure on the left describe the results for the standard kernel while the sub-figure on the right the corresponding results for the Preempt-RT.
![Multi-thread Configuration 4B Standard Kernel]()
![Multi-thread Configuration 4B Preempt-RT Kernel]()
Fig. 1a: Standard Kernel - Raspberry Pi 4B
Multi-thread ConfigurationFig. 1b: Preempt-RT - Raspberry Pi 4B
Multi-thread Configuration![Single-thread Configuration 4B Standard Kernel]()
![Single-thread Configuration 4B Preempt-RT Kernel]()
Fig. 2a: Standard Kernel - Raspberry Pi 4B
Single-thread ConfigurationFig. 2b: Preempt-RT - Raspberry Pi 4B
Single-thread ConfigurationThe Preempt-RT patched kernel was 1.11x/1.01x (multi/siglethread) slower to resolve the N-queens-problems. The loss of performance is not considerable large. The temperature values increased only about 0.7°C. In this test, unlike the one carried out with the Raspberry 3B+, an SSH section was connected to the Raspberry Pi, the whole time. The problem with IRQ-39 did not appear on the new Raspberry using the network chip. This problem was observed in the previous model because the network uses the same chip and therefore BUS as the USB ports.
The numerical values can be found in the following table:
rPi 4 Model B
Preempt-RT BusterrPi 4 Model B
Std. BusterrPi 3 Model B+
Std. BusterrPi 3 Model B+
Preempt-RT StretchrPi 3 Model B+
Std. StretchAvg. Multi-Thread Solving Time 24.27 s 21.79 s 49.83 s 70.38 s 62.66 s Multi-Thread Max. Temperature 82.16 °C 81.40 °C 77.63 °C 69.55 °C 68.78 °C Avg. Single-Thread Solving Time 67.55 s 66.72 s 169.96 s 235.75 s 213.34 s Single-Thread Max. Temperature 70.56 °C 67.09 °C 60.39 °C 56.91 °C 54.22 °C RT-Tests suite
Preempt-RT is a popular patch for the Linux kernel to transform Linux into a real-time operating system. Thus, using the RT-tools, I tested the latency of the Preempt-RT and the standard kernels on the new Raspberry Pi 4B.
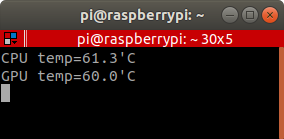
sudo cyclictest -l50000000 -m -S -p90 -i200 -h400 -q > output.txt
grep -v -e "^#" -e "^$" output.txt | tr " " "," | tr "\t" "," >histogram.csv
sed -i '1s/^/time,core1,core2,core3,core4\n /' histogram.csv
Additionally, I measured the CPU and GPU temperatures to see if they remained constant during the test, and between the tests with the standard and Preempt-RT kernels. To do that I used the following code:
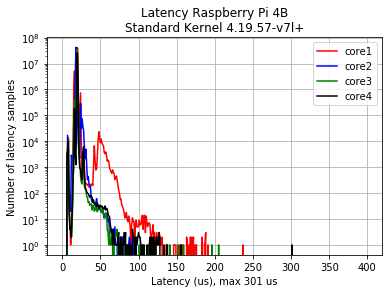
#!/bin/bash

while true
do
  cpuTemp0=$(cat /sys/class/thermal/thermal_zone0/temp)
  cpuTemp1=$(($cpuTemp0/1000))
  cpuTemp2=$(($cpuTemp0/100))
  cpuTempM=$(($cpuTemp2 %$cpuTemp1))
  clear
  echo "CPU temp=$cpuTemp1.$cpuTempM'C"
  echo "GPU $(/opt/vc/bin/vcgencmd measure_temp)"
  sleep 5
done
Figure 3 presents the temperature and latency, that result from using Standard (3a) and Preempt-RT Kernels (3b).
![raspberry_4b_std_latency.png]()
![Raspberry PI Model 4: Latency using Preempt-RT Kernel]()
![Temperature RPi with Std Kernel]()
![Temperature RPi with Preempt-RT Kernel]()
Fig. 3a: Latencies and Temperature using
Std. Raspbian Kernel (4.19.57-v7l+)Fig. 3b: Latencies and Temperature using
Preempt-RT Raspbian Kernel (4.19.59-rt23-v7l+)The CPU and GPU temperatures were almost the same for both kernel on the tests. No significant diference was registered (improvement w.r.t. to the version 3B+). The maximal latency response for the real-time kernel was 93 us while the test with the standard kernel reached 301 us. Thus, the latency was 3.23x optimized using the Preempt-RT patched kernel.
Conclusions
I did not expect such good results. If latency is important for your application, apply a Preempt-RT patch to the Kernel but use only a Raspberry Pi 4B. The Raspberry Pi 3B+ loses too much performance with the RT-kernel.
However, remember that the Raspberry Pi 4B is a general-purpose single-board computer and not a dedicated real-time system. I write this because I was contacted this year by some people who wanted to replace FPGA systems with a Raspberry Pi and wanted to acquire data, perform processing (FFT) and make decisions in less than 1 ms. Something impossible for this type of systems. Low latencies bring Raspberry Pi closer to a real-time type of system, but it is still far from dedicated and programmed systems for a specific activity (FPGA, microcontrollers, etc.)
Tips and Solutions
- If you get this error on your host PC:
scripts/extract-cert.c:21:10: fatal error: openssl/bio.h: No such file or directory
#include <openssl/bio.h>
install the following:
sudo apt-get install libssl-dev
We use cookies to improve our services. Read more about how we use cookies and how you can refuse them.
")


")

 in Chromium")
-")


Empty